Nothing breaks a breakout or ends a bunker tape-run faster than pulling the trigger and hearing the hollow click of a dry-fire. When high-cadence electronic paintball loader jams strike during competition, you are instantly rendered defenseless. In our field tests and match clinics over two decades of national tournament play, loader feed malfunctions account for nearly 35% of all on-field gun stoppages—often mistakenly blamed on marker solenoids or broken detents. Understanding the electromechanical forces, raceway friction, and ball geometry that cause feeder jams is vital for every competitive player and field armorer.
Key Technical Takeaways: Clearing Paintball Loader Jams
Most paintball loader jams stem from swollen gelatin shells (>0.688 inches), ruptured paint in the drive raceway, or battery voltage drops below 7.2V DC. In competition bunkers, clear mechanical jams instantly using the manual anti-jam pull-tab or a 45-degree downward wrist-snap before servicing internal drive tension.
7.2V DC
Below 80% Rated Power
> 0.688 in
Swollen Paint Ceiling
64 ms
2-Inch Feedneck Column
0.18–0.22 N·m
Torque Window
- Bunker Recovery Rule: If feeding stalls mid-lane, pull the manual anti-jam tab (Dye Rotor) or execute a sharp downward 45-degree snap-shake while keeping your muzzle safely oriented downrange.
- Electrical Diagnostic Rule: Never rely on cheap zinc-carbon batteries. Feeder microcontrollers require high-discharge alkaline or lithium 9V / AA cells (avoiding the common power drop issues detailed in our paintball gun won’t turn on troubleshooting checklist) that sustain peak pulse currents without voltage collapse.
- Fatal Maintenance Error: Never spray aerosol lubricants, WD-40, or liquid silicone oil into the loader raceway. Liquid lubricants degrade gelatin shells, attract abrasive dust, and induce catastrophic feed-stack binding.
Physics of Feeding: Why Paintball Loader Jams Occur
Modern tournament loaders operate at extreme feed cadences, driving 15 to 25+ balls per second (BPS) into the marker feedneck. To supply a marker firing at the NXL semi-automatic or ramp cap of 10.5 BPS, the loader must present a ball into the breech every 95.2 milliseconds. If you experience trigger bounce or high-cadence walking cycles, feed reliability hinges on four electromechanical and thermodynamic factors:
- Stack Column Gravity Latency: In gravity-assisted feed stacks, the time t = √(2h / g) required for a paintball to fall through a standard 2-inch (0.0508 m) feedneck stack is approximately 64 milliseconds. Under sustained high-speed streams, gravity alone is too slow. Force-feed systems apply active downward rotational pressure (Fdrive = τ / r) to compress this transit window down to under 25 milliseconds.
- Gelatin Shell Deformation & Humidity Swell: Paintball shells are manufactured from hygroscopic gelatin. When relative humidity exceeds 75% or ambient temperatures climb above 85°F (29°C), shells absorb atmospheric water vapor, swelling from standard .684–.686 calibers up to .692+ inches. As oversized paintballs enter the loader’s circular raceway, friction increases exponentially, wedging two balls into a rigid mechanical arch (the classic “keystone bridge” jam).
- Drive Cone Clutch & Motor Stall Torque: Electric loaders utilize either spring-assisted mechanical clutches (e.g., Dye Rotor, LT-R) or micro-processor pulse-sensors (e.g., Virtue Spire, Bunkerkings CTRL). If clutch torque is adjusted above 0.25 N·m, the rigid drive cone pinches brittle tournament paint, rupturing shells inside the tray. Conversely, if clutch tension is too soft (<0.14 N·m), the motor slips under the static head weight of 200 paintballs.
- Battery Internal Resistance & Voltage Sag: Feeder electric motors generate brief, high-current draw spikes (1.2 to 2.5 Amps) upon initial startup. As a 9V battery drops below 7.2V DC, its internal resistance increases (Vterm = Vopen − I × Rint). The motor cannot generate sufficient breakaway torque, causing pulse-cycle stalls that mimic a physical ball jam.
Master Comparison Matrix: Paintball Loader Jams Diagnostic & Fix Table
Depending on whether your loader utilizes an active spring-loaded rotor, elastomeric drive fingers, or agitated infrared paddles, root causes manifest differently. Reference our armorer diagnostic lookup matrix below:
| Condition / Symptom | Drive Mechanism | Root Cause / Physics Failure | Armorer Field Fix | Required Maintenance Tool |
|---|---|---|---|---|
| Motor Stalls / Red Indicator / Silent Classic mechanical pinch |
Rotary Carrier (Dye Rotor, LT-R, R2) | Swollen/dimpled paintballs wedge between center drive cone and raceway wall | Pull shark-fin jam lever beneath tray; loosen clutch screw 1/2 turn counter-clockwise |
Check Amazon Check eBay |
| Motor Pulses but No Paint Drops Popcorning in tray |
Flexible Finger Spire (Virtue Spire, CTRL) | G-switch sensor desensitized or drive fingers coated in gelatin debris / paint residue | Teardown tray, wipe drive fingers with dry microfiber; adjust sensor sensitivity on mainboard |
Check Amazon Check eBay |
| Motor Whines Rapidly but No Feed Stripped drive or clutch disengagement |
All Electronic Feeders | Drive gearbox teeth stripped, loose drive-cone hex retaining screw, or fractured spring arm | Inspect gearbox gear mesh; tighten center shaft drive screw; replace stripped nylon gears |
Check Amazon Check eBay |
| Double Feeding / Breech Chop Jams Feedneck overflow |
High-Pressure Force-Feeders | Worn rubber nubbins or ball detents in marker breech allowing stack force to push past | Replace marker ball detents (consult our paintball O-ring and detent sizing chart); reduce loader stack speed |
Check Amazon Check eBay |
| Sluggish Feeding in Freezing Temps Cold-weather stall |
All Battery-Powered Systems | Chemical reaction slowdown in alkaline cells (<40°F) plus brittle paint shell fracture | Install Energizer Ultimate Lithium cells (sustained 1.5V output); reference our paintball bolt stick in cold weather solutions |
Check Amazon Check eBay |
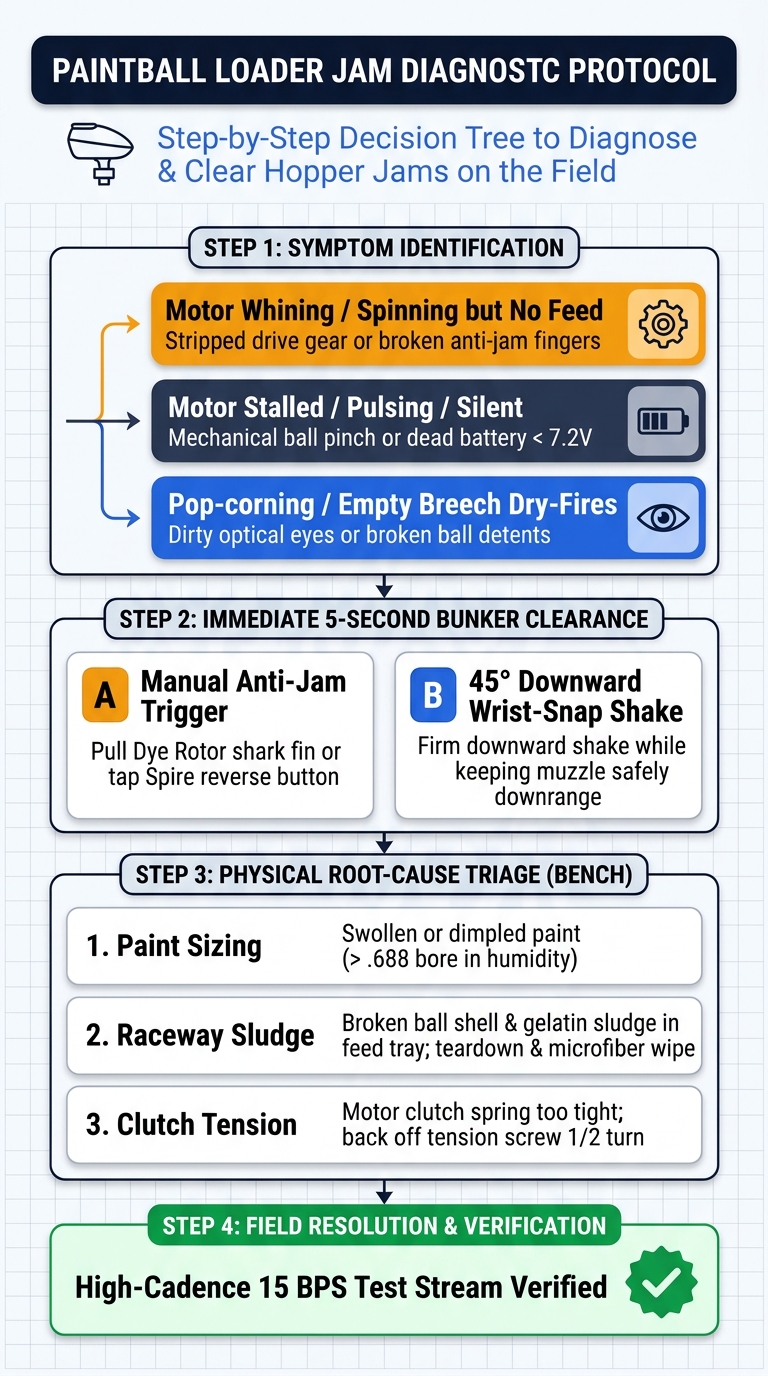
Step-by-Step Field Execution: How to Clear Paintball Loader Jams
When you encounter paintball loader jams on the field, your diagnostic workflow must be divided between immediate 5-second bunker actions and bench-level mechanical triage. Follow our standardized armorer protocol:
Phase 1: Immediate Bunker Clearance (Under 5 Seconds)
If firing stops in a live game, never disengage your barrel plug or take your eyes off the bunker lane:
- Keep Muzzle Downrange: Maintain your marker aimed at the opposing bunker. Do not point the gun upward or look down the feedneck.
- Actuate the Manual Anti-Jam Mechanism: For Dye Rotor and LT-R users, pull down sharply on the spring-loaded shark-fin lever located beneath the battery housing. This rotates the center arm in reverse, releasing pinched balls. For Spire or CTRL users, press the power button once to trigger a reverse pulse cycle.
- Execute the 45-Degree Wrist-Snap: If no manual tab exists, snap your wrist downward at a 45-degree angle. This momentum shifts the top layer of paintballs, breaking keystone arch jams without dropping your gun out of the lane.
- Test Fire Downrange: Pull the trigger in a single 3-shot burst. If feeding resumes, remain in the match. If the marker continues dry-firing, rotate off the active tape line to prevent eliminating yourself.
Phase 2: Off-Field Bench Teardown & Sludge Inspection
If field clearance fails, the loader must be disassembled on the tech table between points:
- Dump Unfired Paintballs: Pour all remaining paintballs into a dry caddy. Inspect the paint: if shells feel sticky, dimpled, or oblong, discard the batch immediately.
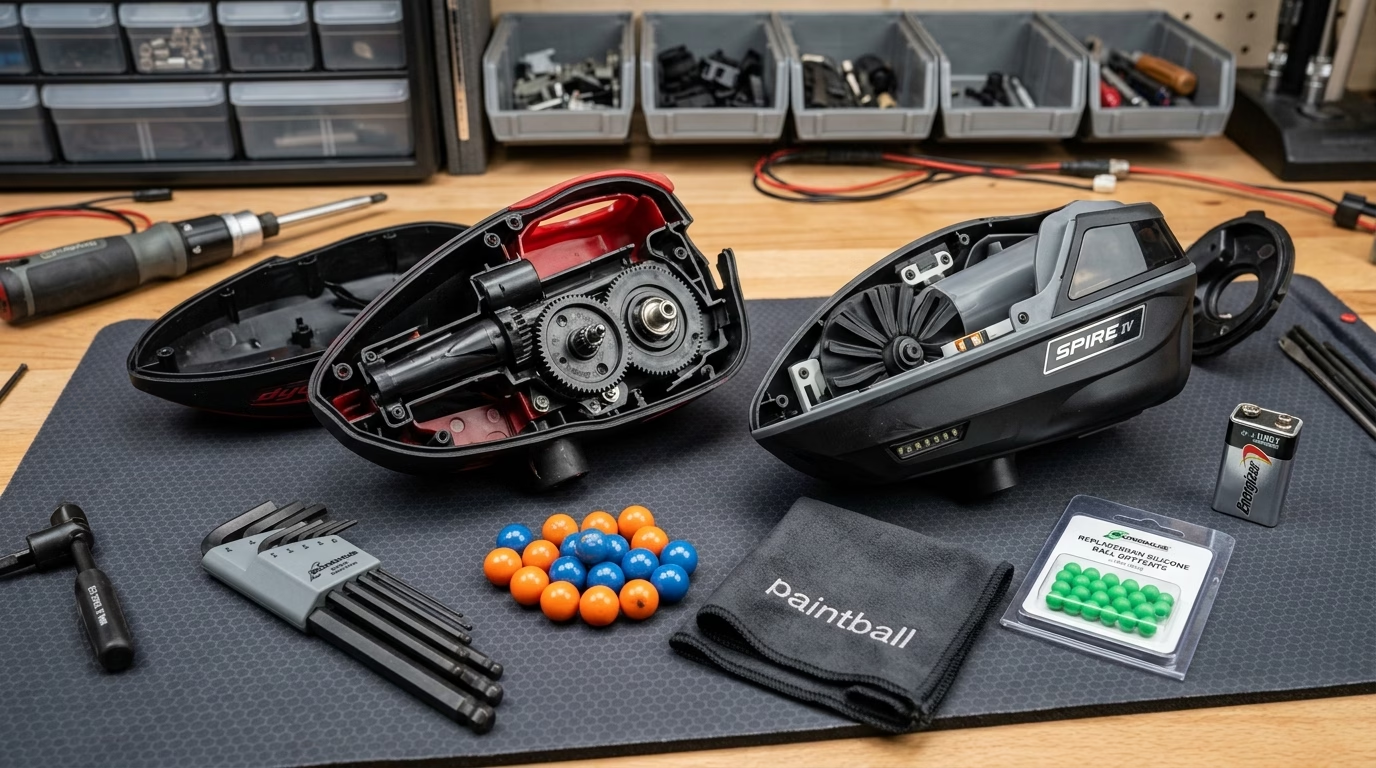
- Depress Toolless Shell Latches: Release the primary shell latch (such as the quick-release rear lever on Rotors or the push-button hinge on Spires) and separate the top lid shell from the lower tray.
- Inspect Drive Raceway for Ruptured Fill: Even a tiny pinhole leak in one gelatin shell can leak polyethylene glycol and dye across the tray floor. This creates extreme hydraulic drag, causing the drive cone to spin against slippery shells without pushing them forward.
- Execute Dry Microfiber Teardown: Wipe every surface of the drive cone, elastomeric fingers, and feedneck raceway using a clean microfiber cloth. Never use rubbing alcohol or chemical cleaners on polycarbonate shells, as solvents induce micro-crazing and brittleness.
Phase 3: Electromechanical Clutch & Torque Calibration
If the raceway is clean but the motor continues to stall under a full pod of paint, the clutch tension must be re-calibrated:
- Locate the Torque Adjustment Screw: On Dye Rotors, the tension screw is recessed inside the lower gearbox deck. On electronic loaders with digital board settings, navigate to motor pulse delay.
- Perform Quarter-Turn Incremental Tuning: If the feeder pinches paint, back the tension screw out counter-clockwise 1/4 to 1/2 turn. If the feeder skips balls under sustained 15 BPS streams, tighten clockwise by 1/4 turn.
- Verify Free-Spin Backlash: Rotate the top drive tray by hand. It should index freely with spring-loaded resistance and snap back into position without binding or gritty resistance.
NXL & ASTM Breech Safety Protocol
When diagnosing feed issues at your workbench, never look directly down the feedneck or barrel while high-pressure air is connected. If an unchambered paintball dislodges under stack tension while the bolt cycles, it can eject out the feedneck with sufficient velocity to cause serious eye injury. Always install an ASTM-compliant barrel-blocking device (barrel sock), power down the marker board, and disconnect your air system without binding threads (review paintball on/off ASA stuck fix and how to avoid paintball tank threads stuck in the ASA) (following our guide on how to safely empty a paintball tank at home) before disassembling feedneck hardware or servicing pneumatic systems (such as fixing paintball tank regulator leaks or learning how to service a paintball regulator).
Essential Armorer Tools to Fix Hopper Feed Failures
To service high-performance loaders and eliminate feed failures in the staging pits, carry these armorer essentials in your gear bag:
| Gear / Tool Name | Diagnostic Function | Armorer Specification | Direct Purchase Option |
|---|---|---|---|
| Ball Sizing Gauge | Verifies shell diameter and humidity swelling before loading pods | Laser-cut aluminum holes (.675 to .695 in) |
Check Amazon Check eBay |
| Energizer Ultimate Lithium 9V | Provides flat discharge curve without voltage sag under 2.5A pulse load | Lithium/Iron Disulfide, 800mAh capacity |
Check Amazon Check eBay |
| Microfiber Armorer Towels | Lifts gelatin dye residue and dust without scratching polycarbonate shells | 380 GSM plush, non-linting split fibers |
Check Amazon Check eBay |
| Precision Hex Wrench Set | Adjusts clutch tension screws and motor housing fasteners without stripping | SAE imperial & metric ball-end drivers |
Check Amazon Check eBay |
Video Demonstration: Diagnosing & Fixing Hopper Feed Malfunctions
Watch this practical technical breakdown demonstrating disassembly, clutch spring adjustment, and raceway cleaning protocols on electronic loaders:
Final Armorer Verdict: Preventing Paintball Loader Jams
Modern electronic loaders are high-performance electromechanical feeding machines, not indestructible plastic buckets. In our tournament pits, 90% of persistent paintball loader jams disappear the moment players implement three golden rules: check paint bore sizing in a dedicated gauge before loading pods, replace 9V batteries when resting voltage dips below 7.5V DC, and perform a full toolless dry microfiber wipe after every match day.
Whether preparing for match play, calibrating velocity on the chronograph, or checking your paintball operating pressures, inspecting burst disks, or verifying paintball tank hydro testing dates and tank expiration marks, clean feeding ensures your marker fires flawlessly at the break.
Frequently Asked Questions About Paintball Loader Jams
Why does my electronic loader pulse or popcorn balls without feeding?
Popcorning occurs when the loader’s sensor triggers drive agitation but the paintballs bounce upward out of the raceway rather than entering the feedneck stack. This typically happens when infrared optical eye sensors are blinded by paint residue or dust, or when an accelerometer G-sensor is set to overly aggressive sensitivity settings, misinterpreting marker handling vibrations as sustained firing streams.
Can bad paint cause chronic paintball loader jams?
Yes. Cheap, improperly stored, or old paintballs are the single leading cause of loader jams. Paintballs exposed to humidity swell into oblong, non-spherical shapes with raised seam ridges. When these misshapen balls enter the circular raceway of a force-feed loader, they bind against each other, creating an immovable keystone arch that halts motor rotation.
Should I lubricate the inside of my paintball hopper raceway?
Never apply oil, grease, or spray lubricants inside a loader. Lubricants soften the gelatin shells of paintballs, turning them into a mushy sludge that fractures under drive pressure. Additionally, wet lubricants attract dirt, grass, and field grit, accelerating gear wear and blinding internal optical sensors. Always keep loader internals completely dry and clean with a plush microfiber towel.
How does battery voltage affect feed reliability and jam clearing?
Electronic loaders rely on sudden bursts of electrical torque to break through static ball friction and clear minor binding. As battery voltage drops below 7.2V DC (on a 9V system), motor torque decreases substantially. The motor may continue to spin freely when the loader is empty, but under the physical weight of 200 paintballs, it will stall and jam repeatedly. Always use premium alkaline or lithium batteries.
What is the difference between a mechanical jam and a ball chop?
A loader jam occurs entirely within the hopper raceway, preventing paintballs from dropping down the feedneck. A ball chop occurs inside the marker breech when the bolt closes on a half-chambered paintball. When a ball chops in the breech, debris can back up into the feedneck (learn how to remove a stuck paintball from the barrel and breech), creating secondary feed jams.
How do I store my electronic loader during the off-season?
Always remove batteries to prevent corrosive alkaline leakage that destroys battery terminals and circuit boards (as outlined in our comprehensive guide on how to store a paintball gun during off-season). Disassemble the shell, wash the plastics with warm water, dry thoroughly, and store in a climate-controlled room away from humidity.