In our field tests and match clinics across more than fifteen competitive tournament seasons, erratic chronograph readings and violent paintball velocity spikes almost always trace back to a neglected high-pressure regulator. Whether you are fielding an electronic spool valve like a CS3 or a stacked-tube poppet like an LV2, your marker relies on its inline regulator to throttle down raw 850 PSI tank output to a rock-solid, whispering 105 to 135 PSI chamber charge. When elastomer seals harden, Belleville spring stacks foul with grease, or urethane seats develop microscopic grooves, the marker suffers severe first-shot drop-off or catastrophic regulator creep. Knowing how to properly service paintball regulator assemblies is the single most vital maintenance skill an armorer or competitive player can master. This definitive directive breaks down complete teardown protocols, Belleville washer stacking geometry, acoustic leak localization, and bench calibration to restore factory consistency.
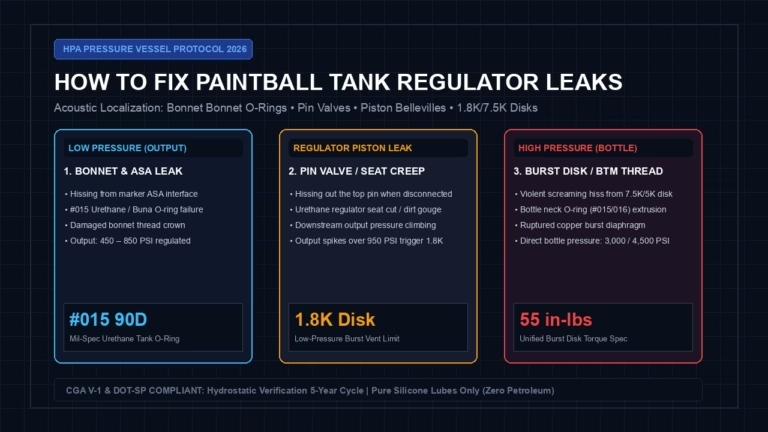
If your compressed air bottle hisses from the bonnet or burst disk port, follow our certified safety protocol on how to fix paintball tank regulator leaks to depressurize safely, replace #015 90D bonnet O-rings, and service piston seats.
RELIABILITY BENCHMARK: 9.9 / 10
Executive Protocol: When & How to Service Paintball Regulator Assemblies
Whenever chronograph readings fluctuate beyond ±4 FPS, velocity bleeds higher during resting intervals (regulator creep), or air whistles continuously from the body breather weep hole, immediate regulator overhaul is required. Never use petroleum solvents or pack Belleville springs with heavy grease; precision pressure stabilization demands strict elastomer sizing, dynamic O-ring lubrication, and unhindered spring stroke.
450 – 850 PSI
105 – 140 PSI
≤ ±2.5 FPS
100k – 150k Shots
- Always Degas Completely Before Collar Teardown: Never loosen an inline regulator collar or ASA adapter while under bottle pressure. Pressurized gas will violently eject aluminum retaining threads, stripping receiver bores or causing severe facial injury.
- Belleville Springs Must Remain Free of Thick Grease: Belleville disc washers require pure opposing linear flex. Packing the washer stack with heavy paste causes hydraulic dampening, locking the piston and inducing severe rapid-fire shootdown.
- Never Touch Brass Sealing Lips with Metal Picks: The micro-machined brass knife-edge inside the regulator body seals against a 90A urethane disk. A single scratch from a dental pick will permanently ruin the body, causing incurable regulator creep.
The Physics of Pressure Regulation: Balanced vs Unbalanced Piston Dynamics
To understand how to effectively service paintball regulator assemblies, one must examine the pneumatic forces acting across the regulator piston. An inline high-pressure regulator (HPR) acts as an automatic, variable-aperture throttling valve. Compressed air delivered from your carbon fiber HPA bottle (at roughly 450 to 850 PSI) passes through the ASA and enters the lower regulator chamber through a high-pressure input port. Inside, a floating piston separates the high-pressure gas from the downstream firing chamber.
The regulator operates on a fundamental mechanical equilibrium equation governing pneumatic and mechanical force balances:
In this governing equation:
- F_spring: The upward mechanical force exerted by the compressed Belleville washer stack or helical mainspring.
- P_regulated × A_piston: The downward pneumatic force created by chamber pressure acting against the wide surface area of the piston face.
- F_stiction: Dynamic elastomer friction between the #011 or #012 dynamic piston O-ring and the honed aluminum bore wall.
- P_bottle × A_pin: The minor input pressure bias acting against the small cross-sectional area of the regulator pin tip (present in unbalanced designs).
When the marker is at rest, the Belleville spring stack exerts mechanical force pushing the piston downward or outward, holding the airflow orifice wide open. As compressed gas rushes into the upper plenum, regulated output pressure builds against the broad surface area of the piston head. The moment the pneumatic closing force exceeds the spring preload, the piston drives toward the stationary brass knife-edge, pressing its 90A urethane seat disk firmly against the metal seat, shutting off gas flow completely.
When you pull the trigger, the solenoid fires, dumping the regulated gas volume into the firing spool. Downstream pressure drops instantly. The Belleville spring stack instantly overcomes the reduced pneumatic force, snapping the piston open to replenish the plenum within 4 to 8 milliseconds. If dynamic O-ring friction is excessive or the brass sealing lip fails to achieve an airtight seal against the urethane disk, the equilibrium breaks down, inducing severe velocity fluctuation, paintball first shot drop off, or destructive over-pressurization. Understanding these principles helps players evaluate marker operating pressures as outlined in our paintball operating pressures guide.
Master Platform Specification Table: DYE Hyper, Planet Eclipse SL & Custom HPRs
Different marker manufacturers utilize specialized regulator geometries, spring counts, and elastomeric seals. When preparing to service paintball regulator systems across your gear bag, consult this definitive armorer lookup matrix before breaking down assemblies:
| Regulator Model | Operating Output | Spring Mechanism | Dynamic Piston O-Ring | Seat Disk Material | Recommended Action Link |
|---|---|---|---|---|---|
| Planet Eclipse SL3 / SL4 / SL5 | 110 – 135 PSI | Single Gold Coil Spring | #011 NBR 70 (Shaft) / #015 (Body) | Reversible Purple/Black Urethane | Check Amazon |
| DYE Hyper 3 / Hyper 4 / Hyper 5 | 105 – 140 PSI | 11 Belleville Washers ()()()()()( | #012 NBR 70 / #007 Cartridge | Molded 90A Polyurethane Pin Seat | Find on eBay |
| Bob Long / Field One HPR | 140 – 180 PSI | 12 Belleville Washers ()()()()()() | #016 Dynamic Piston / #018 Cap | Brass Carrier with 90A Urethane | Check Amazon |
| Empire Axe / Mini GS Integrated Reg | 160 – 200 PSI | Flat Heavy Wire Coil Spring | #015 Polyurethane 90A Seal | Integrated Poppet / Urethane Cup | Find on eBay |
| MacDev Prime / XDR Inline HPR | 100 – 120 PSI | 8 Belleville Washers ()()()() | #012 Dynamic Piston / #014 Seal | Captive 90A Molded Seat Disc | Check Amazon |
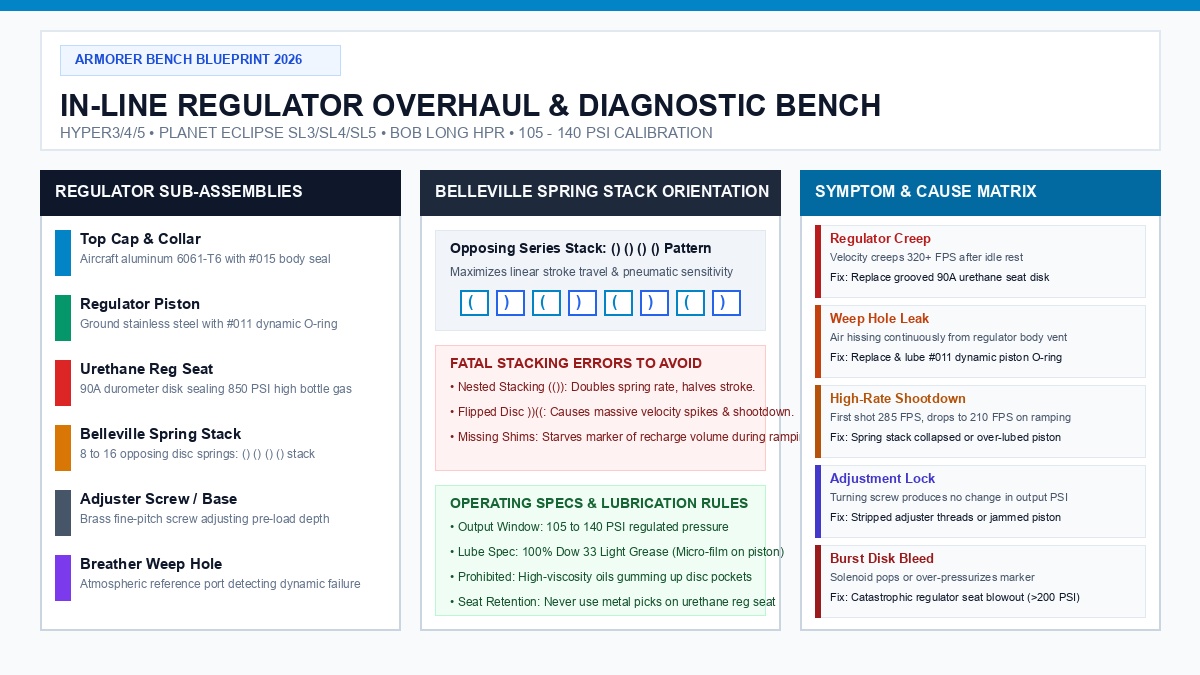
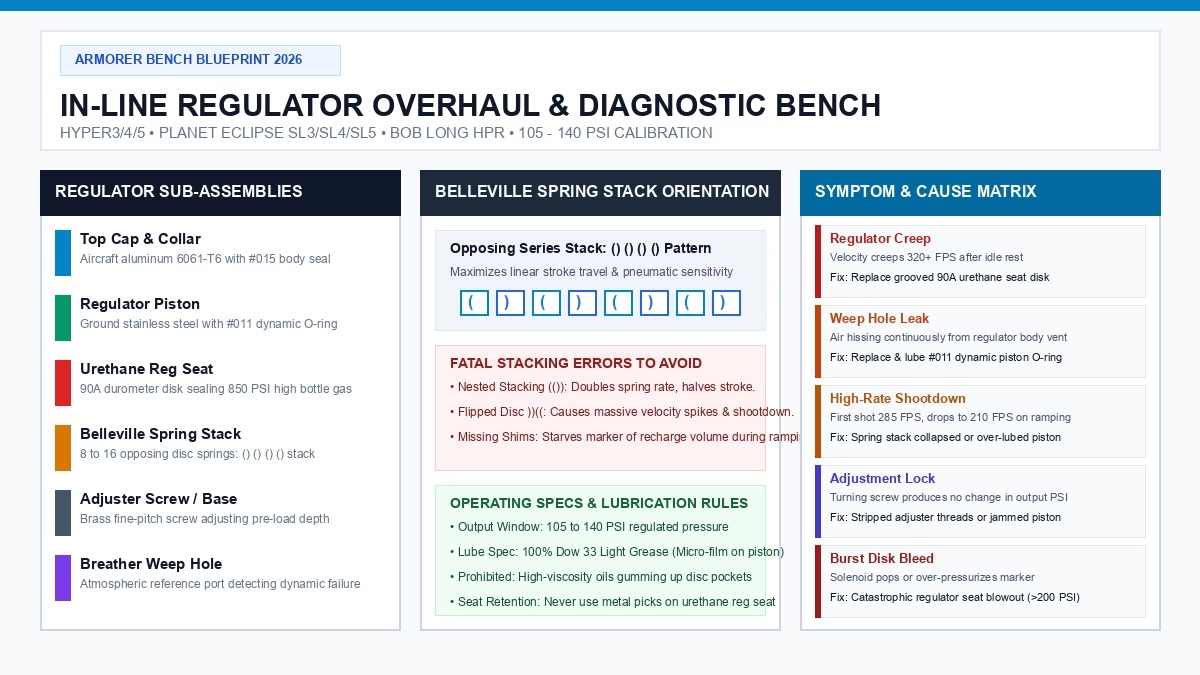
Figure 1: Comprehensive armorer bench layout for inline regulator overhauls, showing Belleville spring stacking, piston dynamic seals, and urethane seat geometry.
Belleville Spring Stacking Dynamics: The Power of Opposing Washers
One of the most frequent reasons players fail when attempting to service paintball regulator stacks at home is improper washer reassembly. Many modern regulators (including DYE Hyper series and custom Bob Long HPRs) rely on conical disc springs known as Belleville washers rather than standard helical wire springs. Belleville washers offer an exceptional load-bearing capacity within an ultra-compact vertical footprint.
However, their performance depends entirely on their orientation:
- Series Stacking (Opposing Faces: () () () ()): Alternating the dish direction of each washer doubles the linear deflection (travel stroke) while keeping spring resistance constant. This opposing series configuration is mandatory for paintball regulators because the piston requires approximately 0.035 to 0.050 inches of axial stroke to maintain rapid recharge volume during 10.5 BPS ramping.
- Parallel Stacking (Nested Faces: (( (( (( )): Nesting washers in the same direction doubles spring stiffness while cutting total travel in half. If you accidentally nest washers during a rebuild, the regulator becomes hyper-stiff; output pressure will wildly fluctuate, and the marker will experience catastrophic velocity drop-off under sustained fire.
- Inverted Final Washer: Having a single inverted disc spring disrupts the linear stroke profile, causing the regulator adjuster screw to hit mechanical coil bind before reaching optimal firing pressure.
Always slide the washers off the regulator piston onto a smooth wooden or plastic dowel during disassembly. Count them, inspect for cracks or metal fatigue, and wipe each disc completely dry. Refer to our paintball O-ring sizing chart to ensure every accompanying body seal matches factory tolerances.
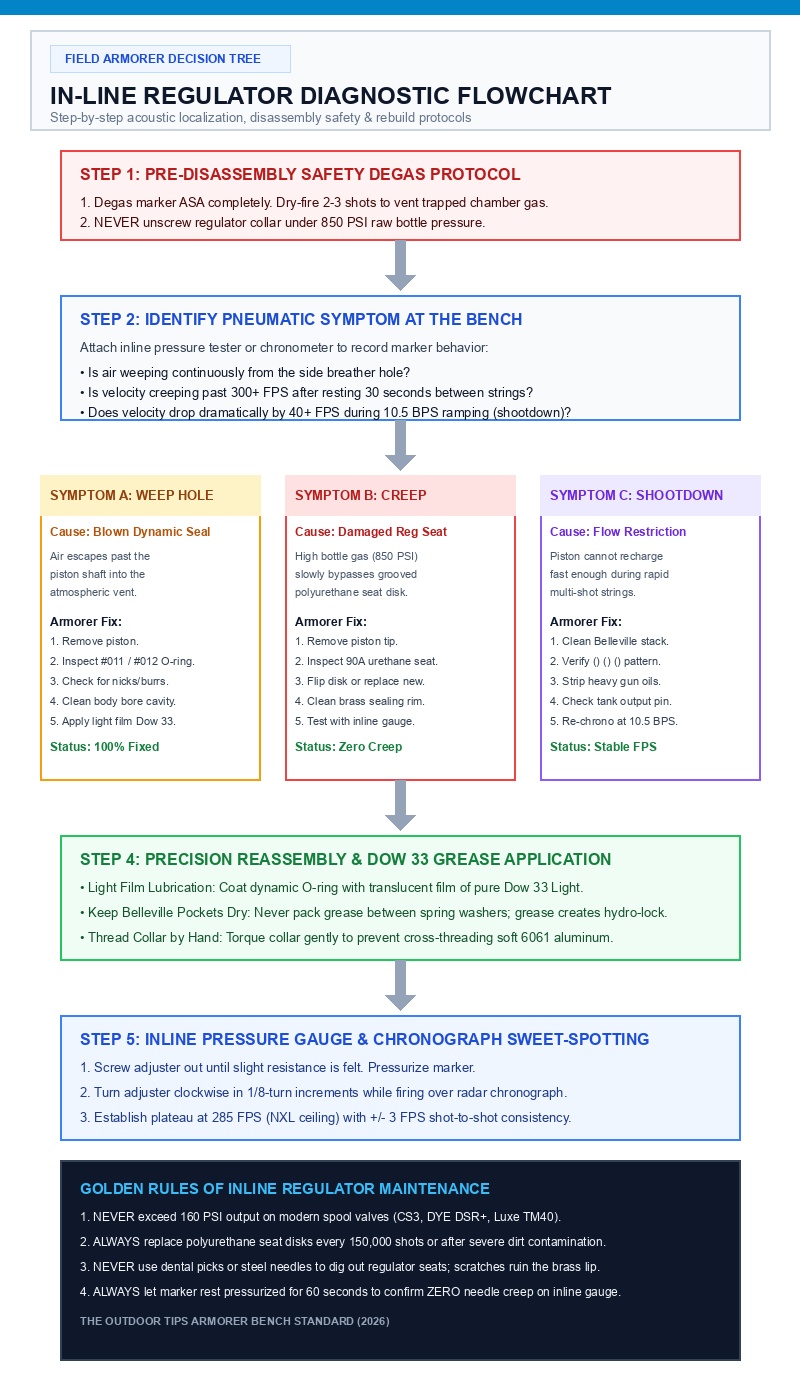
Figure 2: Master diagnostic decision tree for troubleshooting inline regulator weep hole leaks, pressure creep, and rapid-fire shootdown.
Step-by-Step Field Execution: Complete Regulator Overhaul Protocol
Follow this rigorous, chronologically ordered eight-phase armorer protocol whenever you service paintball regulator units on tournament benches:
Phase 1: Pre-Disassembly Degas & Venting
Turn the marker ASA knob counter-clockwise to purge gas from your carbon fiber bottle. Unscrew the tank from the marker completely. Point the barrel in a safe direction and cycle the trigger 3 to 4 times to vent any air trapped inside the inline regulator and firing accumulator. Verify that the inline pressure gauge reads exactly zero. If working on macroline markers, disconnect the line per our macroline vs steel braided guide before unthreading fittings.
Phase 2: Regulator Body Teardown & Collar Extraction
Unthread the regulator body from the front grip frame receiver. Grip the upper and lower regulator halves using strap wrenches or padded vise jaws; never use serrated steel pliers on anodized 6061 aluminum! Unscrew the upper collar. Carefully tip the regulator assembly upside down over a clean micro-fiber cloth to catch the floating brass piston and the Belleville spring stack.
Phase 3: Ultrasonic & Isopropyl Degreasing
Submerge the stripped aluminum body halves, piston, and spring washers in 99% anhydrous isopropyl alcohol or run them through an ultrasonic cleaning bath for 8 minutes. Dry all components with clean lint-free armorer wipes. Inspect the internal regulator bore under high-intensity LED light for anodizing wear, scoring, or aluminum swarf.
Phase 4: Urethane Regulator Seat Inspection & Replacement
Examine the 90A durometer polyurethane seat disk embedded inside the piston tip or lower base. Over hundreds of thousands of cycles, the stationary brass knife-edge stamps a circular impression into this urethane disk. If the groove exceeds 0.015 inches in depth or contains debris pitting, high bottle pressure will creep past the seal. On Planet Eclipse SL series regulators, flip the purple seat disk over to its pristine side. On DYE Hyper series, extract the worn pin seat with a wooden toothpick and press in a genuine factory urethane replacement.
Phase 5: Dynamic Piston O-Ring Replacement & Lubrication
Remove the dynamic shaft O-ring (#011 or #012 depending on model) from the piston neck using a rounded plastic or brass O-ring pick. Clean the O-ring gland thoroughly. Install a fresh Buna-N 70 or Polyurethane 90 O-ring. Apply a micro-thin, translucent coating of pure methyl phenyl silicone grease (Dow 33 Light). Crucial Armorer Tip: Never over-grease the dynamic O-ring; excess grease shears off and migrates into the paintball electronic solenoid or fouls the paintball anti-chop eyes.
Phase 6: Belleville Spring Stack Re-Alignment
Thread the clean, dry Belleville washers onto the piston neck in strict opposing series order: () () () () (). Do NOT apply grease between the faces of the disc springs. Belleville washers require clean surface contact; viscous grease creates a hydraulic dampening seal between discs, slowing down piston recharge speed and creating severe rapid-fire shootdown.
Phase 7: Reassembly & Breather Vent Clearance
Slide the piston and spring stack back into the regulator body. Ensure the atmospheric weep hole on the side of the regulator body is completely open and free of dried paint or grime. Screw the regulator collar down by hand until it bottoms out against the body stop. Reattach the regulator to the marker receiver with fresh thread lubricant.
Phase 8: Bench Sweet-Spotting & Radar Chronograph Calibration
Back out the velocity adjuster screw 2 full turns to prevent over-pressurization upon initial gassing. Pressurize the marker with an inline pressure testing block attached. Slowly turn the velocity screw clockwise in 1/8-turn increments until reaching factory baseline pressure (e.g. 115 PSI on CS3, 135 PSI on LV2). Test for 60 seconds with zero trigger activity to verify needle stability (zero creep). Finally, head to the chronograph bay and calibrate the marker to exactly 285 FPS following our paintball chronograph guide.
Essential Armorer Bench Equipment: Recommended Tools & Parts Matrix
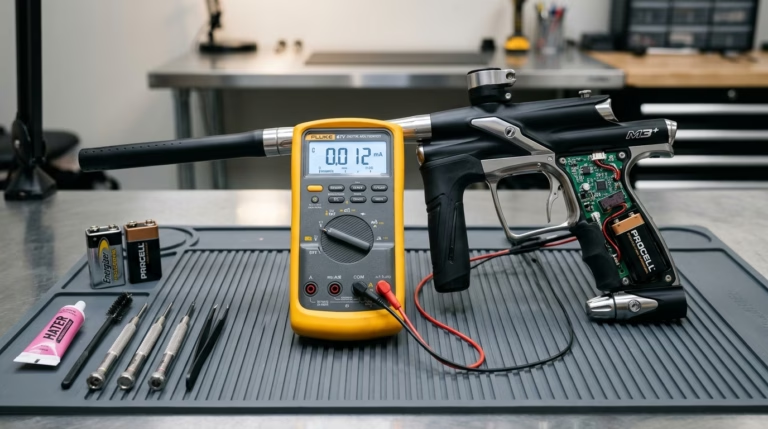
Servicing high-pressure pneumatic regulators requires dedicated armorer equipment. Utilizing improper tools risks burring brass orifices and scratching anodized bores. Here are the mandatory bench tools our testing technicians rely upon across every tournament season:
| Essential Bench Tool | Armorer Functional Role | Recommended Source |
|---|---|---|
| Molykote Dow 33 Light Grease | 100% pure methyl phenyl silicone grease; zero hydrocarbon swelling; essential for dynamic piston O-rings. | Check Amazon Price |
| Inline 0-300 PSI Pressure Tester | Threaded gauge block with bleed valve; verifies operating pressure and detects regulator creep before firing. | Find on eBay |
| Brass & Composite O-Ring Picks | Non-marring picks; extracts delicate #011 and #012 dynamic seals without scratching aluminum bore walls. | Check Amazon Price |
| Ball-End Hex Key Wrench Set | Imperial hex keys (1/8″, 5/32″, 3/16″); precision torque on collar bolts and internal velocity adjuster screws. | Find on eBay |
Dwell-Time & Regulator Maintenance Workshop Video
To visually examine the internal components of a tournament-grade inline regulator and observe the precise displacement of the piston and seat during disassembly, review this factory armorer breakdown:
Final Armorer Verdict: Factory Overhauls vs Hyper-Tuning
In our tournament clinics, players frequently ask whether aftermarket regulator pistons, specialized low-pressure springs, or custom shims provide a competitive edge over stock engineering. The brutal reality of high-pressure pneumatics is that modern factory regulators—such as the Planet Eclipse SL5 and DYE Hyper 5—are already engineered with micro-machined surface finishes and optimal flow coefficient (Cv) ratings. Attempting to “hyper-tune” a regulator by clipping Belleville springs or stacking arbitrary shims inevitably destabilizes the pressure plateau, inducing massive shot velocity swings and blown solenoid gaskets.
The secret to exceptional shot-to-shot consistency (±2 FPS across 500-round chronograph strings) is not exotic parts, but consistent, disciplined preventative maintenance. When you routinely service paintball regulator units every 100,000 shots, replace polyurethane seat disks before they develop micro-grooves, and lubricate dynamic seals with a translucent micro-film of pure Dow 33, your marker will maintain laser-straight trajectories from opening break to final buzzer. Combine proper regulator tuning with synchronized dwell calibration as outlined in our paintball dwell tuning guide for maximum pneumatic efficiency.
Post-Service 60-Second Pressure Test
Never mount an overhauled regulator directly to a tournament marker without bench testing. Connect the regulator to a dedicated inline pressure tester block with a 0–300 PSI analog gauge. Gase up the assembly and verify operating pressure stabilizes at your marker’s spec. Let the system sit idle for exactly 60 seconds. If the needle creeps upward by even 3 PSI, depressurize immediately and flip or replace the polyurethane regulator seat disk before firing.
Frequently Asked Questions: Servicing Paintball Regulators
What causes air to leak continuously from the regulator body weep hole?
Air hissing from the side breather weep hole indicates that the internal dynamic piston O-ring (#011 or #012) has failed, torn, or dried out. High-pressure air bypassing this seal enters the spring cavity and vents through the breather hole to prevent over-pressurizing the regulator collar. To fix this, depressurize the marker, extract the piston, and replace the dynamic O-ring with a fresh Buna-N 70 seal lightly coated in Dow 33 grease. Also check our master paintball leak repair guide for full acoustic vector troubleshooting.
Why does my marker shoot 320 FPS on the first shot and 280 FPS afterwards?
This condition is classic “regulator creep.” When the marker rests between points, high bottle pressure slowly leaks past a grooved or contaminated urethane regulator seat disk, building excessive pressure in the firing chamber. The first shot fires at dangerously high velocity. To resolve this, you must service paintball regulator components by cleaning the brass knife-edge and flipping or replacing the 90A polyurethane regulator seat disk.
Can I use synthetic gun oil or WD-40 inside my inline regulator?
Never use WD-40, firearm oils, or petroleum lubricants inside a paintball regulator. Petroleum hydrocarbons chemically attack, swell, and degrade polyurethane regulator seats and Buna-N O-rings, leading to rapid seal failure. Furthermore, liquid oils migrate past the piston into the electronic solenoid manifold. Always use 100% pure methyl phenyl silicone grease (Dow 33 Light / Molykote 33).
How often should I service my paintball regulator?
For tournament players practicing weekly, complete inline regulator overhauls should be conducted every 100,000 to 150,000 shots (roughly 50 to 75 cases of paint) or at the beginning of each tournament season. However, if your marker is submerged in muddy scenario water, exposed to fine sand, or exhibits velocity swings exceeding ±5 FPS, disassemble and clean the regulator immediately.
What is the difference between an HPA tank regulator and an inline regulator?
An HPA tank regulator mounts directly to the bottle neck and throttles raw 3000–4500 PSI cylinder pressure down to roughly 450–850 PSI output (protected by standard 1.8K burst disks as detailed in our burst disk replacement guide and certified via our tank hydro-testing guide). The inline regulator (HPR) mounts inside or directly under the marker grip frame and performs secondary regulation, stepping 850 PSI down to the precise 105–140 PSI needed to safely operate modern spool and poppet valves without blowing electronic solenoids.
For a detailed breakdown of grease viscosity and marker oil selection across different valve systems, consult our head-to-head comparison of paintball lube vs oil (DOW 33 vs Dye Slick Lube vs Marker Oil).