In our field tests and match clinics across more than fifteen competitive tournament seasons, nothing brings a high-speed 10.5 BPS ramping lane to an agonizing halt faster than a blinded optical breech sensor. When modern electro-pneumatic markers cycle, compressed air drives an aluminum bolt forward in under 15 milliseconds—delivering enough kinetic force to cleanly shear an unseated paintball in half. Preventing this catastrophic liquid paint disaster depends entirely on the precision calibration of your paintball anti chop eyes. Whether your tournament marker utilizes opposed infrared break-beam diodes, vintage reflective sensors, or modern self-cleaning polycarbonate eye pipes, understanding optical beam physics and maintaining spotless lens hygiene represents the single most important diagnostic protocol separating tournament-ready markers from chronic paint-chopping blenders. This comprehensive armorer directive establishes the optical physics, board-level delay tuning, and step-by-step solvent cleaning protocols required to ensure flawless 10.5 BPS match performance.
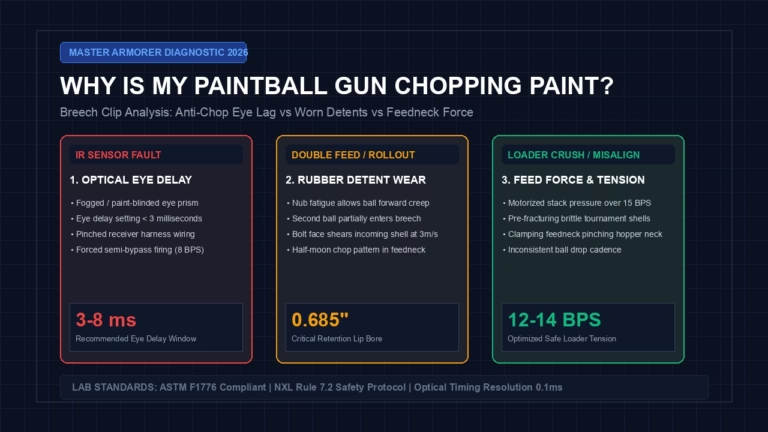
If your marker repeatedly chops paint during high-rate ramping, consult our definitive technical diagnostic on why is my paintball gun chopping paint to isolate optical eye blindness, ball detent fatigue, and loader feed pressure.
DIAGNOSTIC BENCHMARK: 9.9 / 10
Executive Diagnostic: Paintball Anti-Chop Eyes & Optical Calibration Standard
Reliable high-speed feeding requires paintball anti chop eyes to project an unobstructed 940nm infrared beam directly across the breech equator, supported by a 2.0ms to 3.0ms ball-settling delay filter. When paint fill or gelatin sludge blinds the optic lenses, the electronic board automatically defaults to an 8.0 BPS safety bypass rate to prevent catastrophic bolt chops. Never disable optical sensors on the staging line; systematically isolate optical obstruction from board delay settings.
940 nm Wavelength
2.0 – 3.0 ms
8.0 BPS Bypass
99.4% Restored
- Always Clean with 99% Anhydrous Isopropyl Alcohol: Never use acetone, brake cleaner, or petroleum-based degreasers on eye sensors. Harsh solvents melt polycarbonate eye lenses, dissolve wire insulation, and permanently craze DYE Eye Pipes into an opaque, light-blocking fog.
- Protect Delicate Ribbon Wire Routing: When reinstalling eye cover plates or grip frames, ensure the miniature eye wire harness sits completely flush within its machined receiver channel. Pinching an eye wire beneath a tightened screw immediately shorts the 5V logic signal, causing permanent sensor failure.
- Maintain Minimum 2.0ms Eye Delay: Setting board eye delay to 0ms causes premature bolt launch while paintballs are still bouncing inside the breech. Always maintain a 2.0ms to 3.0ms debounce window to ensure the paintball has settled firmly against the paintball ball detents before solenoid energization.
The Physics of Anti-Chop Optical Sensing: Break-Beam vs Reflective Infrared Geometry
To understand how paintball anti chop eyes protect fragile paintballs from destructive bolt impacts, technicians must explore the optoelectronic circuits operating inside modern firing chambers. In high-cadence tournament markers, anti-chop systems fall into two distinct engineering architectures: Opposed Break-Beam Infrared Systems and Reflective Photodiode Arrays.
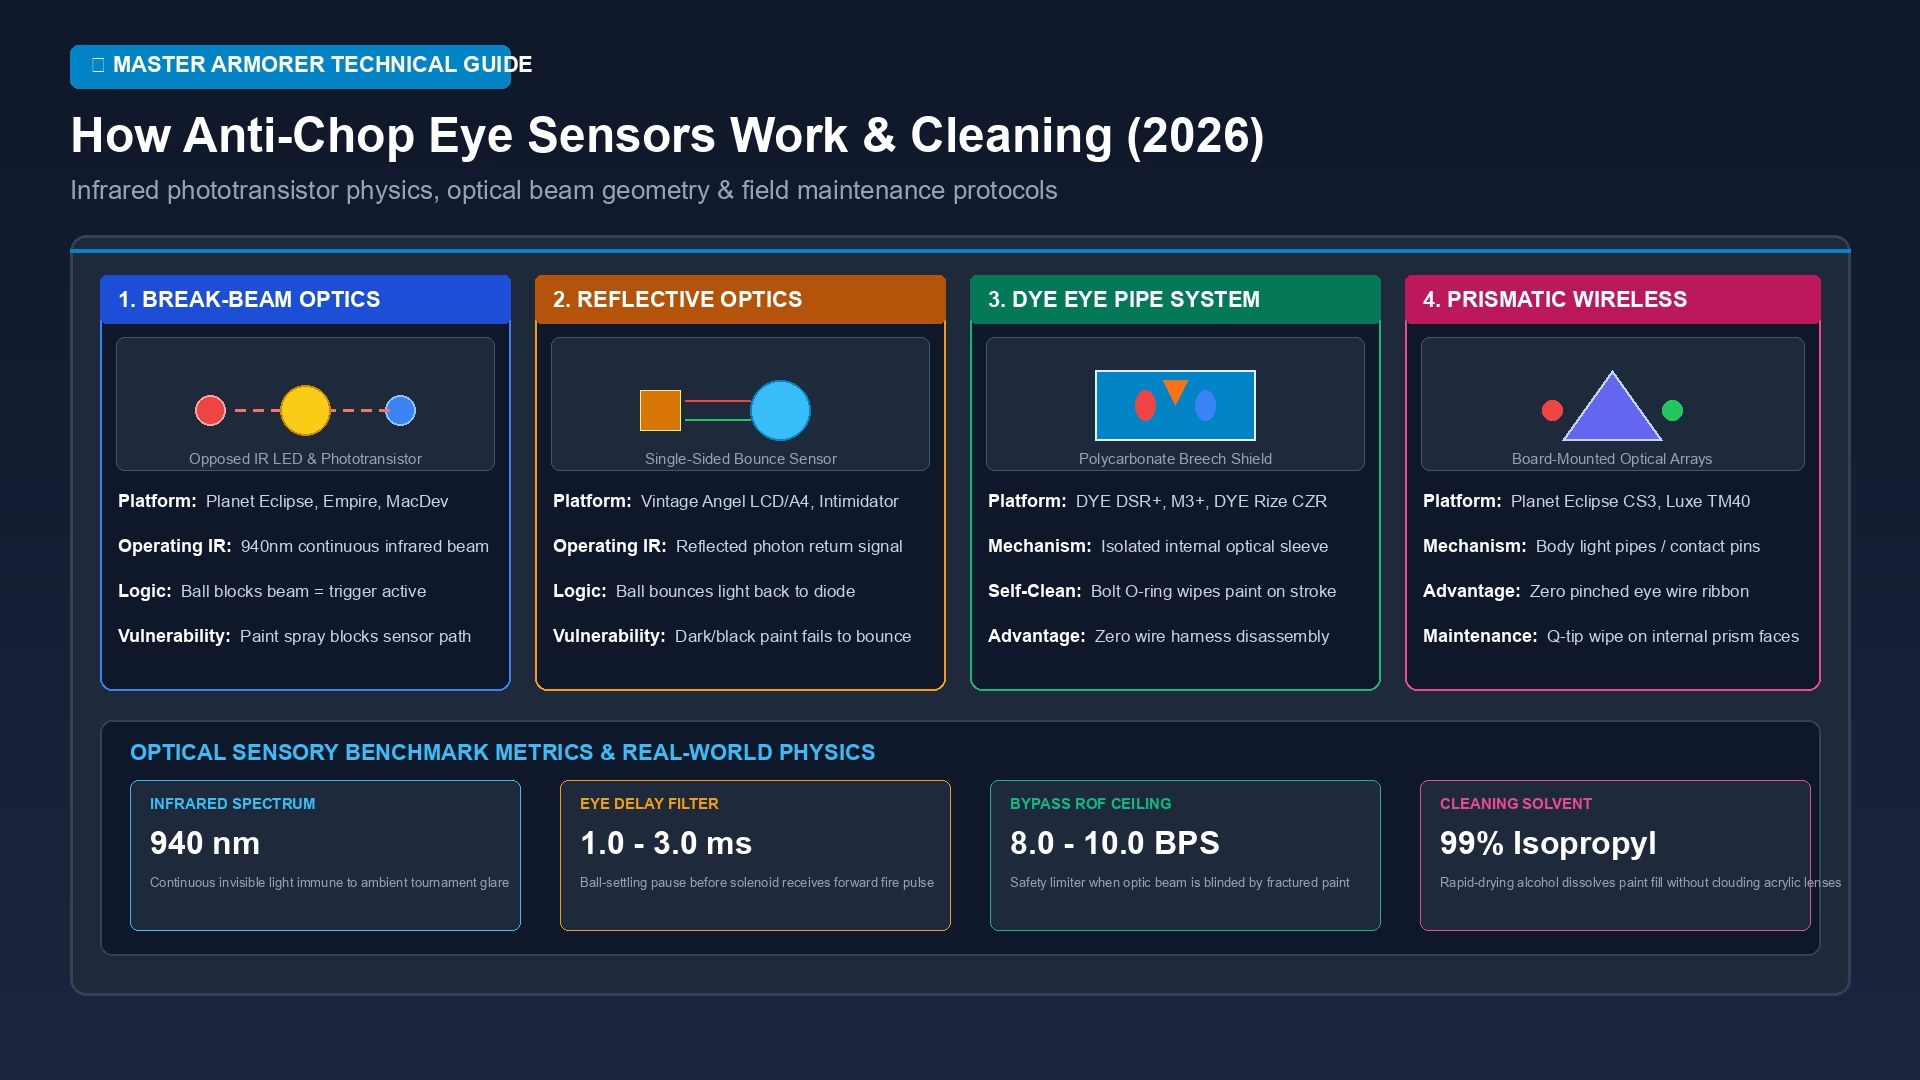
The universal modern standard across competitive paintball is the Break-Beam Optical System. This configuration utilizes an Infrared Light Emitting Diode (IR LED) mounted on one lateral wall of the breech and an Infrared Phototransistor (receiver) mounted directly opposite on the opposing wall. The emitter produces a continuous, invisible infrared light beam at a precise 940-nanometer optical wavelength. At 940nm, the light spectrum is completely impervious to ambient stadium lighting, sunlight glare, and fluorescent staging lamps:
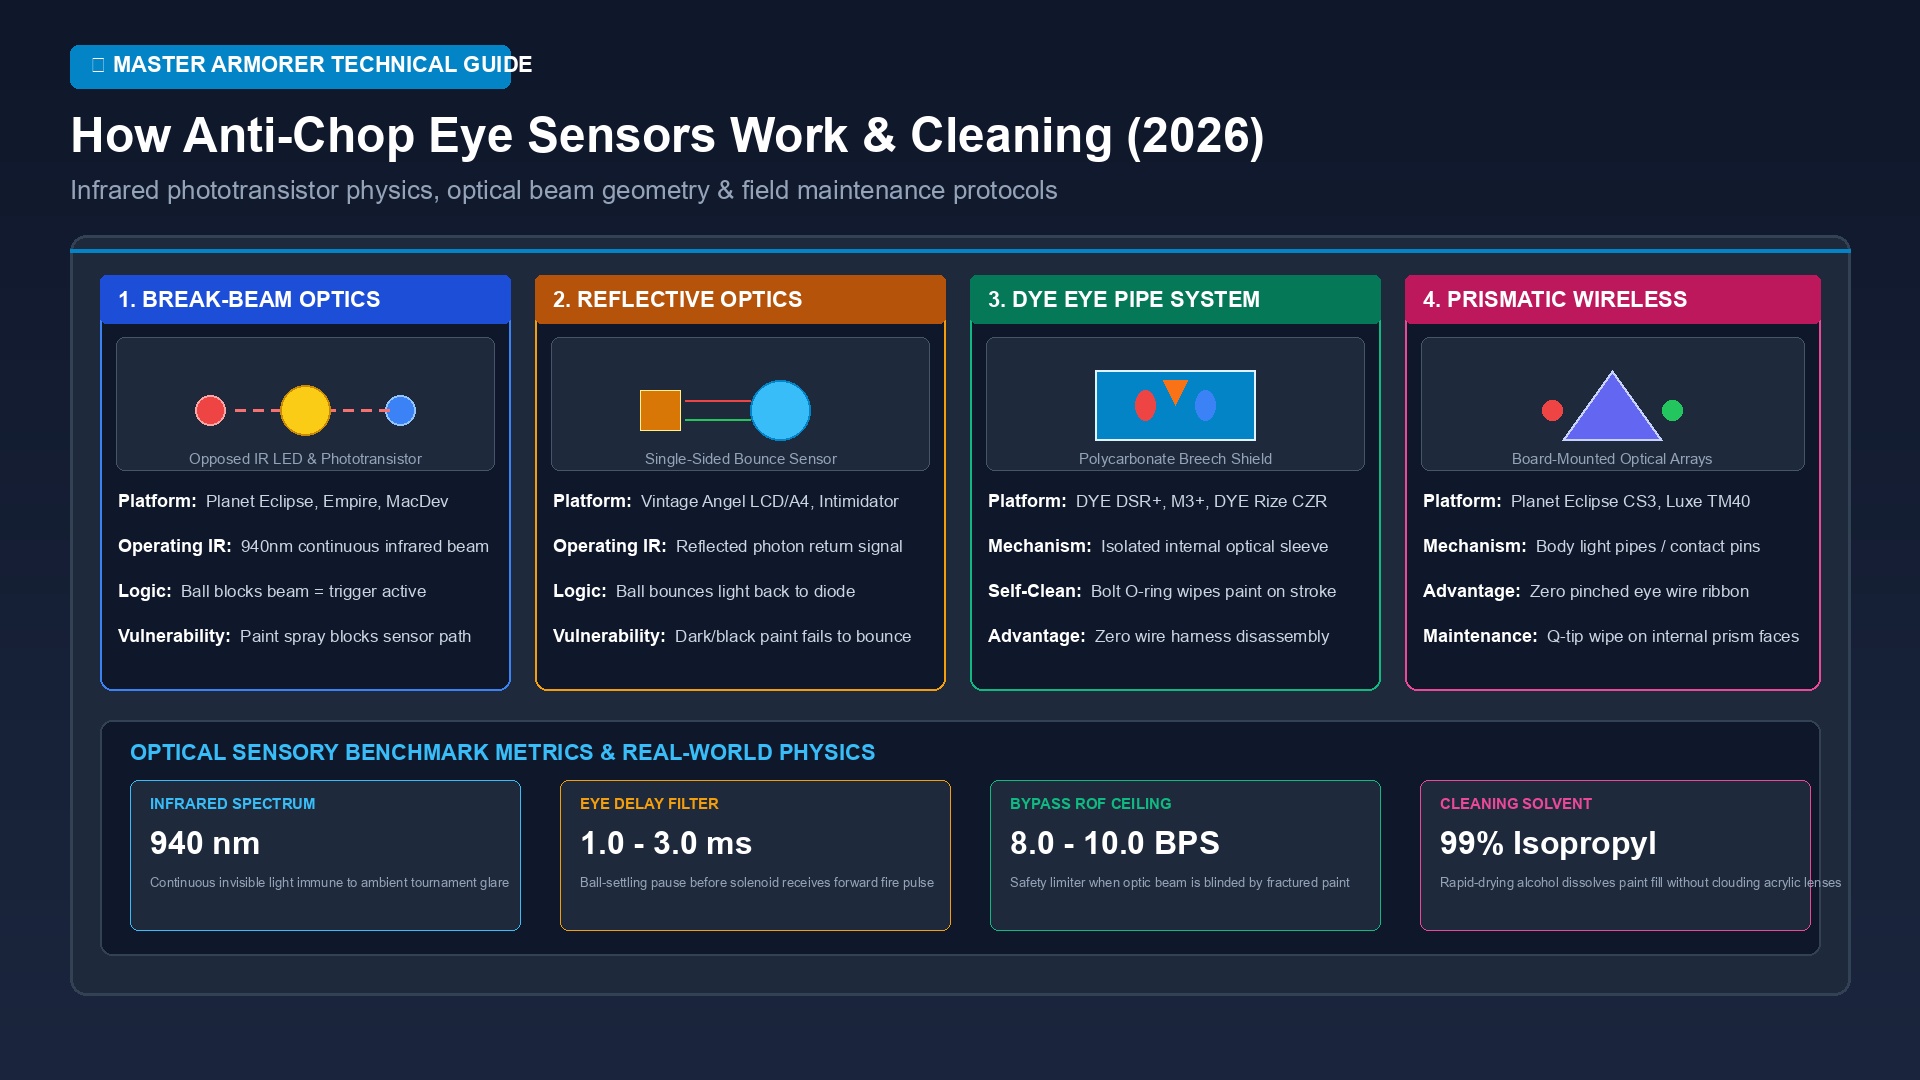
Figure 1.0: Master Gunsmith Anti-Chop Optical Sensor Bench. Showcasing four major sensory architectures: break-beam infrared emitter/receiver pairs, vintage reflective optical eyes, DYE self-cleaning polycarbonate Eye Pipes, and modern wireless prismatic light pipes.
When the breech is empty, photons emitted by the IR LED cross the 0.688-inch breech chamber and strike the base junction of the opposing phototransistor. This photon bombardment saturates the phototransistor, driving the collector-emitter circuit into a conductive state that pulls the micro-controller logic input to a digital LOW (0.0V). In this state, the board microprocessor knows the breech is clear and actively inhibits solenoid energization—even if the player pulls the trigger.
The instant a paintball drops from the feedneck and settles into the breech pocket, its opaque gelatin shell physically intercepts and breaks the 940nm beam. Starved of photons, the phototransistor instantly switches off, allowing an internal pull-up resistor to drive the microcontroller input pin to a digital HIGH (5.0V or 3.3V) in under 15 microseconds. Once the board detects this logic state change—and verifies that the programmed eye delay timer has elapsed—it signals the electronic board solenoid to vent pilot air and stroke the bolt forward at full velocity.
Master Platform Paintball Anti Chop Eyes Architecture Lookup Matrix
Different marker manufacturers integrate optical sensors through proprietary mounting, wiring, and light-pipe structures. Identify your specific platform specifications below before initiating cleaning or teardown:
| Marker Engine Class | Eye Sensor Architecture | Primary Failure Mode | Service Protocol | Armorer Bench Tool |
|---|---|---|---|---|
| Planet Eclipse (CS3 Pro, 180R, LV2, Etha 3) |
Wired break-beam ribbon harness or frame-mounted wireless prismatic light pipes. | Paint spray coating optical prism tunnel; pinched wire ribbon behind eye covers. | Swab internal light tunnel with 99% alcohol; verify prism alignment pins. | 5/64″ Hex Wrench |
| DYE Precision (DSR+, M3+, DYE Rize CZR) |
Toolless Polycarbonate Eye Pipe with sealed internal sensors and dynamic bolt wiper. | Cracked Eye Pipe wall; paint sludge leaking behind polycarbonate sleeve. | Slide Eye Pipe forward from breech; wipe exterior sleeve; inspect detent clips. | Toolless Slide Pipe |
| Empire & Invert (Axe 2.0, Mini GS, Syx) |
Dual wired break-beam laser diodes connected via micro Molex plug to mainboard. | Corroded wire solder joints; liquid paint seeping down foregrip into eye socket. | Remove eye covers; unclip Molex connector; clean pins with electrical contact cleaner. | 5/64″ Hex Wrench |
| DLX & Shocker (Luxe TM40, Luxe Idol, Shocker AMP) |
Intelli-eye magnetic contact prisms mounted to body without external frame wires. | Oxidized gold pogo contact pins; paint fill covering magnetic prism faces. | Unlatch magnetic eye covers; swab optical lenses; clean pogo pins with alcohol. | Magnetic Toolless |
| Vintage Reflective (Angel LCD / A4, Bob Long Intimidator) |
Single-sided infrared transceiver; measures reflected light bounce-back from shell. | Dark shell paint absorbing IR photons; internal breech scratch scattering beam. | Tune potentiometer sensitivity screw on eye board; upgrade to break-beam eyes. | Flathead Micro-Tuning |
Diagnostic Decision Logic: Master Armorer Flowchart
When troubleshooting optical sensor malfunctions on the armorer bench, technicians must follow a structured logical pathway rather than disabling safety logic in desperation. Follow our certified decision tree below to isolate whether your feeding failure stems from blinded optical lenses, insufficient eye delay filtering, or a damaged wire ribbon harness:
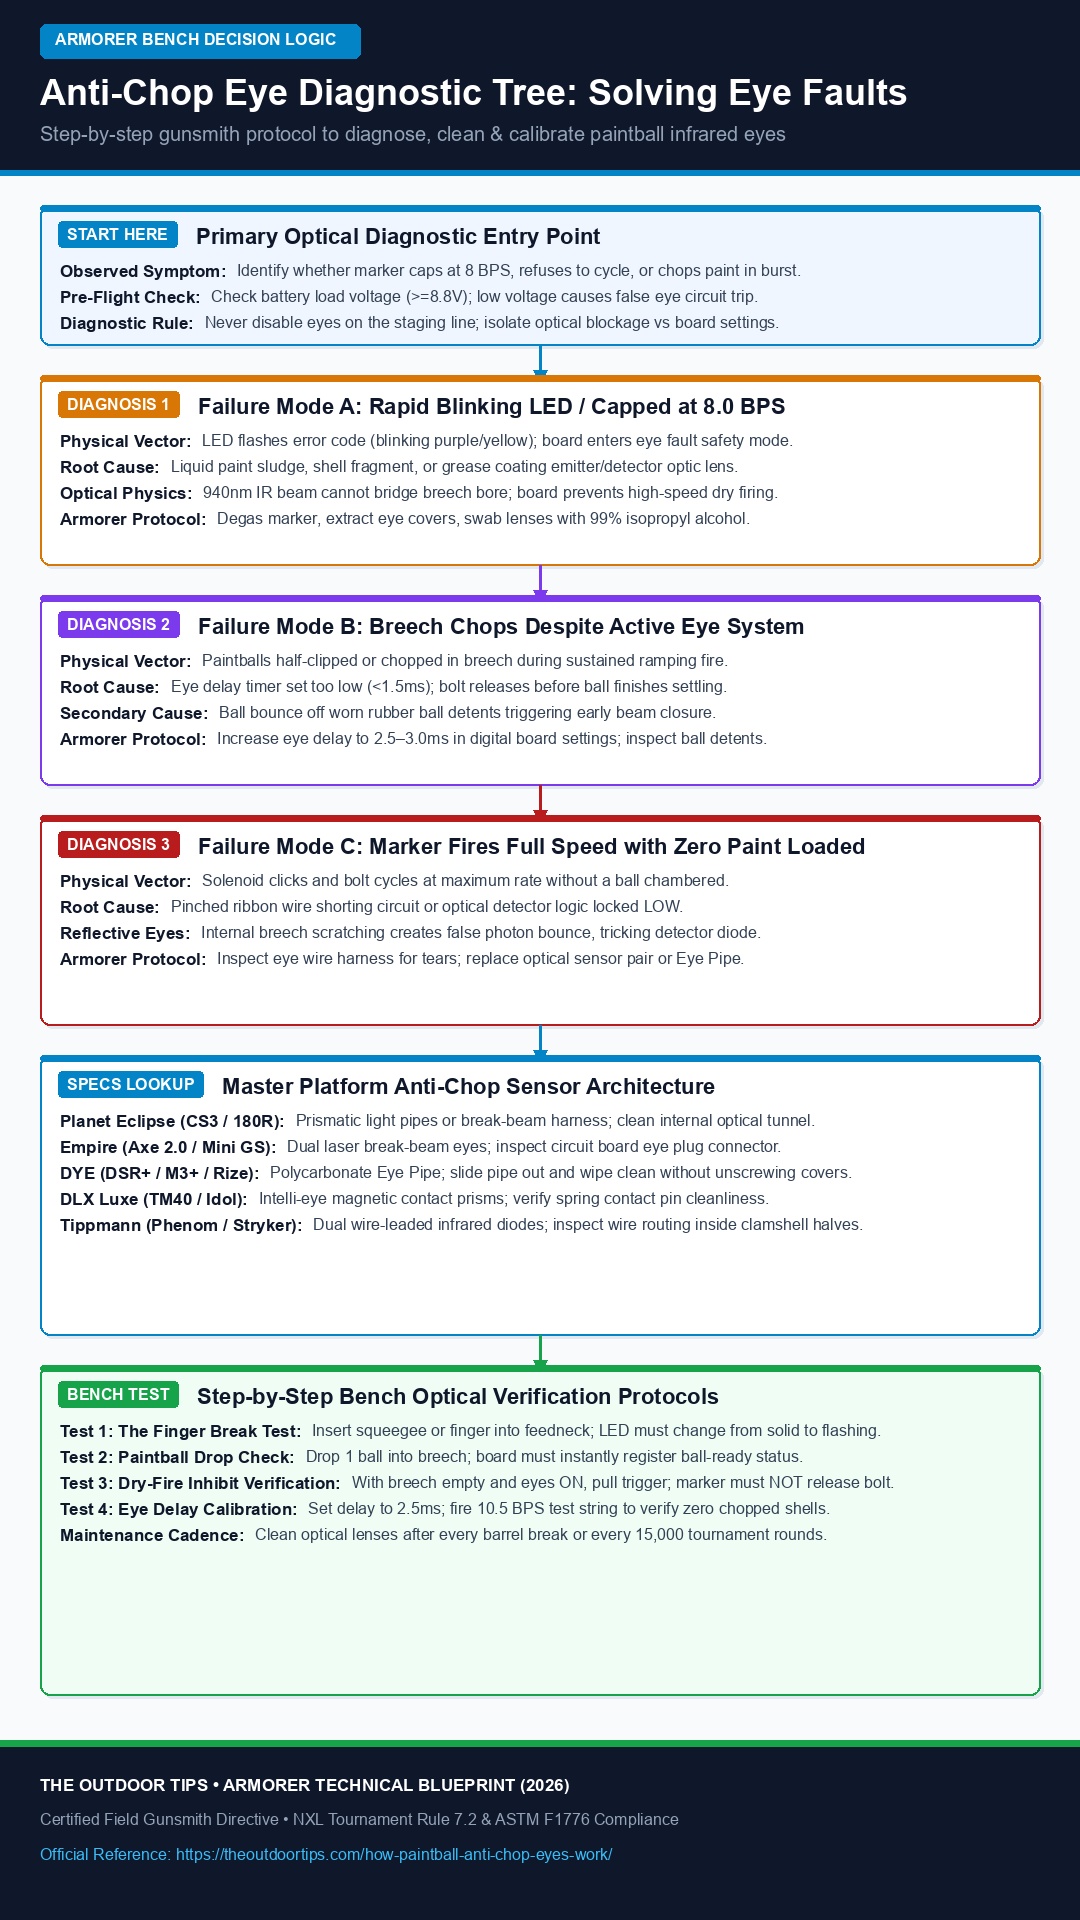
Figure 2.0: Master Armorer Decision Logic Tree for Anti-Chop Eye Diagnostics. Step-by-step procedural pathway resolving rapid blinking fault codes (Diagnosis 1), high-cadence breech chops (Diagnosis 2), and empty-breech dry firing (Diagnosis 3).
Step-by-Step 5-Phase Armorer Protocol: How to Clean & Diagnose Paintball Anti-Chop Eyes
Execute this standardized 5-phase gunsmith procedure to eliminate optical eye faults and restore tournament-grade anti-chop reliability:
Phase 1: Pre-Teardown Diagnostic & Error Code Deciphering
Before taking your marker apart, decode your board’s LED or OLED diagnostic status to isolate the electrical state of your paintball anti chop eyes:
- Power-On LED Verification: Turn your marker on with the loader removed and breech completely empty. A properly functioning break-beam system will display an unblocked status indicator (typically a slow-flashing blue or solid yellow LED). If the LED flashes a rapid, frantic warning pattern (such as blinking purple on Planet Eclipse or flashing orange on Empire), the board has detected a blocked beam in an empty breech and tripped into “Eye Fault Mode”.
- The Squeegee Interruption Test: Insert a rubber squeegee or your finger down through the feedneck into the breech cavity. The status LED should instantly transition from unblocked to locked (e.g., solid blue or green), verifying that the optical receiver detects the beam break. If the LED does not respond to physical interruption, the sensor circuit is dead or permanently shorted.
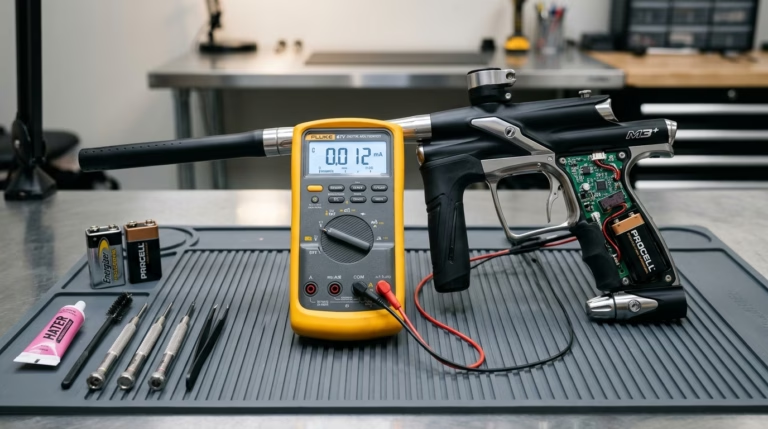
- Battery Load Verification: Test your 9V alkaline battery with a digital multimeter under active circuit load. If battery voltage drops below 8.8 Volts, the logic board cannot supply sufficient continuous current to the infrared LED, creating intermittent “ghost” eye faults that mimic dirty lenses.
Phase 2: Pneumatic Depressurization & Eye Cover Disassembly Hygiene
Accessing eye sensors requires extreme care to protect micro-ribbon wire harnesses and delicate aluminum threads:
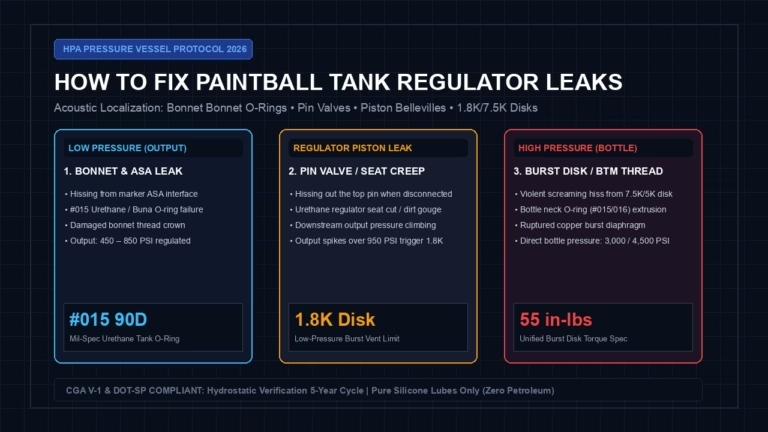
- Complete Gas Depressurization: Remove your compressed air tank and dry-fire twice through a barrel blocker to vent residual gas stored in the inline regulator operating pressure chambers. Never work on eye covers with gas connected.
- Precision Hex Tooling: Use a precision-machined 5/64″ or 0.050″ hex driver (such as Bondhus Protanium). Seat the bit to the absolute bottom of the shallow button-head eye cover screw before turning counter-clockwise. Stripping these miniature aluminum screws requires drilling and receiver re-tapping.
- Gentle Cover Separation: Carefully lift the eye cover plate straight up. Never pry horizontally with metal screwdrivers, which can slice through the ultra-fine wire insulation or damage the adjacent paintball ball detents.
Phase 3: Solvent Decontamination & Optical Lens Swabbing
Eliminating liquid paint residue and shell glaze without fogging the lenses requires proper chemical solvents:
- 99% Isopropyl Alcohol Application: Dip a lint-free foam swab or precision Q-tip into 99% anhydrous isopropyl alcohol. Never use household 70% rubbing alcohol, which contains 30% water and leaves a mineral film across optical lenses upon drying.
- Radial Lens Swabbing: Gently rotate the saturated swab directly against the curved dome of both the IR emitter and phototransistor receiver. Dissolve all dried gelatin paint fill, shell dust, and excess bolt O-ring lubricant. Follow immediately with a dry swab to buff the acrylic lens face until crystal clear.
- Breech Channel Flushing: Use the alcohol swab to wipe clean the lateral receiver tunnel holes connecting the eye covers to the breech chamber. A tiny speck of paint sludge caught in this 3mm optical tunnel will completely block the infrared beam.
Phase 4: Wire Ribbon Strain Relief & Cover Reassembly
Reassembly requires disciplined routing to eliminate pinched wire shorts:
- Wire Channel Seating: Carefully tuck the eye wire ribbon flat into the CNC-milled wire retention groove in the marker body. Ensure there is sufficient slack at the sensor head so the wire is not under tension.
- Ball Detent Retention Check: Verify that the rubber detent finger or spring detent sits squarely in its pocket and has not been dislodged during eye cleaning. A displaced detent will physically shadow the optical eye beam.
- Micro-Torque Specification: Reinstall the eye cover plate and tighten the fastener by hand until snug, followed by a gentle 1/16-turn finish (2.5 to 3.0 in-lbs max). Never over-tighten, as crushing the plate can pinch the eye wire or deform the ball detent rubber.
Phase 5: Digital Eye Delay Calibration & 10.5 BPS Bench Validation
Calibrating board timing parameters is the final gunsmith step in preventing high-speed breech chops:
- Programming the Eye Delay Filter: Enter your marker’s digital board programming menu. Navigate to Eye Delay (also labeled Ball Delay or Ball Settle Time). Modern high-torque motorized loaders—such as the DYE Rotor or Virtue Spire—force paintballs down at high speed, causing micro-bounces inside the breech. Set eye delay strictly to 2.0ms to 3.0ms (never 0ms or 1ms) to ensure the paintball has finished bouncing before the bolt moves forward.
- Static Empty-Breech Trigger Test: Power on the marker with eyes enabled and pull the trigger 10 times with no paint loaded. The marker must NOT cycle a single stroke, verifying that the optical receiver is actively blocking dry-fire operation.
- High-Cadence 10.5 BPS Match String: Air up the marker, attach your motorized loader, and fire a 50-round string over a tournament radar chronograph. Confirm smooth, continuous 10.5 BPS ramping with zero chopped shells, zero half-clipped paintballs, and zero First-Shot Drop-Off.
Under ASTM F1776 standard safety regulations and NXL Tournament Rule 7.2.1, turning off paintball anti chop eyes during competitive match play is strictly prohibited on motorized ramping markers. Disabling optical eyes allows the marker to fire blindly at 10.5 BPS regardless of ball chambering, guaranteeing severe breech chops. A chopped paintball coats the barrel bore in viscous gelatin fill, inducing severe hydrostatic barrel friction that can spike downstream chamber pressures, damage your pneumatic regulator seals, or trigger dangerous projectile shrapnel exiting the barrel porting. Always keep optical eyes enabled and cleanly maintained.
Advanced Troubleshooting: Resolving Recurrent Eye Faults & Blind Readings
If your marker continues to report optical sensor errors or failing paintball anti chop eyes or chop paint despite thoroughly cleaning the lenses, the failure stems from underlying electrical or timing conflicts. Use our certified troubleshooting matrix below to eliminate the problem:
| Optical Eye Symptom | Pneumatic & Electrical Root Cause | Verification Diagnostic | Permanent Armorer Fix |
|---|---|---|---|
| Marker Caps at 8.0 BPS with Fresh Eyes | Optical beam misaligned across breech; receiver not catching 940nm emitter cone. | Look down breech with phone camera (IR light shows as faint purple on camera screen). | Re-seat eye diodes in mounting sockets; verify eye cover plate sits completely parallel. |
| Half-Clipped Paintballs During 10.5 BPS Ramping | Eye delay filter set too low (<1.5ms) or ball bouncing off worn ball detents. | Bolt face displays yellow paint crescent on bottom lip; eyes report zero fault code. | Increase board eye delay to 3.0ms; replace fatigued rubber ball detents in matched pairs. |
| Marker Dry-Fires Continuously with Eyes ON | Pinched eye wire ribbon shorted to ground or defective phototransistor stuck closed. | Status LED indicates “ball loaded” continuously even when breech is empty. | Inspect wire harness for crimp marks; replace eye ribbon cable assembly. |
| Intermittent Eye Shutdown Mid-Match | Battery voltage sag under sustained 10.5 BPS solenoid draw or cracked DYE Eye Pipe. | Marker shoots first 100 shots fine, then LED trips into eye fault bypass mode. | Install fresh industrial 9V alkaline battery; inspect DYE Eye Pipe for hairline fractures. |
Essential Armorer Tools for Paintball Anti-Chop Eye Maintenance
Servicing miniature optical sensors without damaging fragile ribbon harnesses or scratching acrylic lenses requires specialized workbench tools:
| Essential Bench Tool | Armorer Functional Role | Recommended Source |
|---|---|---|
| 99% Anhydrous Isopropyl Alcohol & Foam Swabs | Pure electronics solvent. Rapid evaporation dissolves paint fill without leaving mineral streaks or clouding lenses. | |
| Bondhus Protanium 5/64″ & 0.050″ Hex Drivers | Precision-ground hex drivers. Prevents rounded screw heads on delicate button-head eye cover screws. | |
| DeoxIT D5 Electrical Contact Cleaner | Specialized contact rejuvenator for cleaning Molex eye plugs and pogo contact pins on wireless frames. | |
| Digital Multimeter with 9V Battery Load Tester | Verifies real-time battery voltage under circuit load; isolates low-voltage logic tripping from optical eye faults. |
Technical Video Workshop: Live Workbench Eye Cleaning & Diagnostics
To visualize eye cover plate removal, delicate ribbon wire handling, and proper lens swabbing demonstrated on a tournament bench, review this comprehensive armorer workshop:
Final Armorer Verdict: Optical Hygiene vs Hyper-Tuned Eye Delay
In our armory evaluations across dozens of tournament layouts, mastering paintball anti chop eyes requires balancing electronic sensor timing against diligent field cleanliness. Follow these three cardinal field rules before stepping onto the match grid:
Respect the 2.5ms Delay Floor
Never lower your board eye delay to 0ms in search of faster cycle times. Paintballs bounce when hitting the breech floor; maintaining a 2.0ms to 3.0ms buffer ensures the ball is completely settled before bolt release.
Strict 99% Isopropyl Only
Ban petroleum solvents, brake cleaners, and mineral spirits from your tech mat. Harsh chemicals melt acrylic eye lenses and craze polycarbonate DYE Eye Pipes into useless opaque scrap.
Strain-Relief Routing
Always verify that the eye wire ribbon lies completely flat in its machined chassis slot before tightening eye cover screws. A pinched wire shorts the 5V sensor logic and ruins your tournament weekend.
Frequently Asked Questions: Paintball Anti-Chop Eyes
How do paintball anti chop eyes prevent balls from breaking?
Paintball anti chop eyes project a continuous 940nm infrared light beam directly across the breech chamber. When no paintball is present, the receiver detects the light and actively instructs the electronic board to inhibit the bolt cycle. The bolt is only permitted to stroke forward when a paintball physically blocks the beam, ensuring a ball is 100% seated in the firing pocket.
What does a fast-blinking eye error LED mean?
A fast-blinking status LED indicates that your marker has entered “Eye Fault Safety Mode”. This happens when the logic board detects that the infrared beam is blocked while the marker has been idle or when a shot failed to clear the beam within a specified timeout. In eye fault mode, the board limits maximum rate of fire to 8.0 BPS to prevent catastrophic chops.
Can I clean paintball anti chop eyes without taking the gun apart?
On markers with DYE Eye Pipes (DSR+, M3+, Rize), yes—you simply unscrew the barrel and slide the polycarbonate Eye Pipe forward out of the breech to wipe it clean. On traditional markers with eye covers (Planet Eclipse, Empire, Axe), you can perform a temporary field squeegee swab down the feedneck, but permanent decontamination requires removing the eye covers to swab the actual diode lenses with 99% isopropyl alcohol.
Why is my marker chopping paint even though the eyes are turned on?
Chopping paint with active eyes typically stems from three causes: (1) Board eye delay is set too low (under 1.5ms), causing the bolt to fire while the ball is still bouncing; (2) Fatigued ball detents allowing paintballs to roll forward past the eye beam; or (3) Liquid paint or shell dust coating the lens just enough to delay photon detection, causing erratic microsecond timing errors.
What is the difference between break-beam and reflective paintball eyes?
Break-beam eyes utilize two separate components (an infrared transmitter LED on one side and a phototransistor receiver on the opposite wall); a ball is detected when it blocks the beam. Reflective eyes use a single sensor on one wall that emits light and looks for photons bouncing back off the paintball’s shell. Break-beam systems are far more reliable because they work with any paint shell color, whereas reflective eyes frequently misread dark or black shell tournament paint.