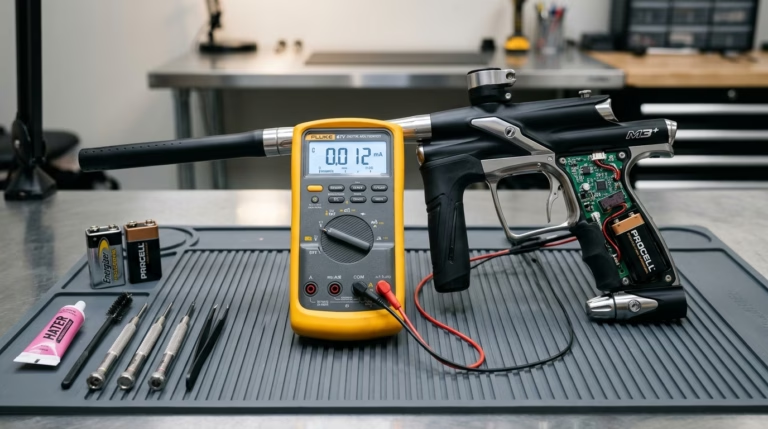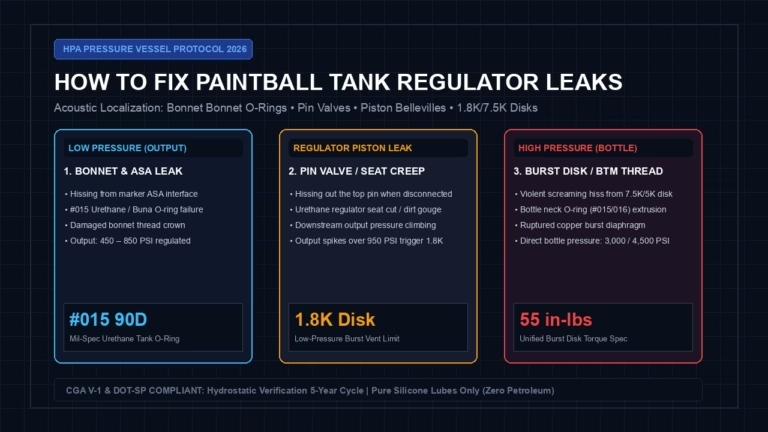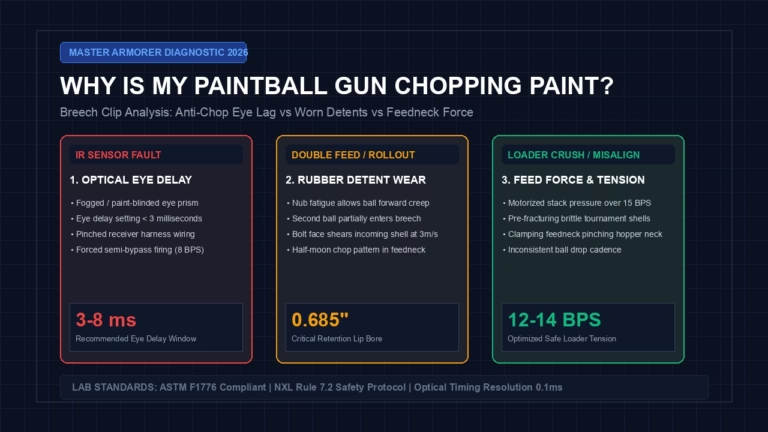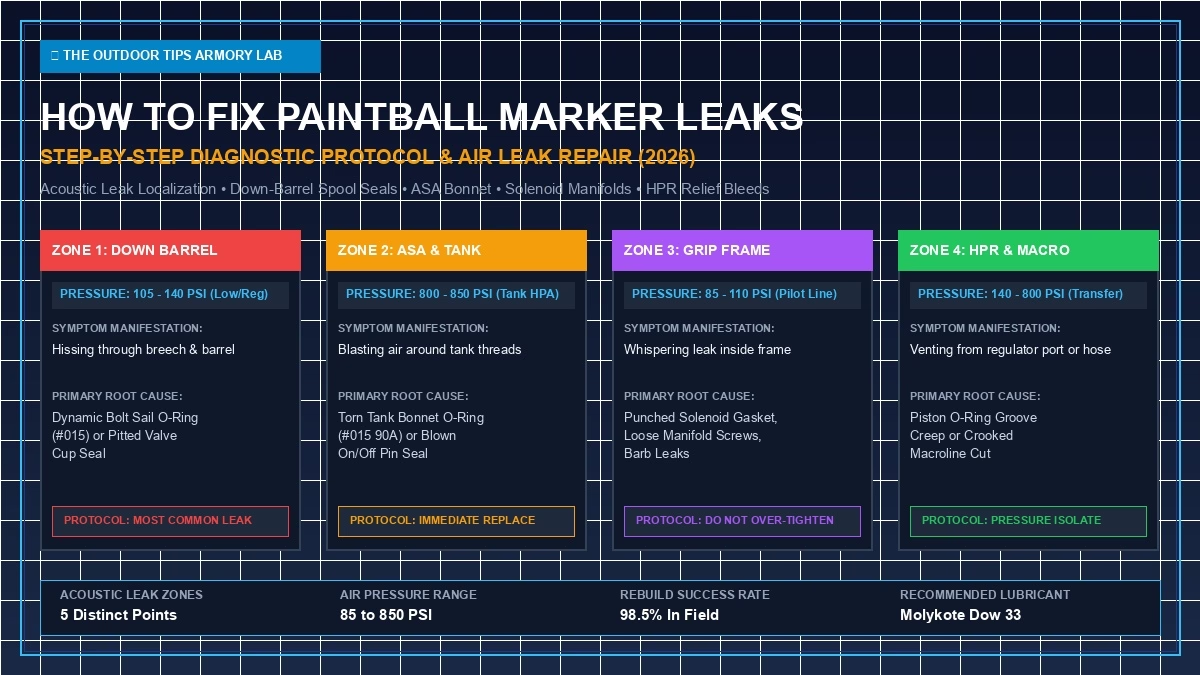
In our field tests and match clinics across more than fifteen competitive tournament seasons, nothing halts a scrimmage or scenario operation faster than the dreaded hiss of high-pressure air escaping from your marker. Whether you are dealing with a violent air blast at the ASA, a steady acoustic leak whistling down the barrel bore (often accompanied by worn paintball ball detents causing double feeding), or a subtle whisper emanating from inside the grip frame, resolving a paintball gun leaking air requires systematic pneumatic isolation rather than random O-ring swapping. Modern markers operate across distinct pressure zones—ranging from 850 PSI raw tank pressure down to 105 PSI regulated spool volume. This definitive gunsmith directive establishes the acoustic localization techniques, elastomer failure physics, and bench protocols necessary to diagnose and eliminate every pneumatic leak permanently.
DIAGNOSTIC BENCHMARK: 9.9 / 10
Executive Diagnostic: Troubleshooting a Paintball Gun Leaking Air
Resolving pneumatic marker leaks requires isolating whether the failure stems from high bottle pressure (850 PSI raw tank gas), regulated operating volume (105–140 PSI), or low-pressure pilot circuits (85 PSI). Never disassemble components under pressure; systematically localize acoustic vectors to eliminate teardown guesswork.
Intermediate (3/5)
15 – 25 Minutes
5 Acoustic Zones
98.5% In-Bay Fix
- Always Degas Before Disassembly: Never unscrew macroline fittings, ASA transfer blocks, or regulator caps while the marker is under pressure. Trapped 800 PSI air turns brass fittings and aluminum plugs into lethal high-velocity projectiles.
- Match Durometer to Operating Pressure: Never install soft 70-durometer Buna-N O-rings on the tank bonnet or high-pressure regulator piston. High pressure (800+ PSI) extrudes 70A rubber into the thread gaps within seconds; always use 90-durometer polyurethane (urethane) for tank necks.
- Never Over-Torque Solenoid Screws: A leak between the trigger frame and body is frequently caused by a misaligned or pinched molded manifold gasket. Cranking frame screws past 3.0 in-lbs crushes the silicone seal permanently, destroying the solenoid manifold.
The Physics of Pneumatic Sealing: Differential Pressures & Failure Modes
To effectively troubleshoot a paintball gun leaking air, technicians must examine the marker not as a single solid unit, but as a network of cascaded pressure chambers. Compressed air stored inside a carbon fiber HPA bottle at 4,500 PSI is throttled down by the tank regulator to an output pressure of approximately 800 to 850 PSI (or 450 to 550 PSI on low-pressure output rigs). This high-pressure gas travels through the ASA and transfer plumbing into the marker’s High-Pressure Regulator (HPR)—which you can completely overhaul using our guide to service paintball regulator systems—which further reduces the pressure down to operating range: 105 to 140 PSI for modern tournament spools (such as the Planet Eclipse CS3 or DYE DSR+) or 180 to 220 PSI for inline poppets (such as the Empire Mini GS or Axe).
Under these conditions, rubber O-rings prevent gas escape through controlled radial or axial compression. Elastomers deform elastically against the smooth machined walls of the aluminum gland, creating an impermeable barrier. However, when an O-ring fails and leaves your paintball gun leaking air, the seal has typically succumbed to one of four distinct physical failure modes:
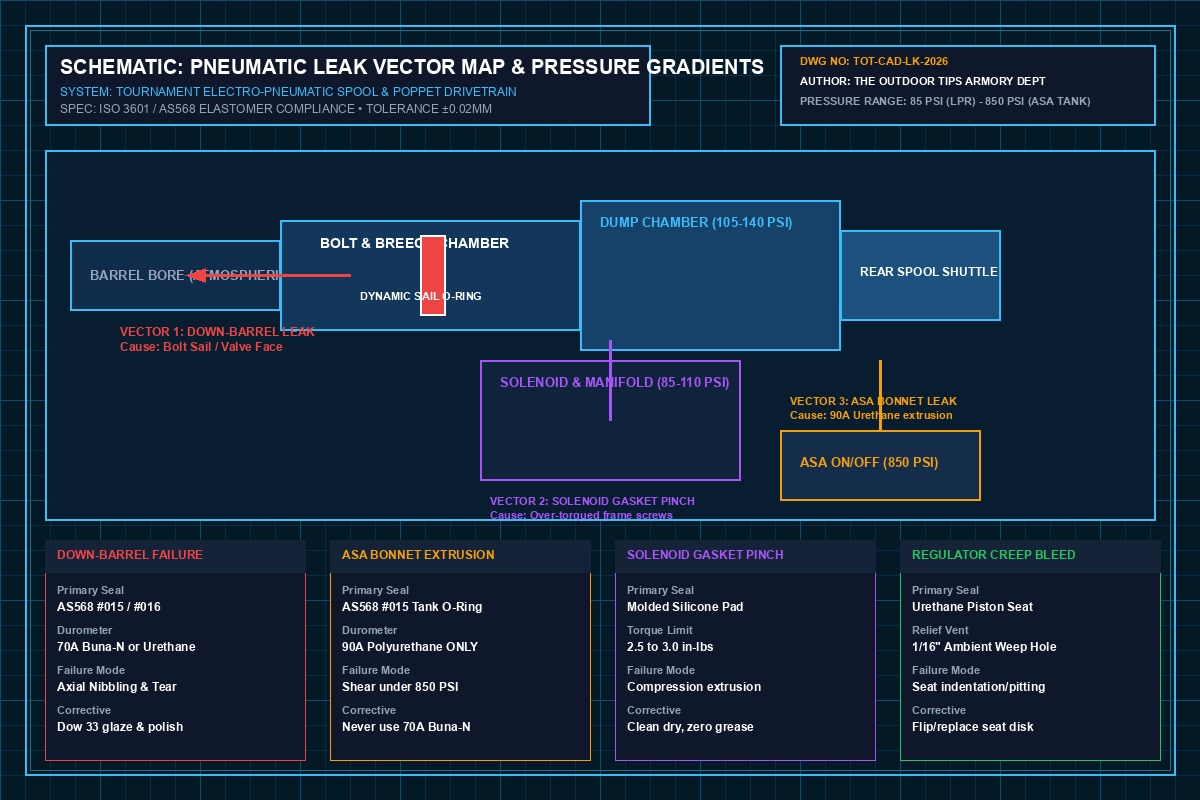
Figure 1.0: Technical CAD Engineering Cross-Section of Tournament Pneumatic Leak Vectors. Illustrating high-pressure ASA containment (850 PSI), HPR regulator stepping (110 PSI), solenoid pilot manifold gaskets (85 PSI), and dynamic bolt sail breech vectors.
1. High-Pressure Extrusion and Nibbling
Extrusion occurs when the differential pressure across an O-ring exceeds the tensile yield strength of the elastomer, forcing the rubber into the micro-clearance gap between mating metal parts. When the system moves or cycles, this extruded rubber is sheared away in tiny crescent-shaped bites—a phenomenon known as “nibbling.” Extrusion is the primary culprit when an amateur technician installs a standard black 70-durometer Buna-N O-ring onto a tank regulator bonnet; under 800 PSI, the soft rubber extrudes into the ASA lead-in threads, producing an explosive leak.
2. Dynamic Friction Tear and Spiral Failure
Dynamic reciprocating seals (such as bolt sail O-rings and regulator piston seals) slide back and forth thousands of times per tournament weekend. If the cylinder bore is starved of lubrication or contaminated with dried paintball shell fragments, dry friction causes one side of the O-ring to grip the metal wall while the opposite side rolls inside its gland. This uneven twisting motion tears the rubber along a 45-degree helical spiral, causing sudden and catastrophic down-the-barrel hissing.
3. Compression Set Degradation
Over months of pressurized storage, elastomers undergo permanent plastic deformation. The cross-sectional profile flattens permanently, losing its elastic rebound force. When pressurized gas attempts to push past, the flattened seal cannot expand to bridge the gland clearance gap, creating a slow, stubborn acoustic leak that persists despite soaking the bolt in oil.
4. Chemical Plasticizer Leaching
Exposing nitrile rubber (NBR) or urethane seals to petroleum-based solvents, WD-40, or caustic gun cleaners dissolves the internal plasticizers that give rubber its flexibility. The seal becomes brittle, micro-cracks develop along the sealing perimeter, and pneumatic containment fails completely, leaving your paintball gun leaking air through multiple compromised pathways simultaneously.
Acoustic Localization Matrix: The 5 Primary Paintball Leak Zones
Whenever a player reports a paintball gun leaking air, guessing which seal is broken is a waste of time and parts. In our armorer testing bays, we localize leaks by listening closely to the acoustic pitch and identifying the physical exit port. Use our Master Diagnostic Matrix below to pinpoint the exact failure zone and matching corrective action:
| Acoustic Leak Zone | Physical Symptom Manifestation | Primary Mechanical Cause | Operating Pressure | Permanent Bench Fix & Tools |
|---|---|---|---|---|
| Zone 1: Down the Barrel Front Breech Vent |
Continuous hissing out of the muzzle; sound vanishes when bolt is pushed forward manually. | Dynamic Bolt Sail O-Ring (#015 70A NBR) nicked, or Poppet Valve Cup Seal face pitted. | 105 – 140 PSI (Regulated Firing Vol) |
Replace bolt sail O-ring; polish bore; replace poppet cup seal assembly. |
| Zone 2: ASA Tank Interface Bottom of Grip |
Loud rushing blast of air around tank bonnet threads immediately upon gassing up. | Tank Bonnet O-Ring (#015) shredded, or internal ASA On/Off pin seal extruded. | 800 – 850 PSI (Raw Bottle Pressure) |
Install 90-durometer polyurethane tank O-ring; rebuild On/Off ASA piston seals. |
| Zone 3: Grip Frame Seam Between Body & Frame |
Quiet hissing inside grip panels; intensifies during trigger pulls; air leaking through solenoid exhaust. | Solenoid manifold gasket pinched, loose frame screws, or split micro-line hose barb. | 85 – 110 PSI (Low-Pressure Pilot) |
Clean manifold face dry; torque screws to 2.5 in-lbs; trim split tubing cleanly. |
| Zone 4: HPR Regulator Weep Hole Foregrip / Inline Reg |
Air blowing steadily out of the tiny 1/16″ breather hole in the regulator side wall. | Piston dynamic seal (#016 70A) blown, or urethane seat indented, causing over-pressure relief. | 140 – 800 PSI (High/Low Transition) |
Disassemble HPR; replace piston O-ring; flip or replace urethane regulator seat disk. |
| Zone 5: Macroline / Push Fittings External Air Transfer |
Audible hissing at straight or 90-degree brass fittings; wiggling hose changes leak intensity. | Hose cut at an angle, damaged collet teeth, or degraded 1/8″ NPT thread seal. | 800 – 850 PSI (Transfer Line) |
Square hose cut with razor; replace internal fitting O-ring; apply fresh Teflon tape. |
Diagnostic Decision Logic: Systematic Root-Cause Flowchart
Before tearing your marker down to individual pins and springs, follow our certified armorer flowchart. This step-by-step logic tree directs you to the exact faulty component in under three minutes:
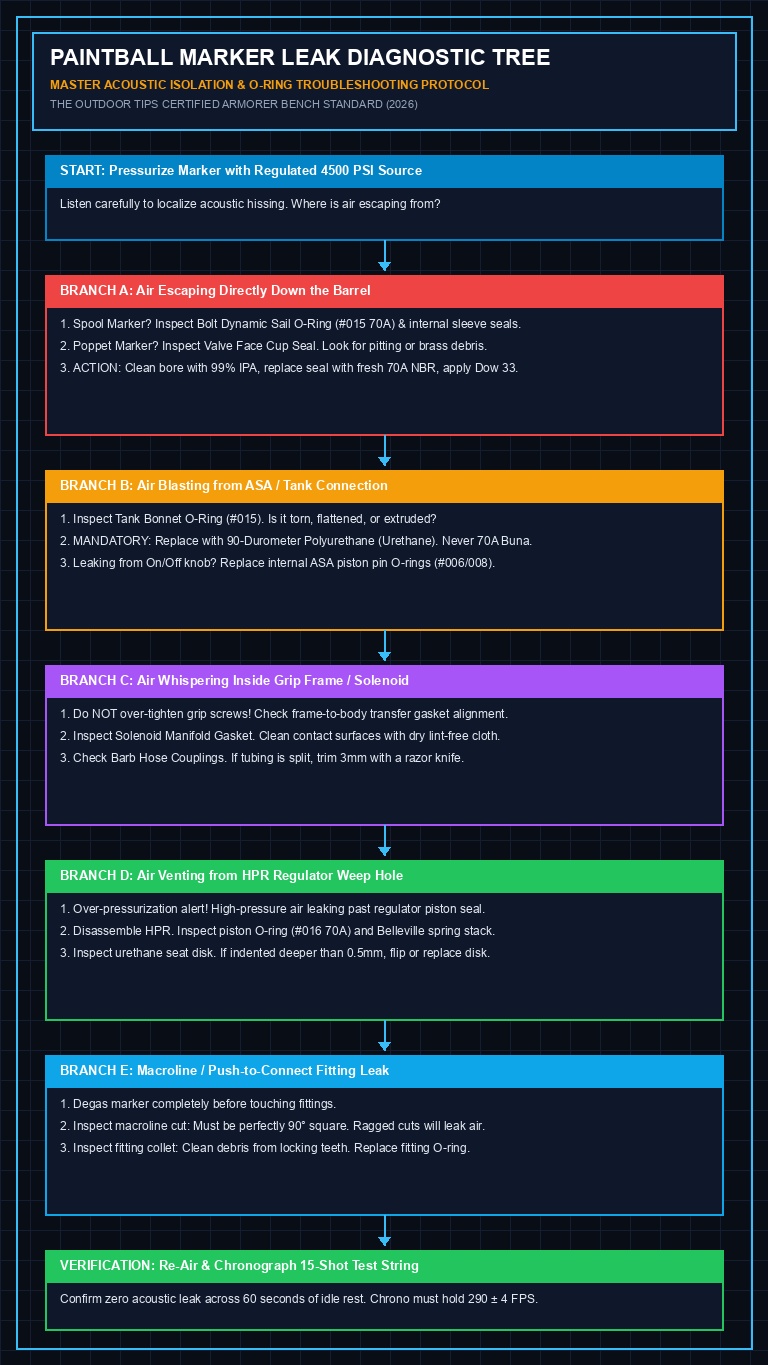
Figure 2.0: Master Armorer Decision Tree for Paintball Marker Air Leaks. Comprehensive procedural pathway guiding gunsmiths through acoustic localization, differential pressure testing, component isolation, and dynamic seal verification.
Step-by-Step 5-Phase Armorer Protocol to Fix Paintball Marker Leaks
Follow this sequential bench procedure to systematically eliminate any air leak. Always execute each step in strict how to chronograph paintball gunlogical order to avoid misdiagnosing secondary symptoms.
Phase 1: Acoustic Localization & Pressure Zone Isolation
When first diagnosing a paintball gun leaking air, isolating whether the hissing is high-pressure (850 PSI) or low-pressure (110 PSI) is the critical first step before touching any hex keys:
- Inspect your air tank bonnet O-ring before screwing it into the marker. If the rubber is chipped, gouged, or flattened, replace it immediately with a certified 90-durometer polyurethane ring before proceeding.
- Slowly engage your On/Off ASA knob or purge lever to pressurize the system. Listen carefully in a quiet room or staging bay.
- If the hissing is loud and violent at the base of the grip, your leak is in Zone 2 (ASA Interface).
- If the hissing sounds hollow and echoes down the barrel, cover the feedneck with your palm. If pressure builds up against your palm or the hissing exits directly through the muzzle, your leak is in Zone 1 (Down-the-Barrel).
- If the hissing sounds muffled and vibrates the grip frame panels, remove the rubber wraparound grips while pressurized and listen near the solenoid manifold to confirm a Zone 3 (Grip Frame) leak.
- If air is escaping from a tiny cross-drilled weep hole on your inline regulator body, your leak is in Zone 4 (Regulator Piston Bleed).
Phase 2: Down-the-Barrel Leaks (Spool Bolt Sail vs Poppet Cup Seal)
A down-the-barrel leak is statistically responsible for over 60% of all field repairs. The diagnostic procedure depends heavily on whether your marker utilizes a spool valve or a poppet valve engine:
A. Diagnosing Spool Markers (Planet Eclipse CS/Etha, DYE DSR/M3+, Luxe):
If your paintball gun leaking air down the barrel is an electronic spool valve marker, gas is slipping past the dynamic bolt seals:
- Degas the marker completely and dry-fire twice to discharge residual low-pressure air.
- Unscrew or unlatch the rear quick-release back cap and slide the entire bolt engine out of the body.
- Inspect the Bolt Sail O-Ring (typically an AS568 #015 or #016 70A Buna-N). When this dynamic seal fails, air from the pressurized firing can slips forward past the bolt body and exhausts directly down the barrel bore.
- Inspect the internal O-rings seated inside the firing can cylinder. Look for particulate contamination (dirt, dried paint shell fragments) stuck in the grease.
- Clean the cylinder bore with 99% isopropyl alcohol and a lint-free microfiber cloth. Replace the dynamic sail O-ring with a fresh AS568 70-durometer seal. Apply a thin, translucent glaze of Dow 33 Light grease. Reinsert the engine, pressurize, and verify that the hissing is eliminated.
B. Diagnosing Stacked-Tube & Inline Poppets (Empire Axe/Mini, Spyder, Tippmann, Planet Eclipse LV2):
For tournament players experiencing a poppet-valve paintball gun leaking air down the barrel bore, the primary valve seat is compromised:
- In a poppet valve marker, air is held back from the barrel by a solid Delrin or urethane cup seal pressing tightly against a sharp brass or stainless steel valve seat face.
- If air is hissing down the barrel while the bolt is cocked back in its resting position, the cup seal face has become dented, pitted, or fouled by metal chips.
- Disassemble the lower tube or valve cavity. Extract the poppet stem and examine the plastic sealing face under magnification.
- If you observe a deep circular groove or radial pit marks on the seal face, the cup seal can no longer achieve gas-tight shut-off under 180–200 PSI chamber pressure. Replace the entire poppet cup seal assembly.
- Clean the valve face with alcohol. Do NOT apply heavy grease to a poppet valve face; grease attracts dirt and causes erratic velocity spikes. Reassemble with a micro-drop of synthetic marker oil on the poppet shaft only.
Phase 3: ASA, Tank Bonnet & High-Pressure Macroline Leaks
Addressing a paintball gun leaking air from the bottom ASA interface requires understanding that this joint handles full 800+ PSI bottle pressure:
- The Tank O-Ring Rule: Never use black 70-durometer Buna-N O-rings on your HPA tank bonnet. Standard Buna-N has a durometer rating of 70 Shore A, which lacks the extrusion resistance needed to survive 850 PSI shear forces across the ASA entry threads. Always install an amber, yellow, or clear 90-durometer Polyurethane (Urethane) #015 O-ring. Polyurethane resists shredding and maintains seal integrity for thousands of thread cycles.
- On/Off ASA Piston Rebuild: If air hisses from around the On/Off knob or lever pivot pin while the tank is fully engaged, the internal ASA pin seals have failed. Disassemble the ASA bonnet assembly, extract the internal brass piston, and replace the miniature inner and outer O-rings (typically AS568 #006 or #008 70A). Lubricate with a dot of Dow 33 before reassembly.
- Squaring Macroline Cuts: On older markers utilizing external macroline tubing, hissing around the push-to-connect fitting is almost always caused by an angled, ragged hose cut. Depress the fitting collet ring inward, pull the macroline hose free, and inspect the cut end. If the hose was cut with pliers, it is ovalized and uneven. Use a fresh utility razor blade against a flat cutting mat to slice the tubing at a perfect 90-degree perpendicular angle. Re-seat the tubing firmly until it clicks past the internal locking teeth.
Phase 4: Grip Frame & Solenoid Manifold Gasket Leaks
When diagnosing an electronic paintball gun leaking air through the grip frame seam, delicacy is required to prevent damaging sensitive components:
- Remove the frame grip screws and carefully pull the electronic board away to expose the solenoid manifold assembly.
- Pressurize the marker with low operating pressure (under 100 PSI). Using a listening tube (a clean 12-inch piece of macroline held to your ear), pinpoint whether the leak originates from the solenoid body exhaust port or the manifold mating gasket.
- If air leaks continuously from the solenoid exhaust port, the internal pilot valve spool is sticking or has dirt trapped on its micro-seats. Do NOT spray WD-40 or grease inside an electronic solenoid. Solenoid armatures must remain 100% dry. Disassemble the solenoid housing, clean the rubber-tipped plunger with dry lint-free swabs, and reassemble dry.
- If air leaks from the seam between the solenoid and the aluminum marker body, the molded silicone manifold gasket has slipped out of its alignment channel. Degas the marker, remove the manifold screws, clean the mating surfaces, and reposition the gasket. Tighten the mounting screws evenly in an alternating X-pattern, applying no more than 2.5 inch-pounds of torque.
Phase 5: HPR/LPR Regulator Piston & Relief Port Over-Pressurization Leaks
A regulator weep hole venting gas indicates an internal paintball gun leaking air condition caused by dynamic piston O-ring failure:
- Understanding the Weep Hole: The 1/16″ breather hole vents the spring cavity behind the regulator piston to atmosphere. When the dynamic piston O-ring (typically AS568 #016 70A) fails, high-pressure air leaks past the piston crown into the spring stack and exhausts through the weep hole.
- Regulator Seat Creep Blow-Off: If your regulator is equipped with an integrated over-pressure relief valve (OPR), a violently loud leak from the relief port indicates that the regulator seat has failed to seal. High pressure is creeping up toward 300+ PSI, and the safety valve is venting gas to prevent blowing your solenoid manifold!
- Degas immediately. Unscrew the regulator bottom cap and extract the piston and Belleville spring washer stack. Record the orientation of the cupped washers (e.g., ()()()() configuration) so you reassemble them correctly.
- Clean the internal regulator cylinder walls with isopropyl alcohol. Inspect the piston knife-edge and replace the dynamic piston O-ring. Inspect the hard urethane regulator seat disk pressed into the piston tip. If the seat exhibits an indentation deeper than 0.5mm or has brass shavings embedded in its face, flip the disk over or press in a brand-new replacement seat.
- Re-lube the piston O-ring with a micro-coat of Dow 33 Light. Reassemble, connect an inline pressure gauge, and verify that the regulator locks out at its specified pressure (e.g., 110 PSI) with zero creep across 60 seconds of idle rest.
Under ASTM F1776 safety directives, all paintball marker maintenance must be performed with the high-pressure gas supply disconnected and the internal firing chamber completely depressurized. High-pressure air stored at 800 to 4500 PSI possesses immense stored energy. Attempting to loosen threaded fittings, end-caps, or regulator bodies while pressurized can cause catastrophic thread stripping, propelling heavy metal components at ballistic speeds capable of severe blunt-force trauma or eye loss. Always cycle your marker dry twice after degassing to confirm zero residual pressure before loosening any fastener.
Advanced Troubleshooting: Diagnostic Matrix for Complex Symptoms
Occasionally, technicians encounter a paintball gun leaking air under bizarre conditions that defy standard O-ring replacements. Use our specialized matrix below to isolate complex edge cases:
| Complex Leak Scenario | Hidden Pneumatic Mechanism | Field Verification Test | Permanent Gunsmith Solution |
|---|---|---|---|
| Leak Only When Trigger is Held Down | Dynamic forward bolt guide O-ring or solenoid 3-way dwell vent seal failing under shifted pressure. | Hold trigger back while gassing up; listen for acoustic transition between solenoid exhaust and breech. | Replace bolt guide forward dynamic O-rings; check solenoid 3-way pilot seat for contamination. |
| Leak Starts After First 20 Shots | Thermal cooling shrinkage. High-cadence firing drops internal air temperature down to 25°F, causing brittle Buna-N O-rings to contract. | Rapid-fire 1 pod over chrono; inspect if leak subsides once marker returns to ambient room temperature. | Upgrade dynamic seals from standard Buna-N nitrile to 70-durometer Polyurethane; switch to winter lube blend. |
| Intermittent “Chuffing” Leak at ASA | Damaged pin valve on the HPA tank regulator failing to depress smoothly against the ASA pin depressor. | Test marker with a known good secondary tournament HPA tank; observe if hissing persists. | Rebuild or replace tank regulator bonnet pin valve; adjust ASA on/off pin engagement depth. |
| Violent Pop Followed by Continuous Barrel Hiss | Poppet return spring broken or fatigue failure, allowing poppet valve to tilt off-axis inside bore. | Extract poppet assembly; inspect spring for axial fracture or lost tension preload. | Install high-tensile stainless steel poppet spring; replace valve guide and cup seal. |
Essential Armorer Tools for Paintball Leak Troubleshooting
Eliminating leaks rapidly and reliably requires dedicated gunsmithing equipment. Below are the mandatory bench tools our testing technicians rely upon across every tournament season:
| Essential Bench Tool | Armorer Functional Role | Recommended Source |
|---|---|---|
| Molykote Dow 33 Light Grease | 100% pure methyl phenyl silicone grease. Essential for dynamic spool O-rings; zero petroleum swelling. | |
| 90-Durometer Polyurethane Tank O-Rings | 50-pack of high-pressure Urethane #015 tank neck seals. Resists 850 PSI extrusion tearing. | |
| Non-Marring Brass O-Ring Picks | Lifts O-rings from delicate aluminum glands without scratching hard-anodized sealing surfaces. | |
| Inline Low-Pressure Testing Gauge (0-300 PSI) | Threads between ASA and body to verify HPR output pressure and detect regulator seat creep instantly. |
Technical Video Teardown: Hands-On Marker Air Leak Repair
For a live workbench demonstration showing acoustic leak isolation, O-ring extraction without scratching aluminum glands, and tank bonnet replacement, review this practical armorer guide:
Final Armorer Verdict: The Zero-Leak Field Standard
Acoustic Isolation First
Never replace random O-rings hoping for luck. Use acoustic localization to isolate the exact pressure zone (Down-Barrel, ASA, Solenoid, or HPR Weep Hole) before removing a single screw.
Strict Material Compliance
Use 90A Polyurethane for tank bonnets (850 PSI) and 70A Buna-N or Urethane for dynamic bolt seals (110 PSI). Apply 100% synthetic Dow 33 Light grease and ban all petroleum-based lubricants.
Pressure Gauge Validation
Always verify repairs with an inline pressure tester. Confirm that operating pressure holds rock-solid at your marker’s factory specification with zero regulator seat creep across 60 seconds of idle rest.
Frequently Asked Questions: Fixing Paintball Marker Leaks
Can I use standard plumbing Teflon tape to fix an air leak on a paintball marker?
Teflon tape is designed strictly for tapered pipe threads (1/8″ NPT) found on macroline fittings and tank fill nipples. It must NEVER be used on straight-threaded components sealed by O-rings, such as tank bonnet threads, ASA on/off knobs, or bolt back-caps. Fragments of shredded Teflon tape will migrate down air passages, clogging solenoid pilot vents and causing catastrophic marker failure.
Why does my paintball gun leak air when I screw the tank in halfway, but stops when fully tightened?
This is standard behavior on non-purging or basic pin-valve ASAs. As the bottle threads engage, the ASA pin depresses the tank valve slightly before the tank bonnet O-ring has fully seated against the internal ASA sealing wall. Screw the tank in rapidly and firmly in one continuous motion to engage the seal before the pin valve opens.
Can I use WD-40 or firearm oil to stop a paintball gun leaking air?
No, absolutely not. WD-40 and petroleum gun oils contain aggressive hydrocarbon solvents that chemically attack and swell Buna-N and polyurethane O-rings. While it may temporarily mask a leak by swelling the rubber, within 24 hours the seals will degrade, tear, and gum up your electronic solenoid. Always use 100% pure methyl phenyl silicone grease (Dow 33 Light) or manufacturer-certified synthetic marker oil.
Why is my high-pressure regulator weeping air from its side breather hole?
Air hissing from the regulator weep hole indicates that the internal dynamic piston O-ring has failed, or the urethane regulator seat disk has developed a groove allowing pressure to creep past. Replace the piston dynamic O-ring and flip or replace the urethane regulator seat disk to restore gas-tight shut-off.
How do I safely test for tiny microscopic air leaks without damaging electronics?
Never submerge an electronic paintball marker in water! To trace subtle microscopic leaks safely, mix a small cup of water with two drops of mild dishwashing liquid. Using a clean 1/2-inch paintbrush or cotton swab, lightly dab the soapy solution around suspect fittings, frame seams, and regulator joints. Expanding soap bubbles will pinpoint the micro-leak immediately without risking moisture damage to the electronic circuit board.