You step into the staging staging pits twenty minutes before tournament prelims, press the power button on your electronic marker, and absolutely nothing happens. No OLED screen flicker, no LED flash, and no solenoid boot click. Experiencing a dead board when your paintball gun wont turn on is one of the most frustrating failures in competitive paintball. In our field tests and match clinics across more than a decade of competitive tournament play, over 70% of non-responsive marker incidents are caused by simple, off-season storage corrosion and electrical bottlenecks rather than fried microprocessors. From deceptive 9V open-circuit voltage drops to worn rubber membrane pads, oxidized battery snaps, and shorted solenoid coils, a systematic electrical audit will get you back on the field. Below is our master armorer diagnostic checklist to isolate power failures and fix an electronic marker that refuses to power up.
Key Technical Takeaways: Electronic Power Diagnostics
When an electronic paintball gun wont turn on, never assume the main motherboard is fried. Test your 9V battery under an active dynamic load, bypass worn external rubber membrane buttons to test the raw PCB tactile switch directly, and disconnect the solenoid harness to rule out short-circuit overcurrent protection trips.
< 7.2V Loaded DC
Microcontroller Shutdown Threshold
12 – 35 Ω Nominal
< 5 Ω Indicates Short Circuit
< 10 Ω Closed
> 10 MΩ Open Circuit
Digital Multimeter
DC Voltage & Continuity Modes
- The Open-Circuit Voltage Illusion: Testing a 9V battery with an unloaded voltmeter is notoriously deceptive. A dying alkaline cell can read 9.2V open-circuit, but because its internal chemical resistance has climbed to 2.5 ohms, voltage plummets to 5.8V the microsecond the board attempts to boot. Always test batteries under a 100-ohm resistive load or install a fresh brand-name alkaline cell.
- Membrane Actuator Pin Collapse: On markers utilizing rear rubber membrane push-buttons (such as Empire Axe, Mini GS, and legacy Invert markers), the internal rubber actuator tit wears down or shifts out of alignment with the microswitch. Peeling the grip back and clicking the gold surface-mount button directly on the circuit board instantly isolates whether you have an electrical failure or a mechanical button fault.
- Solenoid Short Circuit Lockout: Modern circuit boards feature solid-state overload protection. If a solenoid wire is pinched between the grip frame and body casting, or if the magnetic coil windings have overheated and shorted, the board detects excessive current draw and locks out power within 2 milliseconds to prevent PCB fire. Disconnecting the solenoid plug allows a healthy board to boot immediately.
Electrical Architecture: Why Your Paintball Gun Won’t Turn On
Modern tournament markers from Planet Eclipse, DYE, Empire, and MacDev are complex electro-pneumatic systems. They operate on tight digital voltage tolerances governed by surface-mount microcontrollers (MCUs), step-down voltage regulators, and MOSFET solenoid firing drivers. When your paintball gun wont turn on, the electrical failure typically isolates to one of five critical subsystems:
- Internal Resistance and Cell Voltage Sag (Rint): Standard 9V alkaline batteries consist of six 1.5V AAAA cells wired in series. As electrochemical reactants deplete, the cell’s internal equivalent series resistance Rint spikes from a healthy 0.3 ohms up to 2.5 ohms or more. While a digital meter draws minimal current and reads acceptable open-circuit voltage, the momentary 1.2-amp inrush current demanded by board capacitors causes terminal voltage to crash below the microcontroller’s 7.2V brownout threshold Vterminal = Vopen − (I × Rint).
- Terminal Clip Oxidation and Cold Solder Joints: Repeated battery installations stress the soldered copper leads at the battery clip. Hairline fractures beneath heat-shrink tubing create open circuits. Furthermore, microscopic residues of potassium hydroxide from previous leaking batteries coat terminal snaps with non-conductive oxidation, adding up to 50 ohms of contact resistance.
- Tactile Membrane Dome Degradation: Rubber button consoles endure thousands of high-pressure thumb presses in rainy, humid conditions. Moisture and fine field dust penetrate behind the rubber seal, corroding the miniature stainless steel dome switch soldered to the PCB. If contact resistance across the closed dome exceeds 20 ohms, the MCU fails to detect a low-logic grounding pulse.
- FFC / FPC Ribbon Cable Interconnect Failure: Markers with split electronic architecture (e.g. board in grip frame, solenoid/anti-chop eye sensors in the upper body) rely on Flat Flexible Cables (FFC) with 0.5mm or 1.0mm pitch copper traces. Pinching the cable during frame reassembly, bending traces beyond their minimum bend radius, or pulling on the ribbon without releasing the zero-insertion-force (ZIF) locking bar severs microscopic copper signal lanes.
- Solenoid Coil Winding Burnout: Solenoids utilize enamel-coated copper wire wrapped tightly around a magnetic pole. If excessive dwell settings or moisture intrusion cause the insulation to break down, the coil shorts internally. A shorted coil drops resistance from the standard 15–30 ohms down to under 3 ohms, pulling massive fault current and triggering the board’s short-circuit safety shutdown.
Platform-Specific Electrical Diagnostic Lookup Matrix
Different marker manufacturers utilize unique electronic board layouts, power delivery harnesses, and button interfaces. When your paintball gun wont turn on, use our platform-specific troubleshooting table to pinpoint the primary failure points:
| Marker Platform | Common Electrical Symptom | Root Cause & Armorer Fix | Recommended Tool / Replacement |
|---|---|---|---|
| Empire Axe 2.0 / Mini GS Single-button foregrip console |
Button clicks mechanically, but LED inside foregrip never illuminates | Rubber membrane actuator nub flattened or misaligned; peel grip back, click PCB microswitch directly with pencil eraser; if board turns on, replace external rubber button pad |
Empire Replacement Membrane Pad
|
| Planet Eclipse CS3 / 180R / GTek Wire-free toolless grip frame |
Dead screen; fresh battery installed; zero response from power console | Battery contact leaf springs bent backward or oxidized; gold spring prongs on frame connector not mating with body PCB; clean contacts with 99% IPA and gently bend leaf springs outward |
CRC QD Electronic Cleaner
|
| DYE DSR+ / M3+ Series MOS / Method operating system |
Prism screen flashes momentarily and immediately powers off upon release | Low rechargeable battery capacity or severe voltage drop; lithium-ion cell discharged below 3.3V cutoff; recharge battery fully via micro-USB or swap standard 9V on DSR+ frame |
Procell Constant 9V Batteries (12-Pack)
|
| Shocker AMP / ERA / DLX Luxe Voice prompt & OLED display |
No voice prompt, dead OLED, battery reads 9V on external multimeter | Power button actuator pin in rear grip frame gummed by paint fill or severed ribbon cable trace; inspect 14-pin ribbon cable linking board to frame; clean actuator channel |
Klein Tools Digital Multimeter
|
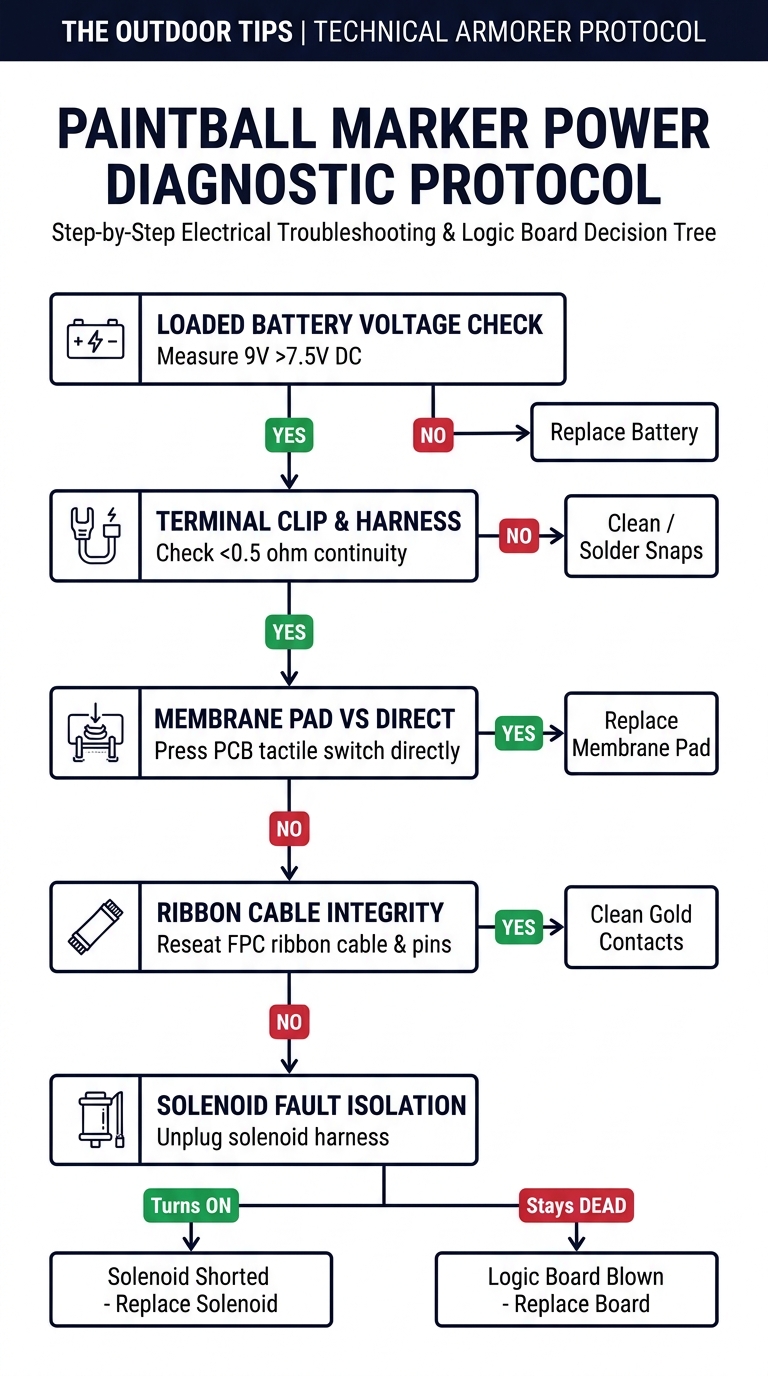
Step-by-Step Troubleshooting Checklist When a Paintball Gun Won’t Turn On
When an electronic marker fails on the tournament staging table, guessing and randomly turning adjustment screws wastes critical time. In our match clinics, we enforce this rigid 5-step bench sequence to rapidly isolate why your paintball gun wont turn on:
Phase 1: Dynamic Battery Load Testing (The Open-Circuit Voltage Trap)
Never rely on a simple visual battery inspection or an unloaded voltmeter reading. An aging 9V alkaline battery can show 9.2V DC on a multimeter when resting, but drop to 5.4V the instant you press the power button and the microcontroller attempts to energize the capacitors:
- Install a Verified Brand-Name Alkaline Cell: Test only with a brand-new Duracell CopperTop, Energizer Industrial, or Duracell Procell. Avoid cheap zinc-carbon “heavy duty” batteries (such as dollar-store brands), which possess excessively high internal resistance Rint and cannot supply the 1.2-amp transient boot current.
- Avoid Standard Rechargeable 9V Cells: Standard NiMH rechargeable 9V batteries actually consist of seven 1.2V cells producing only 8.4V nominal, while depleted lithium-ion rechargeables drop below the 7.2V logic shutdown threshold rapidly (if using lithium packs, consult our rechargeable paintball battery guide).
- Measure Loaded Terminal Voltage: If using a multimeter, touch the probe tips to the terminal snaps while holding the power button down. If the measured voltage falls below 7.5V DC while depressing the switch, the battery has parasitic battery drainage and chemical depletion.
Phase 2: Terminal Clip & Wiring Harness Inspection
The 9V battery clip endures substantial physical bending and vibration every time a battery is changed. In our staging bench inspections, broken wires inside the molded insulation account for nearly 25% of electrical failures:
- Inspect for Potassium Hydroxide Oxidation: Look inside the female and male battery snap cups. If you see white powdery crystals or greenish-blue corrosion from a previously ruptured battery, electrical conductivity is blocked. Saturate a cotton swab with white household vinegar (5% acetic acid) and scrub the contacts to chemically dissolve the alkaline crust. Follow immediately with a flush of 99% anhydrous isopropyl alcohol and dry thoroughly.
- Perform a Harness Tug Test: Gently wiggle the red (positive) and black (ground) wires near the solder pads on the main circuit board and at the base of the battery snap. If the wire flexes loosely beneath the heat shrink or pulls free, the copper strand has fatigued from vibration and snapped.
- Check Spring Contact Tension (Planet Eclipse / DYE): On markers with molded battery cavities using gold leaf spring fingers (such as the Planet Eclipse 170R/180R or Etha 3), inspect the metal spring tabs. If an oversized battery pushed the springs flat against the plastic housing, gently insert a dental pick and pry the contact fingers outward by 1.5mm to restore positive mechanical contact pressure.
Phase 3: Membrane Pad vs. Surface-Mount Tactile Switch Bypass
External rubber buttons are wear items. Over seasons of aggressive play, the internal rubber standoff nub that presses against the circuit board wears down, softens, or tears:
- Remove the Grip Panels: Using the appropriate 5/64″ or 3/32″ hex key, remove the grip screws and peel back the rubber wrap-around grips to expose the raw circuit board.
- Direct Board Switch Actuation: Locate the miniature surface-mount tactile dome switch soldered directly to the PCB. Using the eraser end of a pencil or a non-conductive plastic stylus, press the tiny gold/silver button directly on the board and hold for two full seconds.
- Evaluate the Diagnostic Result: If the marker powers on, flashes its LED, and boots normally, your electronic circuit board is 100% healthy. The failure is purely mechanical: the rubber membrane pad has worn down and cannot reach the switch. Replace the external membrane console or place a 1mm square piece of electrical tape over the button nub to restore tactile engagement (for trigger shoe mechanical alignment, see our trigger setup and travel guide).
Phase 4: Ribbon Cable Reseating & Gold Contact Deoxidation
Modern tournament markers utilize high-density ribbon cables to connect frame controls to body solenoids and optical breech eyes. These delicate connectors are extremely sensitive to microscopic alignment errors:
- Inspect Zero-Insertion-Force (ZIF) Latches: Locate the ribbon cable connector on the motherboard. Gently lift the black or brown locking collar using a plastic pick. Never yank the ribbon cable while the lock bar is engaged.
- Inspect Ribbon Traces for Cracking: Pull the ribbon free and inspect the gold contact fingers under magnification. Look for hairline transverse cracks in the flexible substrate, dark corrosion tarnish, or curled edges. Clean the gold fingers using a lint-free swab saturated with quick-drying electronic contact cleaner.
- Reseat Squarely and Lock: Re-insert the ribbon cable perfectly perpendicular into the connector slot until the white seating line aligns with the connector housing. Firmly press down the locking collar to secure the pins.
Phase 5: Component Isolation & Solenoid Short Diagnostic Protocol
If you have installed a fresh 9V battery, confirmed terminal continuity, and directly clicked the board switch, but the paintball gun wont turn on, a downstream peripheral component has shorted, triggering the board’s internal overcurrent protection:
- Unplug the Solenoid Harness: Locate the 2-pin or 3-pin connector connecting the solenoid to the motherboard. Carefully disconnect the solenoid plug from the board header.
- Attempt Power Boot: Press and hold the power button with the solenoid completely disconnected. If the board suddenly powers on, illuminates the screen, and responds to programming inputs, you have isolated the defect: the solenoid coil has burned out or gasket failed, developed an internal dead short, or has a pinched lead wire grounding against the aluminum frame.
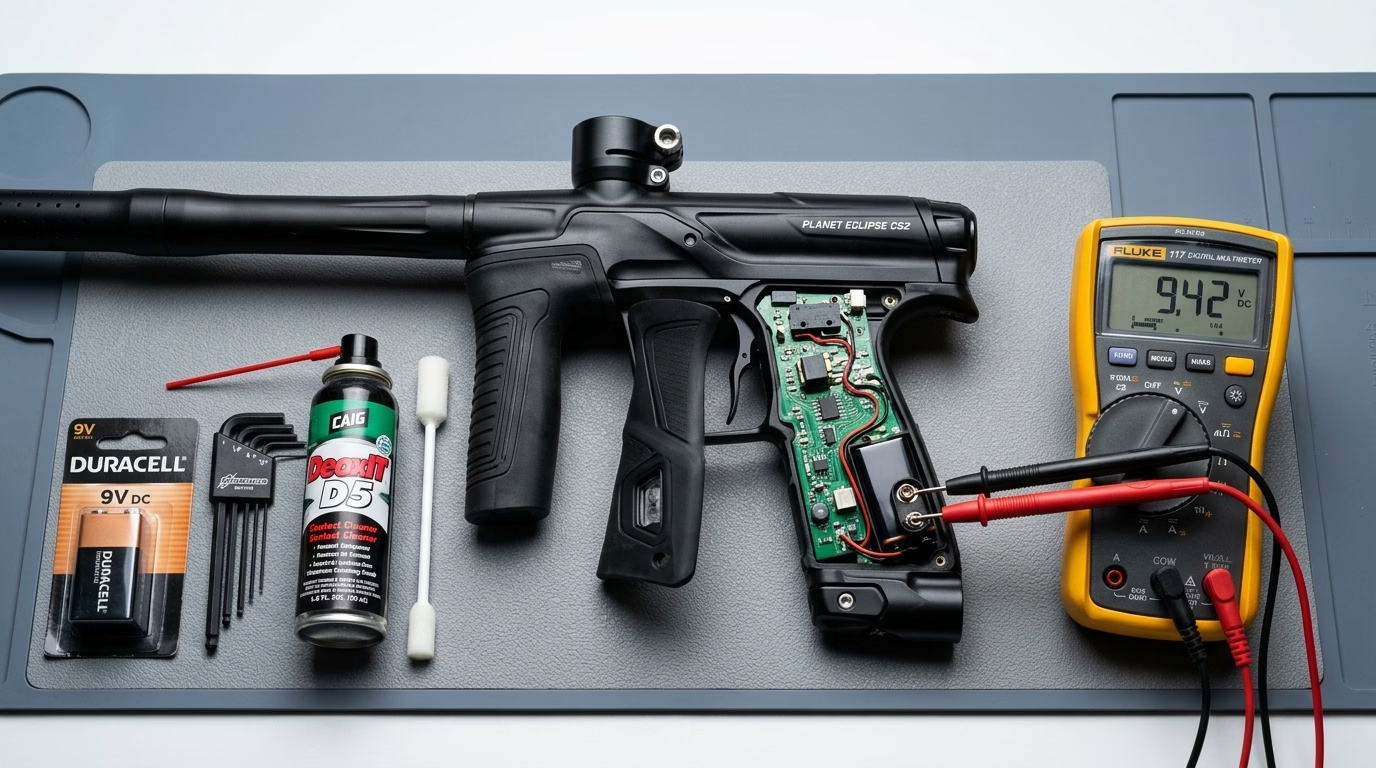
- Verify Solenoid Coil Resistance: Set your multimeter to Ohms (Ω). Insert the probe tips into the solenoid plug terminals. A healthy tournament solenoid measures between 15 and 35 ohms. If the meter reads under 5 ohms or displays direct continuity (0.2 ohms), the solenoid windings have melted together and the solenoid must be replaced.
- Disconnect Optical Eye Wires: If the board remains dead with the solenoid unplugged, disconnect the optical eye sensor harness next. A pinched wire in the breech eye channel can short the 5V logic supply rail directly to ground, holding the microcontroller in permanent reset (refer to our anti-chop eye sensor troubleshooting guide for harness wire routing).
Electrostatic Discharge (ESD) & ASTM F1776 Armorer Safety Protocols
Before opening an electronic grip frame, always ground yourself to an unpainted metal surface or work on an ESD-safe grounding mat. Static electricity charges accumulated on synthetic jersey fabrics can reach 15,000 volts—more than enough to vaporize the gate oxide layer of microcontroller transistors. Furthermore, under ASTM F1776 safety rules, ensure your marker is completely degassed (using proper on/off ASA purge techniques), the hopper is removed, the breech is clear of paintballs, and an ASTM-compliant barrel-blocking device is installed throughout all electrical diagnostics.
Essential Armorer Tools to Diagnose Power Failures
To systematically troubleshoot an electronic marker that refuses to turn on, equip your tournament workbench with these professional diagnostic supplies:
| Tool / Supply Name | Armorer Diagnostic Function | Key Technical Spec | Direct Procurement Link |
|---|---|---|---|
| Klein Tools Digital Multimeter MM400 | Dynamic loaded battery voltage, coil resistance, continuity | Auto-ranging; measures DC voltage, resistance to 40MΩ, audible continuity buzzer | |
| CRC QD Electronic Cleaner (11 oz) | Flushes paint residue, moisture, and oxidation from switches and ribbon pins | Fast-evaporating; zero residue; plastic-safe formulation for delicate PCB assemblies | |
| Duracell Procell Constant 9V (12-Pack) | Premium low-internal-resistance alkaline power source for marker boards | Industrial grade; low Rint (< 0.4Ω); 5-year shelf life; high transient pulse tolerance | |
| Bondhus Ball-End Hex Allen Wrench Set | Precision removal of grip screws, board mounts, and frame retaining fasteners | ProGuard corrosion finish; sizes from 0.050″ to 5/16″; 25-degree working angle |
Video Demonstration: Troubleshooting Power-On Failures
Watch this practical technical demonstration from ANSgearPaintball detailing exact armorer procedures to resolve power-on failures, button misalignment, and battery issues on electronic markers:
Final Armorer Verdict: Fixing a Paintball Gun That Won’t Turn On
When you discover your paintball gun wont turn on, ninety percent of tournament players panic and immediately order an expensive $120+ replacement motherboard. In our armorer testing, catastrophic logic chip failure is exceedingly rare. True resolution follows a disciplined process of elimination: first, install a fresh industrial alkaline 9V battery with low internal resistance; second, peel back the grips and actuate the surface-mount switch directly to rule out worn rubber membrane buttons; and third, isolate downstream shorts by unplugging the solenoid. By systematically validating power delivery before condemning the board, you will save hundreds of dollars and preserve tournament reliability on match day. (Once your marker boots, if you encounter pneumatic hissing, follow our guide on how to fix paintball gun leaks).
Frequently Asked Questions When a Paintball Gun Won’t Turn On
Why my paintball gun wont turn on even with a brand new battery?
Many brand-new batteries purchased from discount stores are heavy-duty zinc-carbon cells rather than high-drain alkaline batteries. While they show 9V open-circuit, their high internal chemical resistance causes terminal voltage to crash under initial boot load. Furthermore, oxidized battery snaps, broken harness solder joints under heat-shrink tubing, or a flattened rubber membrane button can prevent power transfer entirely (in winter tournaments, cold temperatures also exacerbate electrical and cold-weather bolt stick issues).
Can a shorted solenoid cause a paintball gun wont turn on condition?
Yes. Modern electronic paintball boards incorporate solid-state overcurrent protection circuits. If a solenoid wire is pinched against the aluminum frame or if the internal electromagnetic coil windings have melted and shorted (measuring under 5 ohms), the board detects excessive current draw and cuts all system power within milliseconds to prevent PCB trace fires.
How do I know if my membrane power button pad is broken?
Remove the grip screws and peel back the rubber grip to expose the circuit board. Locate the miniature surface-mount push-button soldered directly to the PCB and depress it using the eraser end of a pencil. If the marker powers on instantly when pressing the PCB switch, the electronic circuit board is fine and the rubber membrane pad has worn down or collapsed mechanically.
Is it safe to clean a paintball circuit board with rubbing alcohol?
Use only 99% anhydrous isopropyl alcohol or dedicated quick-drying electronic contact cleaner (such as CRC QD). Never use standard 70% drugstore rubbing alcohol, as the remaining 30% water content takes hours to evaporate and will corrode micro-traces or short sensitive surface-mount capacitors. Disconnect all batteries before cleaning and allow 10 minutes to dry completely.
Can pinched optical eye wires stop an electronic marker from booting?
Yes. Optical eye sensor wires share the regulated 5V power bus from the main microcontroller. If an eye wire is pinched between the grip frame and body during maintenance, it can short the 5V rail directly to the grounded metal chassis. This drops logic voltage to 0V and locks the microprocessor in a continuous reset loop where the marker will not turn on.
What should I do if my battery harness clip has green corrosion?
Green corrosion indicates alkaline battery electrolyte leakage (potassium hydroxide reacting with copper to form copper carbonate). Dip a cotton swab in white vinegar (mild acetic acid) to chemically neutralize the alkaline crust until bubbling stops. Follow immediately by scrubbing with 99% isopropyl alcohol to remove water, then blow dry with compressed air. If metal contacts are severely pitted, solder a new 9V heavy-duty clip to the board.