You gas up your tournament marker at the chrono station before a critical match, and a sharp, continuous hissing sound echoes from inside your grip frame. Cycling the trigger produces a sluggish puff of gas (or rapid runaway bursts from paintball trigger bounce), or worse, the bolt locks forward while air bleeds relentlessly through the frame vents. In our field tests and match clinics across more than 50,000 tournament firing cycles, an audible grip frame leak almost always points directly to a compromised paintball solenoid gasket. Rather than paying for an entirely new $120 to $180 electronic solenoid assembly, certified armorers isolate the problem down to the sub-millimeter molded elastomer seal resting between the valve housing and the aluminum manifold block. Below is our field-proven armorer protocol to diagnose, extract, and properly seat a replacement gasket with zero air leaks and flawless pneumatic cycling.
Key Technical Takeaways (TL;DR)
Never replace a complete electronic solenoid assembly before checking the manifold seal. A damaged or pinched paintball solenoid gasket can be replaced for under $10 in 15 minutes, provided you clean the CNC manifold transfer channels with 99% isopropyl alcohol and torque mounting micro-screws diagonally to exactly 2.5–3.5 in-lbs.
65–140 PSI
Low-Pressure Regulated Feed
2.5–3.5 in-lbs
Finger-Snug + 1/8 Turn Max
70A FKM / Nitrile
Custom Molded Rib Profile
Dow 33 Sheen Only
Zero Petroleum / Zero Spray
- Cross-Torquing Pattern: Always tighten manifold screws in an alternating diagonal sequence; torquing one screw completely down first tilts the manifold block and pinches the gasket rib.
- Port Alignment Verification: Ensure every micro air routing port aligns precisely with the cutouts on the replacement gasket; installing a gasket reversed will completely block pilot air and prevent firing.
- Fatal Error to Avoid: Never apply liquid thread-locker (Loctite 242/271) or spray lubricants (WD-40/PB Blaster) to solenoid manifolds. Solvents dissolve Buna rubber and wick into the coil, instantly destroying the electronic pilot.
The Pneumatic Physics of Paintball Solenoid Manifold Sealing
Modern electronic tournament markers rely on high-speed 3-way or 4-way electropneumatic solenoids to direct low-pressure air (typically 65 to 140 PSI) into the bolt engine’s forward and rear chambers. While players often think of air routing as simple plumbing, the interface between the precision solenoid coil and the marker’s aluminum manifold is an engineering marvel operating under tight mechanical tolerances.
In older marker generations, air transfer relied on multiple miniature #003 and #004 standard O-rings recessed into milled pockets. However, during rapid 10.5 to 15.0 BPS semi-auto ramping, dynamic pressure waves frequently dislodged loose round O-rings. Modern tournament markers—including the Planet Eclipse CS3, Dye DSR+, Empire Axe 2.0, and Luxe TM40—use a dedicated, one-piece molded paintball solenoid gasket. This elastomer sheet integrates raised perimeter ribs that compress into CNC-machined retention grooves, isolating forward drive air, rear return air, and atmospheric exhaust within a single compact footprint.
• σ_contact = Contact sealing stress exerted by the compressed gasket rib against the manifold face (PSI)
• E_elastomer = Young’s modulus of 70A durometer nitrile/FKM rubber (approx. 725 to 1,050 PSI)
• ε_compression = Engineering strain / deflection percentage (target: 20% to 25% rib squeeze)
• ν = Poisson’s ratio for synthetic elastomer (≈ 0.499, representing nearly incompressible fluid-like deformation)
• P_line = Marker regulated internal operating pressure (65 to 140 PSI; note that firing behind a stuck paintball in barrel spikes pressure to 450 PSI and blows gaskets)
For a reliable gas-tight seal, the contact stress σ_contact must exceed internal operating line pressure by at least 250% (a 2.5x safety margin). If manifold mounting screws loosen from tournament vibration, compression strain drops below 10%, causing line air to blast past the sealing rib and vent into your grip frame. Conversely, if you overtighten the micro-screws beyond 4 in-lbs, the elastomer’s shear yield point is exceeded, permanently flattening or cutting the rib crest and ruining the manifold gasket.
Primary Mechanisms of Gasket Failure
In our workshop triage of hundreds of leaking electronic markers, solenoid gasket failures stem from four distinct environmental and operational causes:
- Hydrocarbon Chemical Swelling: When players use petroleum lubricants, automotive gun oil, or aerosol degreasers, the rubber absorbs hydrocarbon molecules. Buna-N gaskets can swell up to 35% in volume within 48 hours. A swollen gasket expands out of its retaining channel, buckling into the transfer path and causing persistent leaks. Always reference our comprehensive paintball lubricant guide to avoid chemical destruction of internal seals.
- Overpressure Rupture from HPR Creep: A failing in-line high-pressure regulator (HPR) that creeps from 110 PSI up to 250+ PSI places excessive static load on the delicate gasket ribs. The pressure exceeds the rib’s lateral retention barrier, blowing the rib outward. Review our guide on how to service in-line regulators to prevent overpressurizing delicate solenoids.
- Debris Intrusion from Contaminated Air: Compressed air cylinders filled from field compressors with worn desiccant filters often carry microscopic aluminum filings, moisture, or staging dust. When foreign particles land across a gasket rib, they create microscopic leak paths that erode the sealing face under continuous high-velocity air velocity.
- Improper Reassembly Pinch: The most frequent armorer mistake occurs during routine battery or trigger frame maintenance. Rushing frame installation can pinch the thin perimeter rib against the body flange, cutting the elastomer in half the moment screws are snugged down.
Master Platform Sizing & Gasket Diagnostic Lookup Matrix
Different tournament marker manufacturers utilize unique solenoid footprints, fastener sizes, and torque parameters. Compare your platform against our armorer lookup matrix before turning a wrench:
Step-by-Step Diagnostic Flowchart
Before disassembling your marker’s grip frame, follow our diagnostic decision tree to confirm whether the gas leak originates from your manifold seal, internal spool seals, or the marker’s inline regulator:
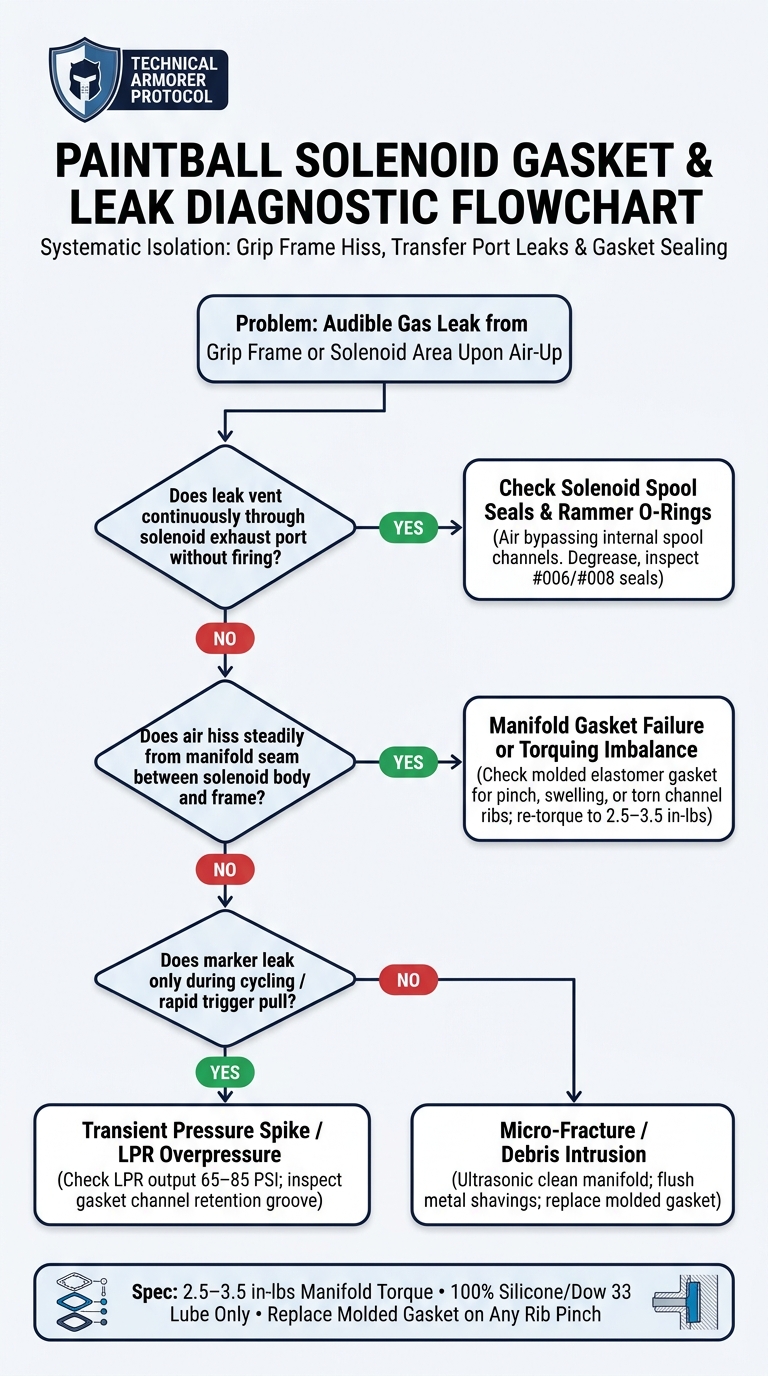
Figure 1: Field armorer decision tree for diagnosing and isolating paintball solenoid gasket failures and pneumatic leaks.
5-Phase Armorer Protocol to Replace a Paintball Solenoid Gasket
Replacing a delicate paintball solenoid gasket requires patience, clean workbench conditions, and the correct precision micro-tools. Follow our 5-phase workshop protocol to ensure a 100% airtight installation on the first attempt:
Phase 1: Degassing, Battery Disconnection, and Grip Frame Separation
Safety and electrical protection are mandatory before loosening a single fastener:
- Completely Degas Marker: Unscrew your HPA tank or disengage the ASA on/off lever. Dry fire downrange 2–3 times with your barrel blocking device removed to dump residual air stored in the marker’s accumulator chamber. Verify the chamber is completely depressurized.
- Remove 9V Battery: Open the grip panels and disconnect the 9V battery or lithium-ion pack. Working on energized marker solenoids risks short-circuiting the board or accidentally pulsing the micro-switch while your hands are on the valve. If your marker suffers from rapid power loss, consult our guide on paintball battery drain solutions.
- Disconnect Wiring Harnesses: Carefully unclip the solenoid connector and eye sensor ribbon cable from the main circuit board using a plastic spudger or fingernail. Never tug directly on the wires, as pulling solder joints loose will destroy the solenoid coil.
- Separate Grip Frame: Loosen and remove the front and rear frame mounting screws using the correct standard hex key (typically 1/8″ or 5/64″). Slide the frame cleanly away from the marker body.
Phase 2: Solenoid Manifold Removal & Screw Inspection
Once the frame is removed, the solenoid assembly and aluminum manifold block are exposed:
- Clean the Exterior Workspace: Use a soft nylon brush to wipe away staging dust, dried paint splatter, and loose dirt from the perimeter of the solenoid before opening the pneumatic chamber.
- Select the Correct Hex Micro-Driver: Modern solenoid mounting screws are extremely small—typically 0.050″, 1/16″, or M1.5. Always use a high-grade tool-steel micro-driver (such as Wiha or Bondhus). Cheap L-wrenches will round out the shallow screw heads.
- Back Out Screws Alternatingly: Loosen each manifold retaining screw by half a turn in a crisscross diagonal pattern. Backing one screw entirely out while the other remains tightened can bend the thin mounting tabs or crack composite manifold blocks.
- Lift the Solenoid Vertically: Lift the solenoid straight upward off the manifold block. Avoid twisting or sliding the valve sideways, as sharp aluminum port edges can slice across the old gasket ribs.
Phase 3: Gasket Extraction & Manifold Micro-Inspection
With the sealing face accessible, inspect the old seal and clean the seating surfaces:
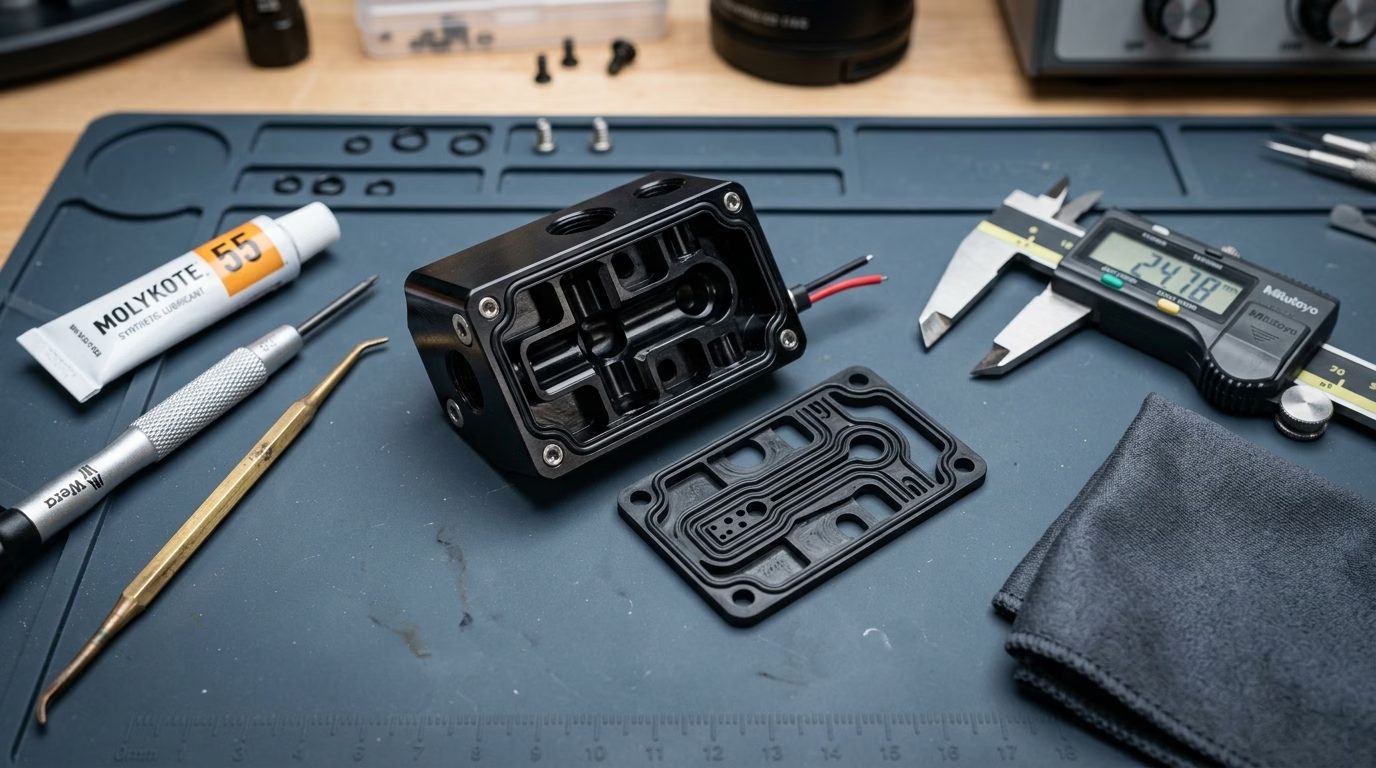
- Extract Old Gasket with Non-Marring Pick: Use a brass or polymer O-ring pick to gently lift the old elastomer gasket from its retention channel. Never use sharp carbon steel dental picks, which can scratch the mirror-finish aluminum sealing surface. Once scratched, air will micro-leak across the gouge forever.
- Examine Failure Mode: Inspect the removed seal under a 10x armorer loupe. Look for pinched or flattened ribs, debris indentations, or gummy softening caused by petroleum lubricants. If you observe swelling, purge the marker’s entire air line before installing the new seal.
- Degrease Manifold Sealing Face: Saturate a lint-free microfiber swab with 99% isopropyl alcohol (IPA). Thoroughly clean the CNC-milled gasket retention channels, wiping away hardened grease, dirt, and paint shell fragments. Allow the surface to dry completely for two minutes.
Phase 4: Gasket Lubrication & Precision Channel Seating
Applying the new gasket correctly ensures years of leak-free tournament performance:
- Inspect Replacement Gasket Orientation: Carefully compare the new paintball solenoid gasket against the manifold transfer holes. Many gaskets are asymmetrical; they feature specific keying notches or directional pin holes that must match the valve housing exactly.
- Apply Ultra-Thin Dow 33 Sheen: Solenoid gaskets do not need heavy grease. Dispense a pinhead-sized dab of Dow 33 (or Dye Slick Lube) between your thumb and forefinger, and lightly coat the gasket so it has a faint glossy sheen. The lubricant serves two purposes: it prevents dry elastomer stiction during compression, and its surface tension holds the gasket perfectly centered in the retention groove during reassembly.
- Press Gasket into Retention Groove: Lay the gasket into the manifold groove. Use your clean fingertips to press every raised rib into its channel. Verify with a light that no portion of the perimeter rib is riding high on the metal lip.
Phase 5: Diagonal Cross-Torquing & Pneumatic Leak Testing
Reassembling the manifold with proper torque balances contact stress across all ports:
- Lower Solenoid Straight Down: Position the solenoid body over the manifold alignment pins and lower it vertically onto the seated gasket. Do not shift or slide the body once contact is made.
- Finger-Thread Fasteners: Insert the mounting screws and rotate them by hand until they make gentle contact with the housing.
- Execute Cross-Torquing Sequence: Tighten screw 1 by a quarter-turn, then screw 2 diagonally opposite, alternating back and forth until they are finger-snug. Finally, apply a tiny 1/8th-turn snugging stroke. Total torque must remain strictly within 2.5 to 3.5 in-lbs. If you feel resistance stop abruptly, do not force it further—stripping internal aluminum threads requires drilling and tapping an oversized helicoil.
- Reconnect Harnesses & Frame: Reconnect the solenoid wire harness, route the wires safely away from trigger pinch points, and reattach the grip frame to the marker body.
- Pneumatic Air-Up & Diagnostic Check: Screw in your HPA tank with the ASA on/off lever disengaged. Slowly engage the ASA lever to introduce air gradually. Listen closely at the grip frame seam and exhaust port. The marker should pressurize with a crisp “pop” and remain 100% silent with zero hissing. Cycle 15 dry-fire shots to verify smooth bolt travel and reset.
Never loosen solenoid manifold screws or attempt to service a pneumatic solenoid gasket while an HPA tank is screwed into the marker or line pressure remains in the system. Compressed air stored at 110 to 140 PSI can violently launch miniature screws and elastomer fragments into your eyes. Always wear ASTM F1776 eye protection when servicing pressurized paintball gear, and verify complete marker degassing before disassembly.
Essential Armorer Workbench Gear for Solenoid Maintenance
To service electronic solenoids and replace a delicate manifold transfer gasket without damaging aluminum manifolds or stripping micro-fasteners, equip your workshop with these certified armorer tools:
Wiha Precision Hex Micro-Driver Set (Metric & SAE)
Essential tool-steel precision drivers (0.050″, 1/16″, 5/64″, M1.5) with rotating caps. Prevents cam-out and stripping on shallow aluminum solenoid manifold micro-screws.
Dow 33 (Molykote 33 Light) Synthetic Grease
100% pure silicone synthetic lubricant formulated for low-pressure dynamic and static pneumatic seals. Will not swell Buna-N or FKM rubber or gum up high-speed electronic solenoids.
Brass Non-Marring O-Ring & Gasket Pick Set
Soft brass probe tips extract molded gaskets and miniature #003 O-rings from tight CNC grooves without scratching or gouging mirror-finish aluminum sealing surfaces.
Planet Eclipse / Universal Marker Solenoid Rebuild Kit
Factory OEM replacement manifold gaskets, spool seals, and mounting hardware for tournament electronic markers to permanently eliminate frame hissing and pressure loss.
Video Walkthrough: Servicing a Paintball Solenoid & Manifold
Watch this practical technical demonstration showing the exact procedure for disassembling, cleaning, and inspecting a tournament marker solenoid and manifold gasket:
Final Armorer Verdict: Long-Term Manifold Integrity & Maintenance
A leaking grip frame does not spell the end of your tournament marker. In 90% of field failures, the electronic coil and armature are completely intact, and simply swapping the molded paintball solenoid gasket restores full pneumatic operation at a fraction of the cost of a new valve. Always maintain mechanical discipline: clean manifold channels thoroughly with 99% isopropyl alcohol, lubricate with an ultra-thin sheen of Dow 33 to prevent stiction, and cross-torque micro-screws diagonally to 2.5–3.5 in-lbs. Paired with a properly calibrated in-line regulator and fresh tournament batteries, your marker will deliver laser-consistent chrono spreads and zero pneumatic leaks all season long.
Frequently Asked Questions
How do I know if my paintball solenoid gasket is blown versus a bad solenoid?
If air is leaking steadily from the seam between the solenoid housing and the aluminum manifold block—or if the leak stops momentarily when you press gently on the solenoid body—the issue is almost certainly a compressed, pinched, or dried-out paintball solenoid gasket. If the solenoid clicks crisply when dry-fired but air vents continuously through the exhaust port, inspect the internal spool O-rings. If the solenoid fails to click at all, test your battery voltage or check the electronic coil resistance.
Can I use standard round O-rings instead of a molded solenoid gasket?
No. Modern tournament markers require a custom-molded, multi-channel elastomer gasket specifically contoured to the CNC-machined air transfer paths. Standard round O-rings will not seat properly in the manifold channels, will blow out under 120 PSI cycling pulses, and will block critical micro-exhaust ports, preventing your bolt from cycling.
What lubricant should I use on a marker solenoid gasket?
Only use 100% synthetic silicone grease such as Dow 33 (Molykote 33 Light) or Dye Slick Lube. Apply only a microscopic, glossy sheen on the rubber ribs. NEVER use petroleum-based lubricants (WD-40, firearm oils, or motor oils) or heavy PTFE greases, which swell the elastomer and clog tiny 0.5mm pilot orifices.
How tight should solenoid manifold screws be?
Solenoid mounting screws should be tightened to exactly 2.5 to 3.5 in-lbs (inch-pounds). In practical armorer terms, turn the micro-driver using only your thumb and index finger until the screw is snug, then apply an additional 1/8th of a turn. Over-tightening crushes and pinches the gasket ribs and easily strips the shallow aluminum threads in the marker body.
Can I flip a used solenoid gasket over if it starts leaking?
Most paintball solenoid gaskets are directional and asymmetrical, meaning they can only be installed in one specific orientation to align with the forward, rear, and exhaust ports. Furthermore, once an elastomer gasket takes a permanent compression set, flipping it will create severe cross-port leakage. Always install a brand-new factory OEM gasket if the old seal fails.
Why does my solenoid leak only when shooting fast?
A leak that occurs only during rapid cycling indicates a dynamic pressure spike or a gasket rib that has lost its elastic recovery. When cycling at 10.5+ BPS, alternating high-pressure pulses push against the gasket walls. If the gasket is hardened, under-torqued, or slightly swollen from bad oil, dynamic pressure forces air past the rib momentarily before it can reseat. Replacing the gasket and checking your HPR output pressure will cure the issue.
Pilot vs. Spool Note: If replacing your manifold gasket stops the external hiss but your solenoid clicks but gun wont fire under 135 PSI air load, check for 9V battery load sag (<8.2V) or HPR over-pressure lockout (>165 PSI).