ASTM F1776 • Dual-Pane Thermal Safety Standard
Rapid Field Diagnostic: Paintball Mask Thermal Lens System
Knowing how to change paintball lens assemblies properly is the single most critical safety and performance skill in tournament and woodsball play. A high-grade thermal lens relies on an optically tuned 2.0mm outer polycarbonate shield bonded to an inner 0.5mm anti-fog acetate pane with a hermetically sealed closed-cell silicone foam gasket. Over 90% of mid-game lens failures trace back to compromised thermal perimeter gaskets, micro-fractures from point-blank 300 FPS impacts, or chemical degradation caused by washing the delicate inner pane with tap water or glass cleaners.
In our tournament armorer bays and field clinics, eye protection is the one non-negotiable component of a player’s gear bag. While an air leak or broken detent costs you a point, a compromised goggle lens risks permanent retinal trauma. Every competitive player must understand how to change paintball lens components correctly, identify when thermal isolation has failed, and execute flawless frame lock swaps before stepping onto the grid.
Whether you shoot a flagship marker like the Planet Eclipse CS3 or run mechanical woodsball leagues, pristine vision dictates your field awareness. If you are also fine-tuning your marker’s pneumatic reliability, cross-reference our field guides on Planet Eclipse POPS ASA service, explore Dye eye pipe replacement and maintenance, or review our in-depth breakdown of the Dye i5 paintball goggle review.
1. Anatomy & Physics: How Paintball Thermal Lenses Prevent Fogging
Single-pane goggle lenses fog up almost instantly under intense physical exertion because of rapid thermal transfer. When your body radiates exhaled moisture and heat at 98.6°F (37°C) against an ambient air temperature of 50°F (10°C), the dew point is instantly breached on the cold inside surface of a single plastic sheet. Microscopic water droplets condense across the optical plane, causing total white-out fogging.
A genuine dual-pane thermal goggle lens solves this problem through thermodynamic insulation, operating on the exact same scientific principle as double-paned architectural storm windows. The outer pane consists of high-density polycarbonate engineered to absorb 15 Joules of kinetic energy from direct 300 FPS paintball impacts under ASTM F1776 testing standards. Behind it sits a secondary thin pane of cellulose acetate, separated by a 0.5mm hermetically sealed dry air cavity and a closed-cell silicone foam boundary. This trapped air gap isolates the internal surface from external temperature shock, keeping the inside pane at ambient facial temperature so water vapor never reaches dew point.
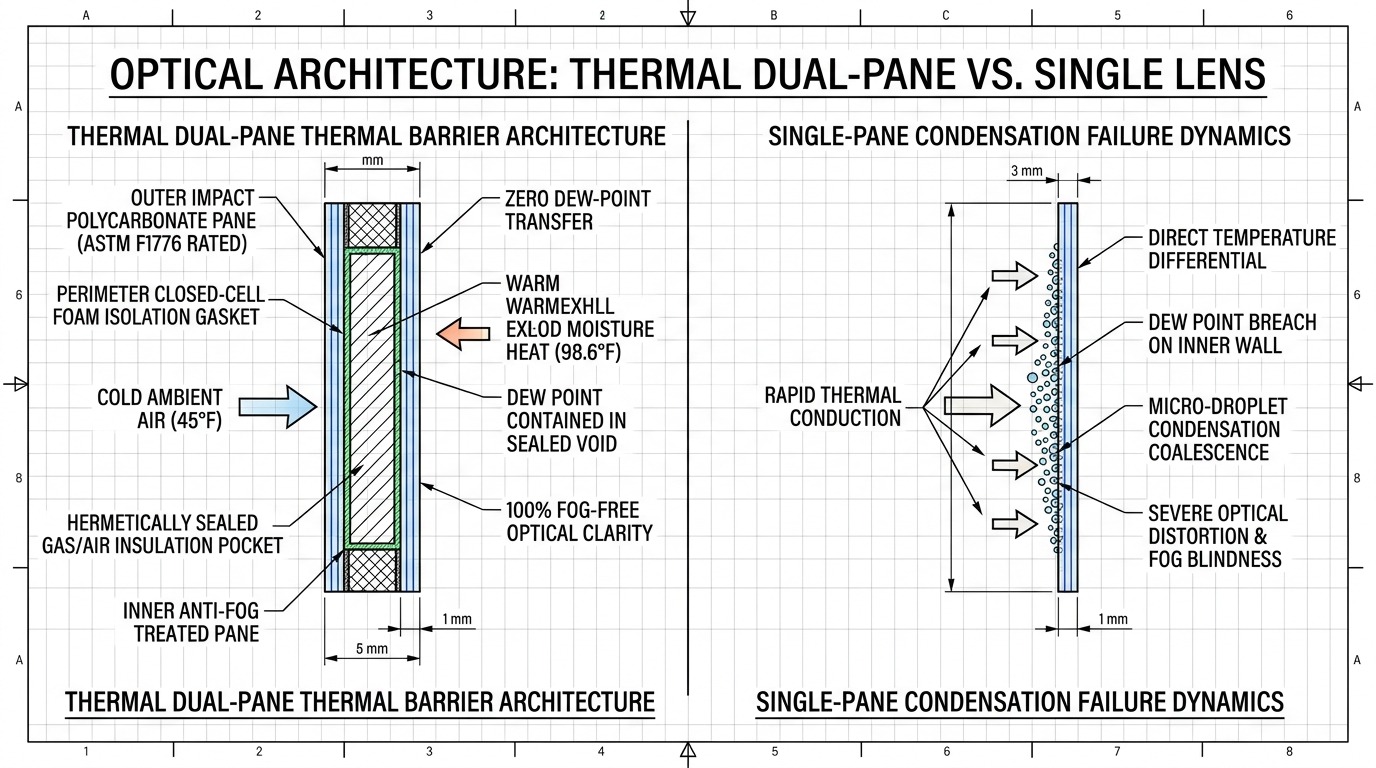
To understand the environmental factors that test this thermal barrier under extreme climate swings, read our technical analysis on paintball goggle fog risk and compare overall frame breathability in our roundup of the best paintball masks.
2. Master Goggle Matrix: How to Change Paintball Lens Across Major Platforms
Different goggle manufacturers employ distinct retention architectures. Quick-change systems like the Dye i4/i5 and Virtue CMD take under 30 seconds to service, whereas heritage platforms like the JT Proflex require meticulous rubber tab seating. The matrix below contrasts retention mechanisms, lens thicknesses, and safety protocols across leading tournament platforms.
| Goggle Platform | Retention Mechanism | Swap Speed | Lens Thickness & Coating | Critical Armorer Note |
|---|---|---|---|---|
| Dye i4 / i5 | Internal slide-lock tabs | < 25 Seconds | 2.0mm Polycarbonate + Dyetanium UV | Push side lock tabs forward from inside ear frame until positive click. |
| Virtue CMD / VIO | Hinge-lock side clips | < 20 Seconds | 2.0mm Dual-Pane Cylindrical | Pry locking clip forward from outside; hinge pivots upward freely. |
| JT Proflex / Proshield | 8 Rubber Bezel Tabs + Frame Prongs | 3 – 5 Minutes | 1.8mm Spectra Dual-Pane | Requires pushing rubber ear strap retainers through frame. Do not tear rubber. |
| Empire EVS | Quarter-turn twist locks | < 30 Seconds | 2.2mm Spherical Polycarbonate | Rotate interior side keys 90 degrees; spherical lens pulls directly outward. |
| HK Army HSTL / SLR | Dual push-pin side clamps | < 35 Seconds | 2.0mm High-Def Optic Pane | Compress external retaining clips inward while pushing lens out from nose bridge. |
| Carbon OGS / CRBN | Magnetic quick-lock slide | < 15 Seconds | 2.0mm Injected Optical Polycarbonate | Depress top frame levers to release magnetic retaining prongs instantly. |
Regardless of the system you run, mastering how to change paintball lens procedures guarantees that you can quickly swap from a tinted mirrored lens during glaring midday matches to a high-contrast yellow or clear optic when cloudy squalls hit the field.
3. Armorer Workbench: Essential Lens Care & Replacement Gear
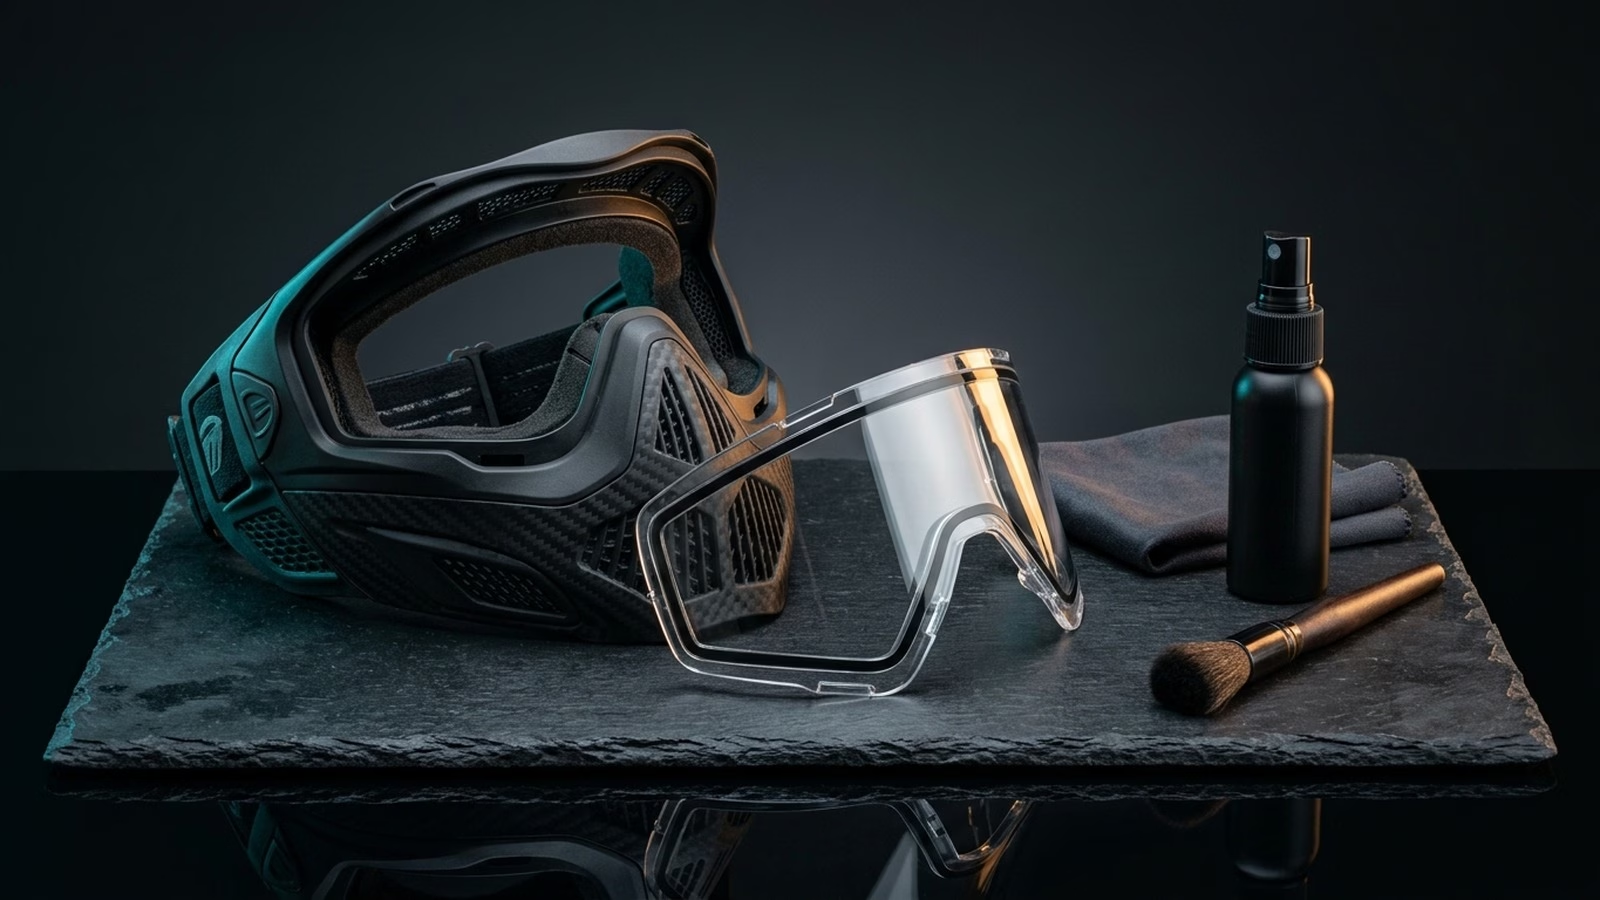
Before you begin learning how to change paintball lens swaps on your workbench, assemble the proper maintenance tools. Harsh chemicals, abrasive paper towels, or household glass sprays will permanently ruin polycarbonate and strip the microscopic anti-fog coating on the inner acetate pane.
- Optical Microfiber Cloths: Ultra-soft 300+ GSM lint-free microfiber specifically designed for delicate optical surfaces. Never use your field jersey or paper towels, which embed micro-scratches.
- Distilled Water Spritzer: The safest cleaning liquid for the outer polycarbonate lens. Tap water contains minerals that leave abrasive deposits.
- Specialized Paintball Lens Cleaner: Alcohol-free and ammonia-free spray formulated without surfactants that could dissolve perimeter foam adhesives.
- Polymer Tech Pick / Spudger: A soft nylon tool used strictly to tease stubborn JT Proflex rubber tabs into position without puncturing the goggle frame.
- Microfiber Goggle Bag: Protects your freshly installed thermal lens inside your gear bag from zipper scratches and barrel tip abrasions during transit.
If you are organizing your gear for off-season storage or major tournaments, make sure you store your goggles in a climate-controlled room. Read our complete guide on paintball marker storage guide to prevent foam rot and seal dry-out across your entire gear collection.
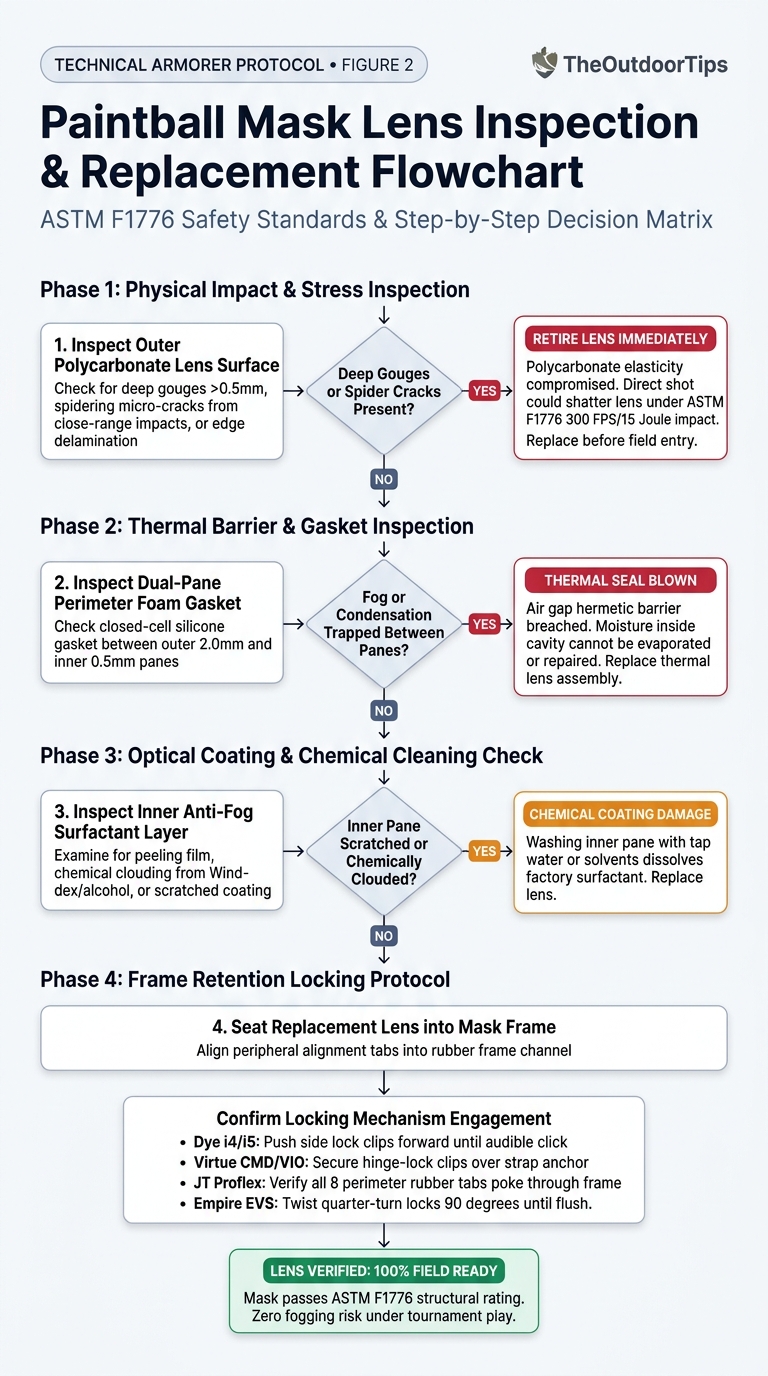
4. Step-by-Step Armorer Protocol: How to Change Paintball Lens Safely
Executing a proper lens replacement requires steady mechanical discipline. Forcing tabs or flexing the goggle frame unevenly can crack retaining clips or crease the thermal perimeter gasket. Follow this five-phase armorer walkthrough detailing how to change paintball lens swaps across modern tournament platforms.
Phase 1: Pre-Service Inspection & Cleaning
Before disassembling your mask, wash all field paint, dirt, and splatter from the external frame using warm water. If sand or dried paint fills the retention grooves while you unlock the lens, abrasive grit will grind against the lens sealing channel. Inspect the outer surface for point-blank impact spidering or gouges greater than 0.5mm. Under ASTM F1776 regulations, any lens exhibiting structural cracking must be immediately retired.
Phase 2: Disengaging Brand Retention Locks
Unlock the retention mechanism according to your specific goggle chassis:
- Dye i4/i5: Reach inside the ear piece area. Press the internal release button and firmly push the side slide-lock forward toward the lens until it unlocks. Repeat on the opposite side.
- Virtue CMD/VIO: Locate the exterior hinge clips on the strap anchors. Pull the front tab forward; the retaining clamp hinges upward 90 degrees to free the strap and lens prongs.
- JT Proflex: Release the strap buckle retainers from the frame. Carefully peel the soft rubber lower frame and upper brow bezel away from the eight molded perimeter tabs.
- Empire EVS: Reach inside the goggle behind the strap anchor. Turn each internal locking key 90 degrees until the horizontal indicator aligns with the unlock arrow.
Phase 3: Extracting the Old Lens & Channel Decontamination
Grip the old lens by the nose bridge and push forward away from the frame while gently flexing the rubber brow upward. Once the lens is free, inspect the rubber channel in the goggle frame. Over seasons of play, liquid paint, sweat salts, and mud accumulate inside this recessed track. Dip a microfiber swab in warm distilled water and wipe the track pristine clean. Let the rubber frame air dry completely before introducing the replacement lens.
Phase 4: Seating the Replacement Thermal Lens
Take your new thermal lens and remove the protective plastic shipping film from the inside and outside surfaces. Align the central nose bridge tabs into the goggle frame first. Work outward toward the temples, pressing the lens perimeter firmly into the rubber channel until all retention grooves are completely flush. Ensure the closed-cell foam thermal gasket is not pinched or twisted against the goggle frame edge.
Phase 5: Engaging Retention Locks & Push-Through Test
Engage the brand-specific locking mechanisms: slide the Dye side-locks backward until you hear a sharp, metallic click; snap the Virtue hinge clips down over the strap anchors; or press the JT tabs through the rubber bezel holes. Finally, perform the mandatory armorer push-through safety check: place both thumbs inside the goggle on the lens and push outward with moderate force (15 to 20 lbs of pressure). A properly seated lens will not budge or dislodge from the perimeter track.
When conducting tournament preparation clinics, we demonstrate how to change paintball lens swaps repeatedly until players can execute the swap blindfolded. If you also service your marker’s front-end drivetrain, check our step-by-step guides on how to clean paintball barrel assemblies and learn how to remove stuck Freak insert sleeves safely.
CRITICAL ASTM F1776 LIFE SAFETY DIRECTIVE
Never play with a cracked, deeply gouged, or compromised paintball mask lens. Paintballs exit tournament markers at velocities up to 300 FPS (204 mph), generating upwards of 15 Joules of kinetic energy. A degraded lens can shatter on direct impact, resulting in catastrophic optical puncture injuries. Discard and replace any lens subjected to direct impacts closer than 10 feet, lenses older than 12 months of active play, or lenses displaying internal gasket moisture breaches.
5. Video Walkthrough: Quick-Change Thermal Lens Replacement
Watch this technical walkthrough demonstrating the rapid release tabs, optical channel cleaning, and locking retention engagement on tournament goggle systems.
6. Four Fatal Lens Care Mistakes That Ruin Anti-Fog Coatings
Even the most durable thermal lens can be destroyed in seconds by improper cleaning methods. When players ask us how to change paintball lens questions at tournament tech booths, we frequently discover that their persistent fogging issues were self-inflicted. Avoid these four fatal maintenance mistakes:
The inside lens is coated with a microscopic surfactant chemical film that absorbs moisture. When you run water over it or spray glass cleaner, the surfactant dissolves and turns gummy, ruining the anti-fog barrier permanently. Only use a completely dry microfiber cloth on the inside pane.
Soaking a thermal lens in a sink or bucket breaches the perimeter closed-cell foam gasket. Water seeps into the sealed 0.5mm air cavity between the panes. Once liquid is trapped between the two sheets, it can never be evaporated or evacuated, creating permanent fog and mildew.
Wiping a lens mid-match with a dirty jersey or muddy towel grinds silica sand and dried paint shells into the polycarbonate surface. This creates fine spiderweb scratches that catch direct sunlight, creating blinding glare on the field.
Leaving your goggle bag in a hot vehicle trunk during summer causes interior temperatures to surpass 140°F (60°C). Extreme ambient heat melts the silicone adhesive securing the thermal gasket, causing pane delamination and warping.
For complete marker reliability troubleshooting when other components fail during humid match days, consult our armorer guides on paintball chopping paint troubleshooting, diagnose electronic triggers via paintball trigger bounce causes and fixes, or resolve velocity issues with our paintball FSDO first shot drop off fixes.
7. Final Armorer Verdict: Optical Clarity vs Tournament Safety
Replace Early, Inspect Regularly, and Respect the Thermal Gasket
Mastering how to change paintball lens swaps is the ultimate insurance policy for any competitive or recreational paintballer. A top-tier marker and high-end loader cannot compensate for foggy vision or an ASTM safety compromise. Treat your thermal lens as a high-precision consumable component: inspect the outer polycarbonate after every match for impact pitting, replace the lens annually regardless of visible wear, and clean the inner pane strictly with a dry microfiber cloth.
By following our step-by-step diagnostic protocol, you ensure optical clarity, eliminate mid-game fogging, and protect your vision for decades of competitive paintball.
8. Frequently Asked Questions (FAQ)
How often should you execute how to change paintball lens on your goggle?
Armorer safety standards recommend replacing your thermal paintball lens at least once per year under regular play, or immediately after taking a point-blank impact (under 10 feet). Additionally, if you notice condensation or moisture trapped between the dual panes, the perimeter thermal seal has blown and the lens must be replaced before your next match.
Can you wash a thermal lens with tap water or Windex?
Never wash the inside surface of a thermal lens with tap water, Windex, or alcohol. The inner pane is coated with a hydrophilic surfactant that dissolves upon contact with water or solvents. Use warm distilled water on the outer polycarbonate lens only, and wipe the inner pane strictly with a dry, clean microfiber cloth.
Why is condensation trapped between the two panes of my thermal lens?
When condensation appears inside the sealed air cavity between the inner and outer panes, the closed-cell silicone foam perimeter gasket has suffered a hermetic breach. This can occur from aging adhesive, flexing the lens during aggressive washing, or submerging the mask in water. A breached thermal gasket cannot be dried out or repaired; it requires immediate lens replacement.
Are paintball mask lenses interchangeable between different brands?
No. Paintball mask lenses are proprietary to specific goggle models or brand families. For example, Dye i4 and i5 lenses are cross-compatible with each other, but will not fit Virtue CMD or JT Proflex frames. Always verify that your replacement lens matches your exact goggle frame model.
What should you do if your goggle retention lock fails to click?
If a retention clip (such as on a Dye i5 slide-lock or Virtue CMD hinge) fails to click into its locked detent, do not force it. Remove the lens and inspect the perimeter track for accumulated dirt, sand, or dried paint. Clean the frame channel with a microfiber swab and re-seat the lens evenly before re-engaging the locks.