BENCH VERIFIED 2026
Executive Armorer Takeaways: Dye 4th-Gen Eye Pipe Maintenance
In our tournament tech clinics and bench servicing across DSR+, M3+, and Rize platforms, a damaged or contaminated dye eye pipe accounts for over 80% of optical breech failures, false chop-prevention faults, and double-feeding ball breaks. Mastering its 4th-generation polycarbonate architecture, integrated detent tension, and chemical cleaning boundaries ensures seamless 15+ BPS cycling without breech jams.
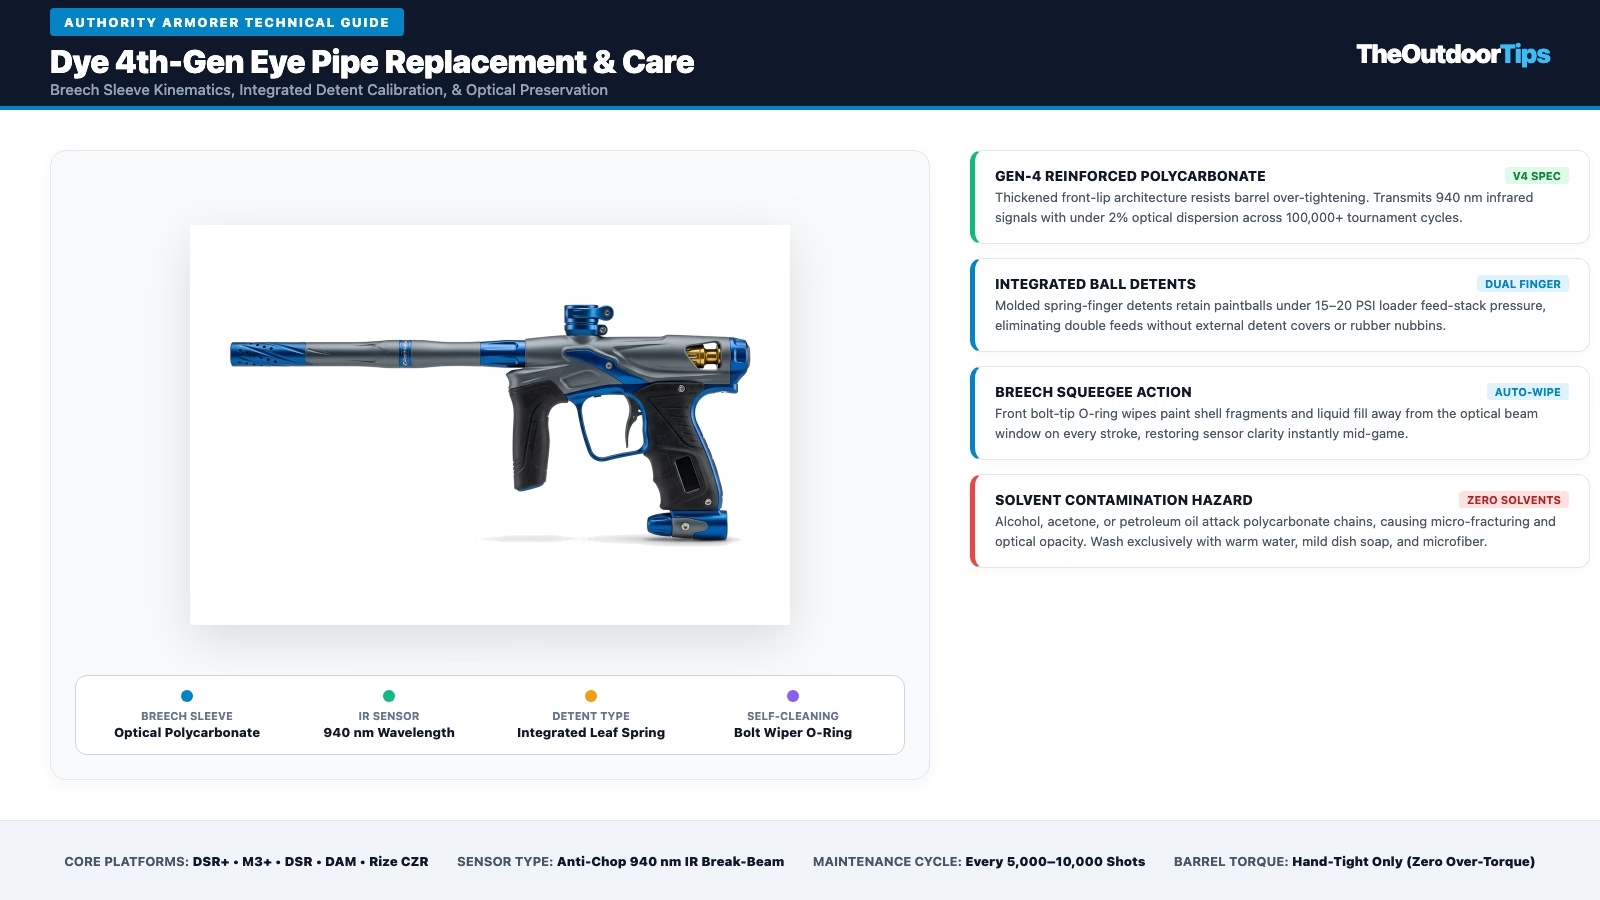
- Optical-Grade Polycarbonate Shell: The Gen-4 sleeve houses the anti-chop infrared path inside the breech, eliminating stripped external eye-plate screws and pinched wire harnesses.
- Chemical Incompatibility Warning: Never expose polycarbonate to isopropyl alcohol, acetone, or mineral solvents. Chemical stress cracking creates instant cloudiness, attenuating the 940 nm IR beam below the receiver threshold.
- Over-Torque Protection: Screwing a tournament barrel into the body past hand-tight crushed the front flange on older generations; the reinforced Gen-4 lip prevents fractures when torqued properly.
Dye Precision fundamentally changed competitive tournament marker engineering when it discarded external eye covers, wire bundles, and exterior rubber detents in favor of the patented internal breech sleeve. If you run a high-performance spool marker like the standard DSR+ and the factory-tuned Dye DSR+ IM Pro Review platform, the standard Dye DSR+, the smart-board flagship Dye M3+, the tactical mag-fed Dye DAM, the tournament workhorse Dye Rize CZR (and its upgraded sibling in our Dye Rize CZR Upgrades Guide), or the ARC-X spool engine reviewed in our Dye MXR Review, every single ball loaded and fired passes directly through this component.
When properly maintained, the dye eye pipe provides flawless ball detection and detent retention. However, rough field handling, solvent contamination, or forgotten paint residue can lead to erratic optical faults, unexpected dry-firing lockouts, and ball breakage. In this comprehensive diagnostic bench guide, we detail the engineering behind the 4th-generation upgrade, step-by-step extraction protocols, detent calibration mechanics, and safe decontamination standards tested under live tournament conditions.
1. Engineering Architecture: How the Dye Eye Pipe Functions
Traditional tournament markers mount transmitter and receiver diodes through holes drilled directly in the receiver walls, protected on the outside by removable metal plates and tiny metric screws. While functional, that legacy design suffered from stripped threads, pinched eye wires, and ball detents that clogged with liquid fill after a single mid-match ball break.
The internal dye eye pipe solves this by moving the entire optical envelope into a self-contained, seamless cylindrical sleeve fabricated from optical-grade polycarbonate with a refractive index of approximately 1.58. Infrared light emitted from the 940 nm diode traverses the clear polycarbonate wall, crosses the 0.68 caliber chamber, passes through the opposing wall, and registers on the receiver phototransistor.
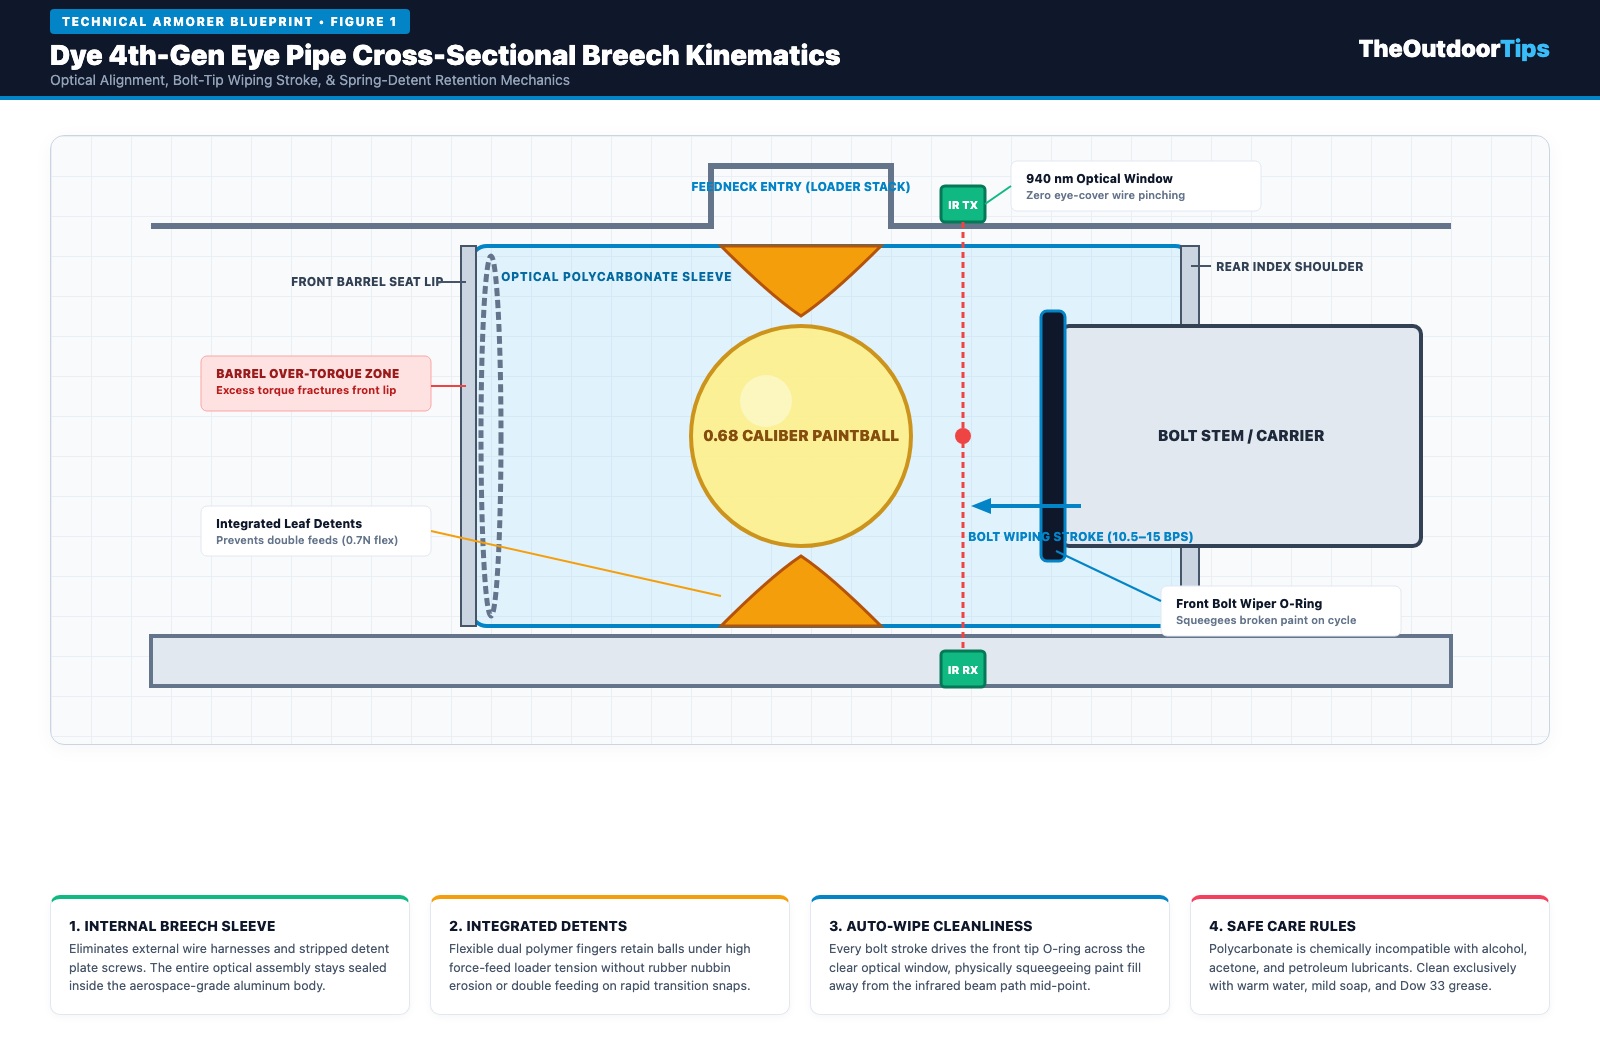
The Auto-Wiping Bolt Cycle Mechanism
One of the most significant engineering innovations of the system is the active breech squeegee stroke. When an errant paintball ruptures in the feed stack or barrel entry, fill coats the interior walls. On conventional markers, this blinds the optical sensors, forcing the board into default eye-fault mode (capping rate of fire to 10.2 BPS or slower).
On markers equipped with the dye eye pipe, the front tip of the bolt carrier is equipped with an external bumper O-ring. On every forward stroke (cycling between 10.5 and 15.0 BPS), this O-ring mechanically squeegees paint fill and shell debris away from the optical beam window and drives it into the barrel porting, instantly clearing the optical path without requiring a squeegee break during the point.
Optical Transmission & Attenuation Physics
The optical logic operates according to the Beer-Lambert law of radiation attenuation:
Where I is transmitted infrared intensity, I0 is emitted beam strength, α is the absorption coefficient of the sleeve wall, and x is wall thickness.
When clean, transmission efficiency exceeds 98%. However, when contaminated with petroleum grease or solvent haze, the absorption coefficient α spikes dramatically, dropping transmitted intensity below the board’s 12 ms threshold and triggering false empty-breech readings.
2. Generational Evolution: Gen 1 Through Gen 4 Upgrades
Dye has refined the breech sleeve through four distinct generations since its introduction on the DM8 platform. Understanding which generation your marker uses prevents ordering incompatible replacement parts or suffering premature shell failure:
| Generation | Structural Wall Spec | Ball Detent System | Marker Compatibility | Common Failure Point |
|---|---|---|---|---|
| 1st-Gen (DM8–DM11) | Thin-wall clear acrylic (1.1 mm) | External rubber nubbins through slot | DM8, DM9, DM10, DM11, Reflex Rail | Fragile front lip cracked under barrel torque |
| 2nd-Gen (DM12–DM15) | Standard polycarbonate (1.4 mm) | External metal leaf spring clips | DM12, DM13, DM14, DM15 | Detent spring clips bent out of calibration |
| 3rd-Gen (M2 / DSR) | Reinforced polycarbonate (1.6 mm) | Integrated flexible polymer fingers | Dye M2, early DSR, Proto Rize | Detent fingers fatigued under force-fed loaders |
| 4th-Gen (Current Spec) | Heavy-duty optical polycarbonate (1.85 mm) | Reinforced independent spring detent clip | DSR+, M3+, DSR, DAM, Rize CZR, MXR | Highly durable; solvent clouding if abused |
The 4th-Gen upgrade is backward-compatible with most modern spool bodies. When servicing markers in our bench shop, we routinely replace damaged 2nd- and 3rd-Gen sleeves with the genuine 4th-Gen unit to eliminate recurrent ball-break headaches permanently.
3. Step-by-Step Replacement: Extraction & Installation Protocol
Replacing or cleaning the dye eye pipe requires zero hand tools, making it one of the fastest maintenance routines in modern paintball. Follow this standardized armorer sequence:
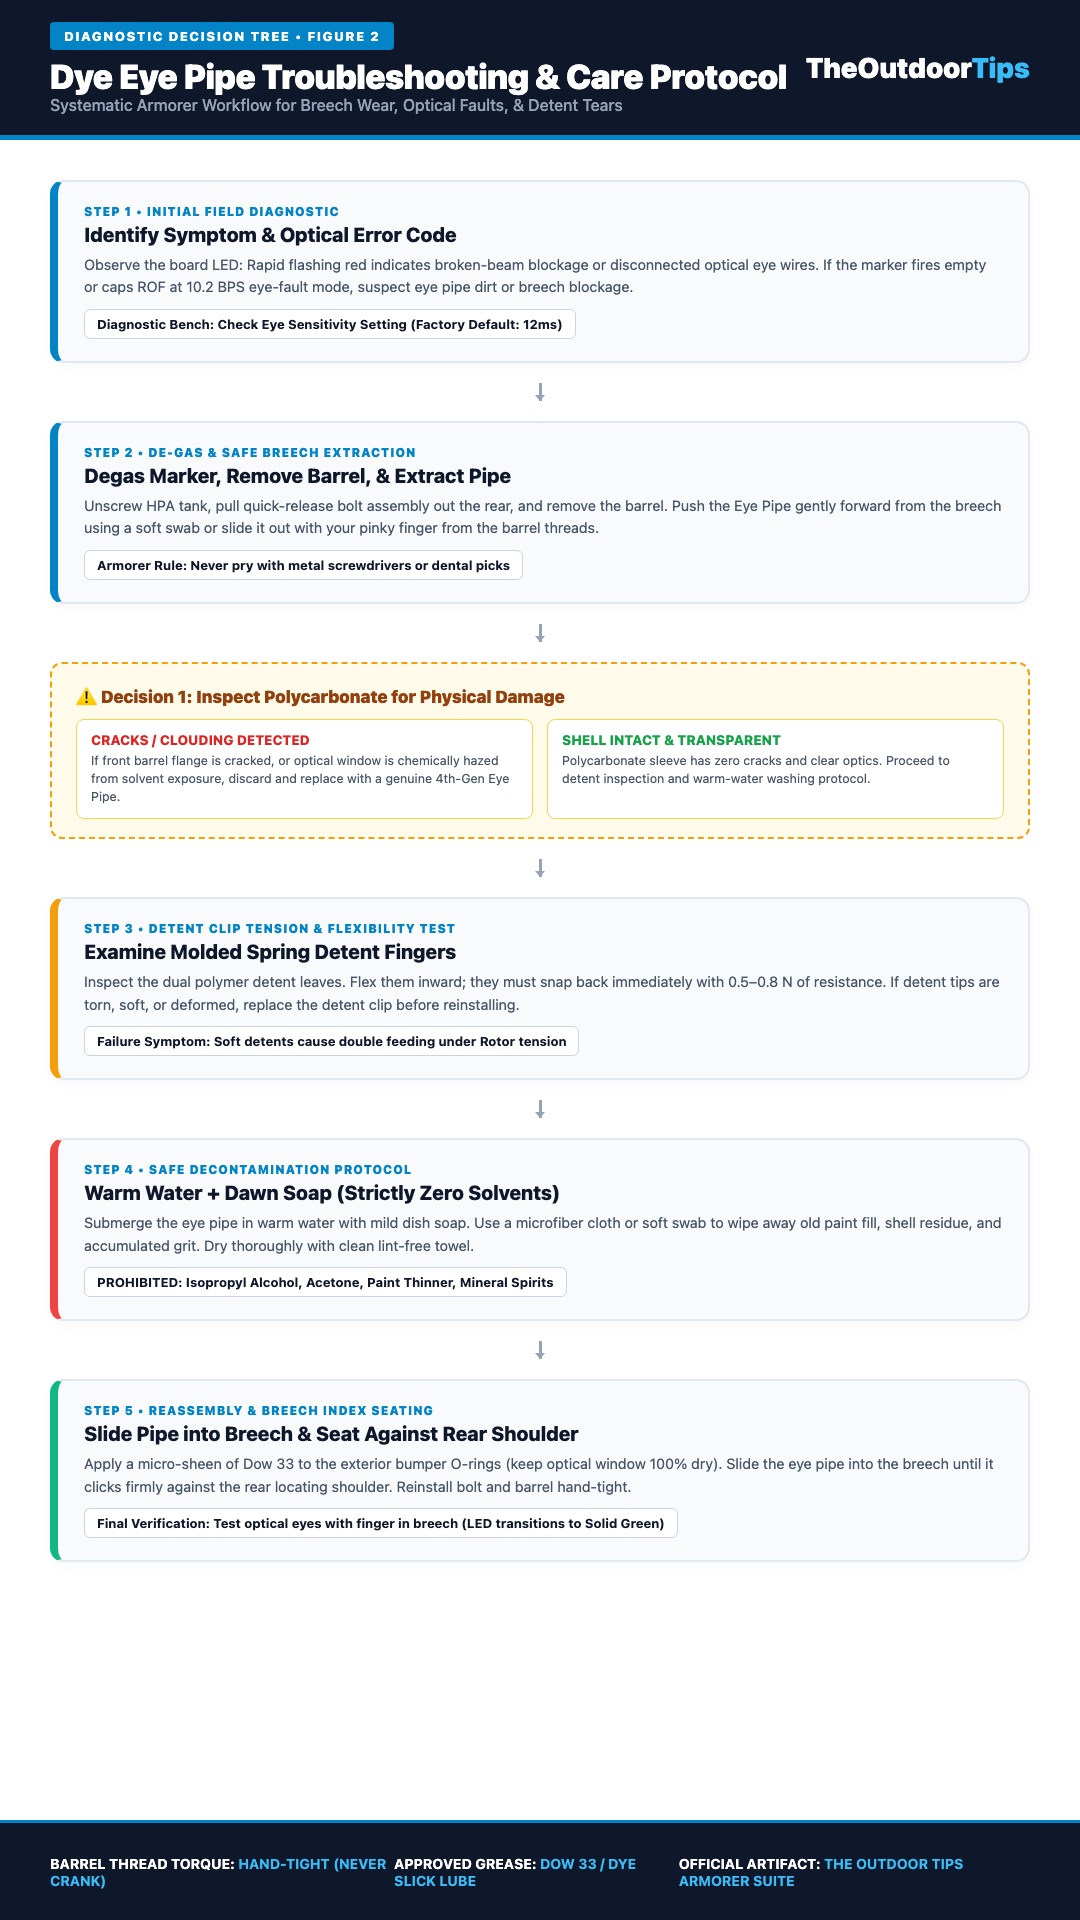
Step 1: Decompress & Field-Strip the Marker
Before handling the breech, disengage the on/off ASA lever to purge stored gas. Pull the trigger in a safe direction (ensuring your switch is calibrated per our Dye Ultralite Trigger Tuning Guide) to confirm zero pressure remains in the solenoid manifold (preventing the seal leaks covered in our Solenoid Clicks But Gun Won’t Fire Diagnostic). Unscrew your barrel and set it on a padded armorer mat (if paint fragments are jammed in the bore, follow our How to Remove Stuck Paintball Guide). Push the quick-release rear bolt button on your Dye DSR+ or M3+ and slide the entire bolt engine rearward out of the receiver body (inspecting rear bolt sails for friction as detailed in our Paintball Bolt Stick in Cold Weather Guide).
Step 2: Safe Extraction from the Breech
With the bolt engine removed, you can see the rear locating shoulder of the dye eye pipe through the rear breech bore. Never use metal dental picks or flathead screwdrivers to pry against the sleeve edges—polycarbonate is tough against compressive force but will chip under sharp metal edges. Instead, push the sleeve gently forward from behind using a soft rubber barrel swab or insert your pinky finger into the front barrel threads to guide the pipe forward out of the body.
On 4th-Gen units, the ball detent leaf clip wraps around the exterior of the pipe. As you slide the pipe forward through the barrel threads, ensure the flexible detent fingers do not catch on the inner threads. Guide the pipe smoothly with even forward pressure.
Step 3: Structural & Detent Spring Inspection
Hold the extracted sleeve up to a bright workbench light and examine two critical inspection zones:
- Front Stop Flange: Look for hairline stress cracks radiating from the front rim. If hairline fractures exist, the sleeve will flex under barrel pressure, distorting optical alignment.
- Detent Leaf Fingers: Press the dual spring fingers inward with your finger. They should require 0.5 to 0.8 Newtons of resistance and snap back instantly. If a finger remains depressed, is torn, or exhibits white stress marks at the root, pop off the detent clip and snap on a replacement.
Step 4: Decontamination Protocol (Zero Solvents Rule)
Wash the pipe in warm tap water mixed with two drops of mild liquid dish soap (Dawn). Gently wipe the optical windows and detent grooves with a clean microfiber cloth. Never soak the sleeve in solvents or wipe it with isopropyl alcohol wipes. Rinse with clean water and blow dry with low-pressure compressed air or dab with a lint-free towel.
Step 5: Re-Insertion & Alignment Shoulder Seating
Inspect the rubber bumper O-ring on the front outside diameter of the pipe. Apply a microscopic film of Dow 33 or Dye Slick Lube to this exterior bumper to ensure smooth seating. Do not allow grease to migrate onto the optical windows or detents. Orient the detent fingers so they align with the vertical feed axis (facing up/down toward the feedneck entry) and slide the pipe into the front breech until it stops flush against the internal receiver shoulder.
Reinstall the bolt assembly, lock the quick-release latch, and thread in your barrel hand-tight. Power on the board (if the console fails to boot, consult our Electronic Paintball Gun Not Turning On Checklist) to confirm the optical status LED illuminates solid green when a finger breaks the beam without trigger stutter (which can be cured with our How to Stop Trigger Bounce Guide).
4. Troubleshooting Diagnostic Matrix: Symptoms & Field Fixes
When optical or feeding errors strike in the staging pits, consult this rapid field diagnostic matrix to pinpoint whether the root cause is pipe contamination, detent fatigue, or barrel over-torque:
| Symptom / Scenario | Root Cause / Physics Mechanism | Armorer Fix / Field Counter | Required Tool / Gear |
|---|---|---|---|
| Flashing Red LED (Eye Fault / ROF Capped) | Paint residue or grease film on inner window attenuating 940 nm IR beam | Extract pipe; clean with warm water and microfiber. Inspect rear receiver diodes. |
Amazon: Microfiber Kit eBay: Lens Swabs |
| Double Feeding / Barrel Ball Rollout | Detent leaf fingers fatigued or torn; holding force drops below 0.4 N under stack tension | Replace snap-on detent leaf clip. Verify 0.7 mm interference fit against ball belly. |
Amazon: Dye Detents eBay: Gen-4 Detent Clips |
| Breech Paint Breaks on High-Rate Ramping | Front lip crushed from overtightened barrel, canting the sleeve and cutting paint shells | Inspect front lip for lip flare or chips. Replace sleeve; tighten barrels hand-snug only. |
Amazon: Gen-4 Eye Pipe eBay: Dye Eye Pipe Kit |
| Persistent Optical Blindness (Eyes Disabled) | Polycarbonate fogged permanently by alcohol or acetone solvent cleaning | Polymer chains chemically broken. Sleeve is scrap. Replace with genuine 4th-Gen pipe. |
Amazon: Dow 33 Lube eBay: Slick Lube Tub |
5. Chemical Safety & Cleaning Compatibility Standards
The number one cause of premature dye eye pipe replacement in competitive paintball is chemical abuse. Many players carry alcohol prep wipes or industrial degreasers in their gear bags to clean grease off bolts. Applying these substances to polycarbonate produces catastrophic failure:
- Isopropyl Alcohol (IPA): Attacks polymer bonds, causing micro-crazing and milky optical hazing within 30 minutes.
- Acetone & Brake Cleaner: Immediately dissolves polycarbonate on contact, melting the sleeve geometry.
- Petroleum-Based Gun Oils: Softens polymer structure and swells rubber detent clips.
- Warm Tap Water: Safely dissolves water-soluble polyethylene glycol (PEG) paintball fill without chemical reaction.
- Mild Dish Soap (Dawn): Breaks down grease and shell residue gently without polymer oxidation.
- 100% Synthetic Silicone Grease: Dow 33 or Dye Slick Lube applied sparingly to exterior locating O-rings only.
6. Video Tutorial: Breech Sleeve Engineering & Bench Maintenance
Watch this technical walkthrough from Dye Precision explaining the internal engineering of the breech sleeve, self-cleaning wiper mechanics, and detent clip retention under live tournament conditions:
7. Armorer Verdict: Best Practices for Maximum Reliability
The 4th-Gen dye eye pipe remains one of the cleanest, most maintenance-friendly breech designs in modern competitive paintball. By removing external eye covers and delicate wiring harnesses from the marker exterior, Dye eliminated the stripped screws, pinched leads, and moisture ingress problems that continue to plague competing tournament markers.
To ensure your setup operates at peak reliability across entire tournament seasons, implement these three non-negotiable bench practices:
- Keep a Spare 4th-Gen Assembly in Your Gear Bag: Even with reinforced polycarbonate, an accidental drop on concrete or an aggressive barrel swap in the staging pits can chip the front lip. Carrying a backup pipe with pre-installed detents ensures you never miss a match point.
- Strictly Restrict Cleaning to Soap and Water: Keep all aerosol degreasers, alcohol wipes, and petroleum lubes far away from your breech sleeve. Warm water and microfiber cloth preserve optical clarity indefinitely.
- Never Over-Torque Your Barrel: Thread your tournament barrel in until it makes firm contact with the receiver face, then stop. Over-tightening provides zero velocity benefit and is the primary cause of front stop flange cracking.
8. Frequently Asked Questions
How often should I clean the Dye 4th-Gen breech sleeve?
Inspect and wipe the sleeve every 5,000 to 10,000 shots, or immediately following any day of tournament play where a ball ruptured in the breech or barrel. Regular wipe-downs prevent old paint fill from crusting between the outer pipe wall and receiver body.
Can I use a 4th-Gen breech sleeve in older Dye markers like the DM14 or M2?
Yes. The 4th-Gen assembly is backward-compatible with the Dye M2, DSR, and DM14/DM15 platforms. It provides significantly thicker polycarbonate sidewalls and upgraded detent retention compared to legacy 2nd- and 3rd-Gen components.
Why is my marker double feeding even though the dye eye pipe is new?
Verify that the snap-on detent clip is fully seated in its locating recess and oriented vertically toward the feedneck entry. If running high-tension force-fed loaders like the Dye Rotor LT-R or the expandable carrier in our Dye Rotor R2 Review (addressing tension binds via our Paintball Hopper Jamming Solutions Guide), excessively small paint (under 0.680 bore) can squeeze past detents if stack tension exceeds 20 PSI.
Can I use rubbing alcohol to quickly clean paint fill off my breech sleeve?
No. Isopropyl alcohol attacks polycarbonate polymer chains through chemical stress crazing, turning the transparent optical window cloudy and opaque. This ruins 940 nm infrared beam transmission, requiring complete sleeve replacement. Use warm water and mild soap exclusively.
Do I need to grease the breech sleeve before installing it into the marker?
Apply only a micro-sheen of Dow 33 or Slick Lube to the exterior rubber bumper O-ring on the front lip. Never grease the clear polycarbonate body, optical windows, or detent fingers, as grease collects dust and blinds the infrared sensors.
How do I know if my detents need replacement?
Flex the spring fingers inward. If they fail to rebound immediately with a crisp snap, show white stress discoloration at the base, or display worn down tips, replace the detent clip immediately to prevent double feeds and mid-match chops.
Why does my Dye marker cap at 10.2 BPS during live firing?
A capped rate of fire at 10.2 BPS indicates the board has entered eye-fault safety mode because the infrared beam cannot bridge the breech. This is caused by dried paint fill on the optical windows, a hazed pipe, or disconnected eye ribbon cables on the main board.