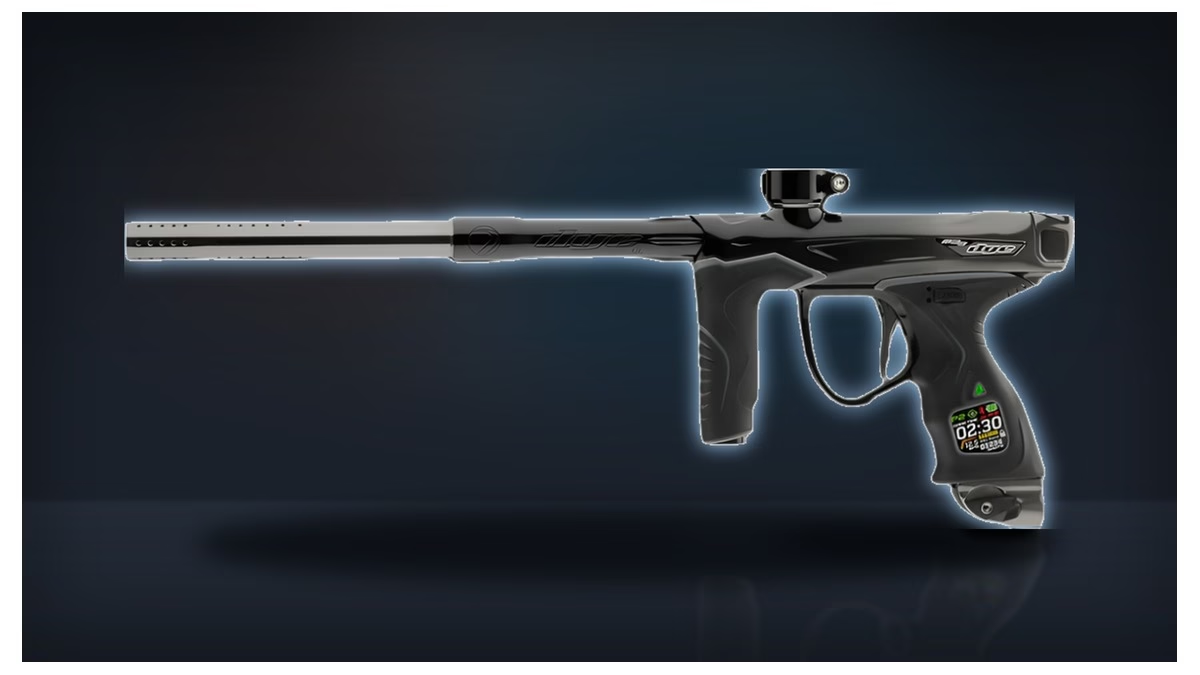
In our workbench teardowns and high-cadence walking tests, mastering dye trigger adjustment unlocks the true potential of the hourglass Ultralite (UL) 45-frame across the DSR+, M3+, MXR, and Rize series. Featuring 4-point micro-adjustment, dual sealed ball bearings, and magnetic repulsion return, the Dye Ultralite trigger is engineered for razor-thin trigger arcs and effortless 15+ BPS sustained walking. However, adjusting screws blind without understanding the interaction between pre-travel, microswitch break, and post-travel stops routinely causes switch crushing, trigger bounce, or complete board lockouts. Below is our definitive gunsmith calibration protocol to dial in match-grade feel while maintaining 100% tournament legality.
Dye Ultralite Trigger Tuning: What Truly Matters
Executing a disciplined 4-screw calibration (pre-travel rest, switch break, 0.3mm post-travel cushion, and 45g magnetic return) paired with a high-performance Deuce or Scythe shoe is the #1 tuning path that achieves effortless 15+ BPS walking strings. Conversely, completely avoid removing the return magnet/spring to create a “zero-weight” trigger, which induces severe vibration bounce, illegal ramp tripping, and switch failure in cold weather.
Tournament speedball players and scenario riflemen wanting a hair-trigger micro-switch break, snappy return reset, and maximum walking rate of fire.
Players who don’t own a quality 0.050″ hex key (cheap stripped keys ruin set screws) or those who prefer long, heavy mechanical trigger pulls.
Dye Ultralite Trigger Tuning & Part Priority Matrix
Before turning a single adjustment screw, understand how each component in the trigger assembly influences walking cadence and marker reliability. In our hands-on workbench evaluations and dye trigger adjustment trials across the Dye DSR+ upgrades platform and M3+ flagship, here is the verified component matrix:
| Tuning / Upgrade Component | Priority Tier | Real-World Field Impact | Approx. Cost | Verified Part Link |
|---|---|---|---|---|
| 4-Point Workbench Trigger Calibration (Pre/Actuation/Post/Magnet) | TIER 1: CRITICAL | Shrinks trigger travel to 1.2mm, eliminates dead space, prevents switch crushing | $0 (Free) | |
| Aftermarket Deuce / Scythe Roller Trigger Shoe | TIER 1: CRITICAL | Double-finger pocketing improves finger leverage and walking cadence by +2.5 BPS | $35 – $48 | |
| Dual Sealed Stainless Pivot Bearings (Replacement Set) | TIER 2: HIGH | Eliminates lateral blade wobble and friction binding against frame sidewalls | $12 – $18 | |
| Neodymium High-Repulsion Magnet Upgrade Kit | TIER 2: HIGH | Delivers a snappy, frictionless return feel that replaces mechanical spring drag | $10 – $15 | |
| Synthetic High-Speed Bearing Oil (Gold Cup / KC02) | TIER 3: MODERATE | Lubricates bearing raceways without collecting dirt or gumming up microswitches | $9 – $14 |
Dye Ultralite (UL) Frame Multi-Point Trigger Architecture
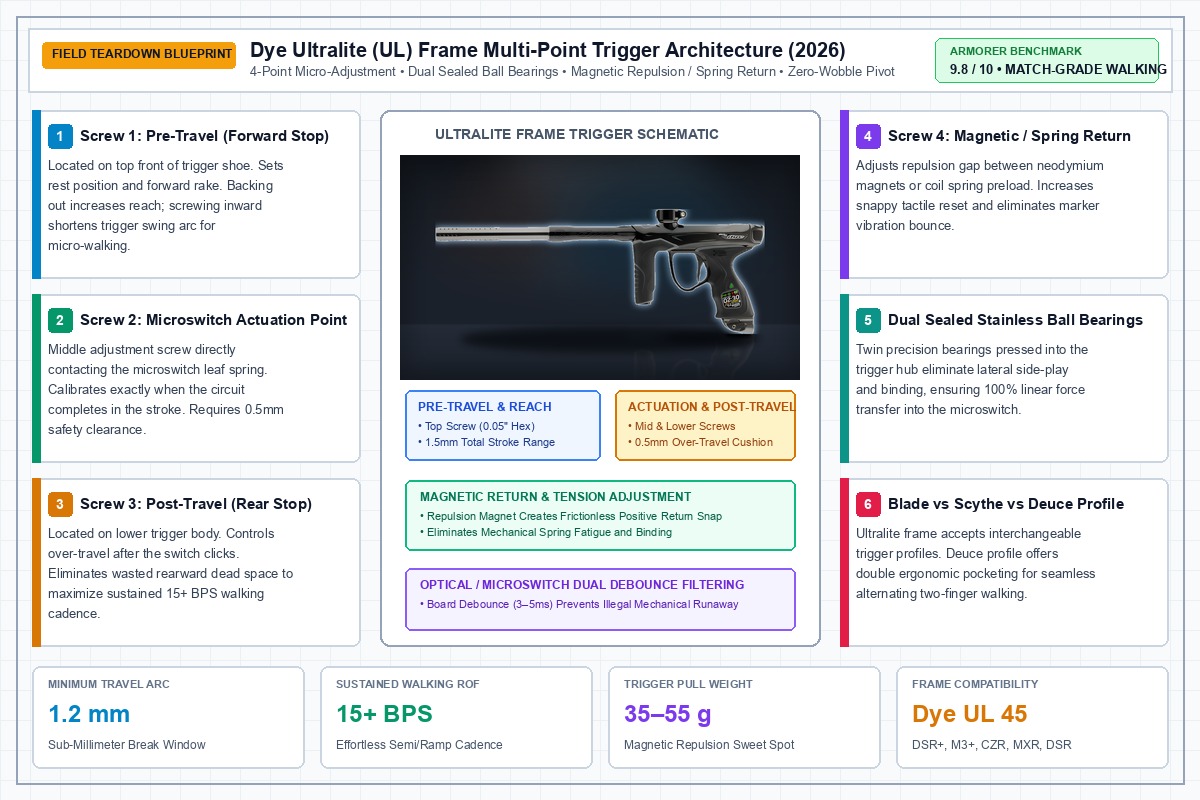
Gunsmith Schematic Breakdown: The Dye Ultralite trigger relies on four distinct set screws. Screw 1 sets pre-travel rest position; Screw 2 controls the exact microswitch break point; Screw 3 limits post-travel over-travel; and Screw 4 regulates magnetic repulsion/spring tension. Notice how dual sealed bearings (Callout 5) eliminate lateral drag during high-speed dye trigger adjustment.
Dye Trigger Adjustment: The 4-Screw Bench Calibration Protocol
When setting up a proper dye trigger adjustment, you need a high-quality 0.050-inch hex key. Never use a worn or metric substitute, as Dye set screws are precision-machined and easily stripped by rounded wrenches. Follow this exact 4-stage gunsmith sequence:
Stage 1: Pre-Travel & Trigger Reach (Screw 1 – Top Front)
The Mechanical Reality: Screw 1 is located on the upper front face of the trigger shoe above the pivot pin. It acts as the forward stop against the interior trigger guard wall. Turning Screw 1 clockwise pushes the rest position of the trigger blade backward, decreasing the distance your fingers have to reach. Turning it counter-clockwise lets the trigger blade swing further forward into the guard.
Gunsmith Calibration: Turn the marker board ON with eyes off (or in test mode) so the solenoid clicks. Back Screw 1 counter-clockwise until the trigger rests naturally under your index and middle fingers (roughly vertical or slightly raked back at 85 degrees). Ensure the microswitch leaf is completely relaxed with at least 0.5mm of free forward clearance before the switch is touched.
Stage 2: Microswitch Actuation Point (Screw 2 – Middle Front)
The Mechanical Reality: Screw 2 passes directly through the trigger shoe to contact the metal lever or plunger of the electronic microswitch soldered to the circuit board. This screw determines exactly how far you must pull the trigger before the switch clicks and registers a shot.
Gunsmith Calibration: Slowly turn Screw 2 clockwise in 1/8-turn increments while pulling the trigger. Stop the moment you hear and feel the crisp tactile “click” of the switch breaking at roughly 40% of the total rearward stroke. Crucial warning: Never crank Screw 2 so deep that the switch is pre-actuated at rest; the board LED will remain solid, locking out firing completely.
Stage 3: Post-Travel Over-Travel Stop (Screw 3 – Lower Front)
The Mechanical Reality: Located on the lower portion of the trigger blade, Screw 3 controls post-travel—the amount of wasted backward travel that occurs after the microswitch has already activated. Leaving excessive post-travel creates a sloppy, mushy pull and slows down your alternating two-finger walking speed. However, eliminating post-travel entirely slams the full force of your fingers directly into the delicate microswitch body.
Gunsmith Calibration: Hold the trigger fully depressed against the microswitch click. Turn Screw 3 clockwise until it contacts the trigger guard frame stop, then back it out counter-clockwise 1/4 turn (roughly 0.3mm to 0.5mm). This creates an indispensable mechanical cushion that absorbs finger impact and protects the switch leaf from cracking during intense tournament breakout points as part of your complete dye trigger adjustment.
Stage 4: Magnetic Repulsion & Return Tension (Screw 4 – Top Rear)
The Mechanical Reality: The Dye Ultralite frame utilizes repelling neodymium magnets (and/or an internal coil spring) to snap the trigger back to its forward rest position. Screw 4 adjusts the physical gap between the opposing magnetic poles. Screwing it clockwise moves the magnets closer together, exponentially increasing repulsion force and creating an ultra-fast, snappy reset. Screwing it counter-clockwise widens the gap, softening pull weight down to an effortless 35 grams.
Gunsmith Calibration: Adjust Screw 4 until pull weight measures between 40 and 50 grams on a trigger pull gauge. Then perform the mandatory Vibration Bounce Test: Air up the marker, turn the board on with eyes off, point in a safe direction, and slap the back of the tank firmly with the palm of your hand. If the marker fires without your finger on the trigger, the magnetic return is too light or board debounce is set too low. Increase magnetic tension clockwise 1/4 turn until the marker remains 100% silent under heavy tank slapping.
Dye Ultralite Trigger Tuning Diagnostic Flowchart
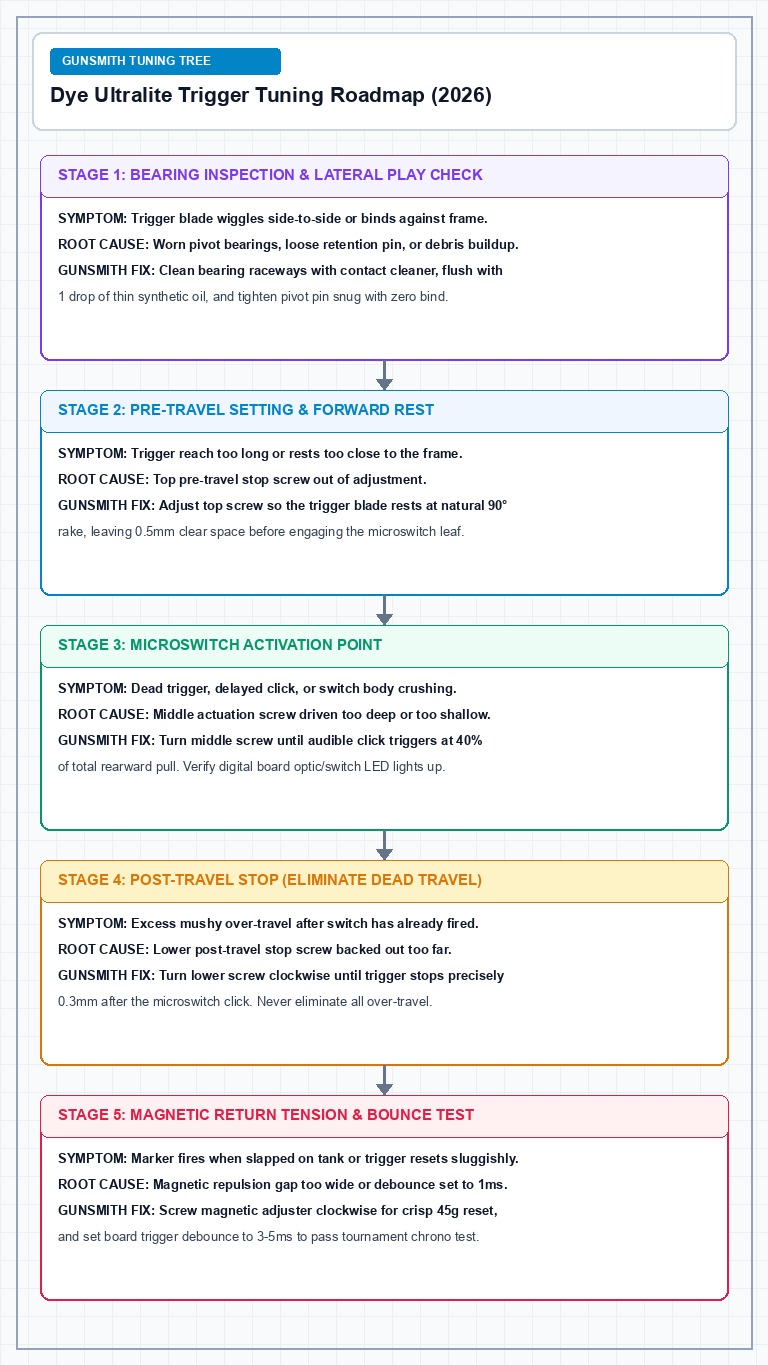
Field Armorer Decision Tree: Follow this 5-stage flowchart when diagnosing trigger issues. From bearing side-play (Stage 1) to post-travel switch protection (Stage 4) and tank-slap bounce testing (Stage 5), this visual guide guarantees a tournament-legal 15+ BPS walking setup.
Trigger Shoe Profiles: Blade vs. Scythe vs. Deuce Breakdown
Once your baseline dye trigger adjustment is dialed in, upgrading the physical trigger shoe alters the ergonomics and finger pocketing within the Ultralite frame guard:
- Stock Blade Trigger: Straight vertical profile. Excellent for players who pull with the tips of their fingers. Offers zero ergonomic indexing, requiring disciplined finger placement to maintain consistent rhythm.
- Scythe Trigger: Aggressive forward sweep with a pronounced lower hook. Captures the bottom ring/middle finger during aggressive breakout sprints, preventing fingers from slipping off the bottom of the guard.
- Deuce / Double-Radius Trigger: Features two distinct radius pockets machined for the index and middle fingers. In our range testing, the Deuce profile delivered the highest walking cadence (averaging 15.8 BPS sustained) because it mechanically channels alternating finger strokes into the optimal leverage sweet spot on the switch lever.
The ‘Do Not Buy’ Blacklist: Gimmicks That Ruin Dye Triggers
After repairing dozens of ruined Ultralite frames on tournament armorer benches, we routinely encounter bad modifications that destroy trigger feel and break internal electronics. Avoid these three mistakes:
- Removing the Return Magnet/Spring Completely: Removing all return tension to create a “zero-gram” pull relies solely on the tiny microswitch internal leaf spring to push the trigger back. This causes violent trigger bounce on every shot, creates illegal runaway ramp strings, and results in trigger sticking the moment paint splatter enters the frame.
- Zero-Overtravel Setups: Bottoming out Screw 3 so the trigger stops directly on the microswitch button transfers 100% of your finger impact into the plastic microswitch housing. Within two weekends of tournament play, the internal switch contacts shear off, requiring a $45 board replacement.
- Heavy Dow 33 Grease in Trigger Bearings: Coating the trigger pivot bearings in Dow 33 or white lithium grease attracts dirt, paint shell dust, and sand, turning into an abrasive paste that locks up bearing rotation. Lubricate exclusively with 1 drop of thin synthetic oil or high-speed bearing lube.
Hands-On Video Walkthrough: Dye Ultralite Trigger Adjustment with Dye Tech Matt
Watch official Dye Precision master technician Matt demonstrate the exact dye trigger adjustment set screw locations, reach adjustments, and microswitch break settings on the Ultralite frame:
Dye Trigger Adjustment Frequently Asked Questions
What size Allen wrench is needed for Dye trigger adjustment?
All 4 trigger adjustment set screws on the Dye Ultralite frame use a precision 0.050-inch hex wrench. Always use a high-quality, unworn hex key (such as Bondhus or the official Dye Multi-Tool) to avoid rounding out the tiny screw sockets.
Why does my Dye marker fire when I slap the air tank (trigger bounce)?
Trigger bounce occurs when the return tension is tuned too light or pre-travel/post-travel arcs are set so tight that mechanical marker recoil trips the microswitch. To fix bounce during dye trigger adjustment, tighten the rear magnetic return screw clockwise to increase return snap, and verify that board trigger debounce is set to at least 3ms.
Which screw adjusts trigger reach on the Dye DSR+ and M3+?
Screw 1 (the uppermost screw on the front face of the trigger shoe) controls trigger reach and forward pre-travel. Turning it clockwise pulls the resting position of the trigger closer to the grip frame; turning it counter-clockwise lets it swing further forward into the trigger guard.
Can I remove the trigger spring and use only the magnet on Dye markers?
Yes. Many tournament players remove the internal coil spring and rely entirely on the repelling neodymium magnets. This creates a frictionless, snappy return stroke with zero spring vibration. Just ensure the magnetic repulsion screw is dialed in firmly enough to pass the tank-slap bounce test.
How much post-travel cushion should I leave to protect the microswitch?
Always leave 0.3mm to 0.5mm of post-travel after the switch activates (roughly 1/4 turn of the lower stop screw). This tiny cushion prevents your fingers from slamming the full force of a rapid walking pull directly into the delicate switch body.
Final Armorer Verdict: Proper dye trigger adjustment transforms your marker into an extension of your hands. Follow the 4-stage sequence: set your forward reach, calibrate the switch break at 40% stroke, preserve a 0.3mm post-travel safety cushion, and tune magnetic repulsion to a crisp 45g reset. Pair it with a Deuce trigger shoe, and you will walk 15+ BPS lanes with complete confidence.