Engineered to feed up to 15 balls per second without batteries, the Tippmann Cyclone Feed System is the mechanical heart of the Tippmann A-5, Tippmann X7 Phenom, and upgraded Tippmann 98 Custom platforms. Yet after thousands of pneumatic cycles or a single broken paintball inside the feed housing, the 5-blade sprocket can begin skipping shots, chopping brittle shells, or venting gas out the cylinder cap. In our field tests and match clinics servicing woodsball and scenario markers, learning how to rebuild tippmann cyclone feed assemblies on the workbench is the fastest way to cure stripped ratchet teeth, replace worn piston U-cup seals, and restore 100% positive 72-degree indexing.
Key Technical Takeaways: How to Rebuild Tippmann Cyclone Feed
To properly rebuild tippmann cyclone feed drivetrains (Part #02-CF / #TA30046), armorers must first run the manual advance button test to isolate whether the failure lies in the mechanical 5-tooth ratchet wheel (#02-05) and dual pawls (#02-06 / #02-08) or in the pneumatic piston U-cup seal (#02-14). During reassembly, orient the flared lip of the piston U-cup seal forward toward the banjo air inlet and never tighten the central axle bolt (#02-03) past 12 in-lbs.
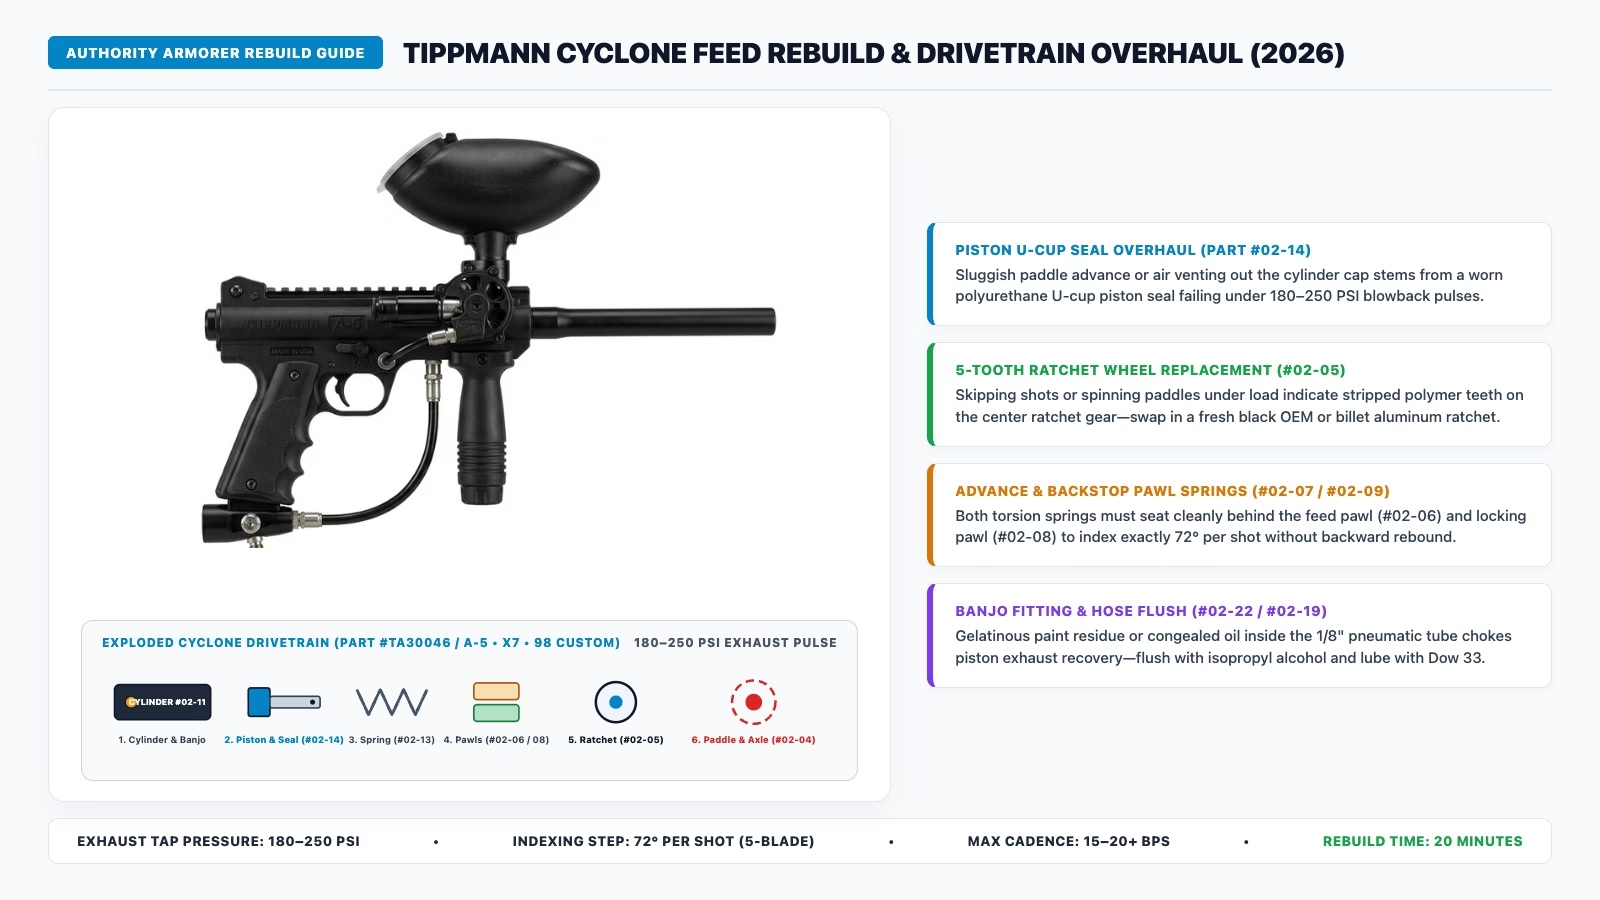
180–250 PSI
Power Tube Banjo Port
≈ 18.3 lbf
11.5 mm Linear Stroke
72° / Shot
5-Tooth Gear (#02-05)
≤ 28 ms
15–20+ BPS Cadence
- Manual Lever Diagnostic Rule: Press the manual advance button (#02-11A) by hand. If the paddles slip or fail to click 72°, the 5-tooth ratchet (#02-05) or pawl torsion springs (#02-07 / #02-09) are worn; if it feeds manually but fails under air, replace the piston U-cup seal (#02-14).
- U-Cup Seal Lip Orientation: The flared cup lip of the #02-14 polyurethane piston seal MUST face forward toward the front banjo air fitting so incoming 210 PSI gas flares the skirt outward against the cylinder wall.
- Fatal Axle Over-Torque Error: Never torque the central 1/8-inch Allen paddle axle bolt (#02-03) beyond 12 in-lbs. Over-tightening compresses the polymer housing against the ratchet hub and freezes the piston return stroke.
Pneumatic & Ratchet Kinematics: How the Tippmann Cyclone Feed Works
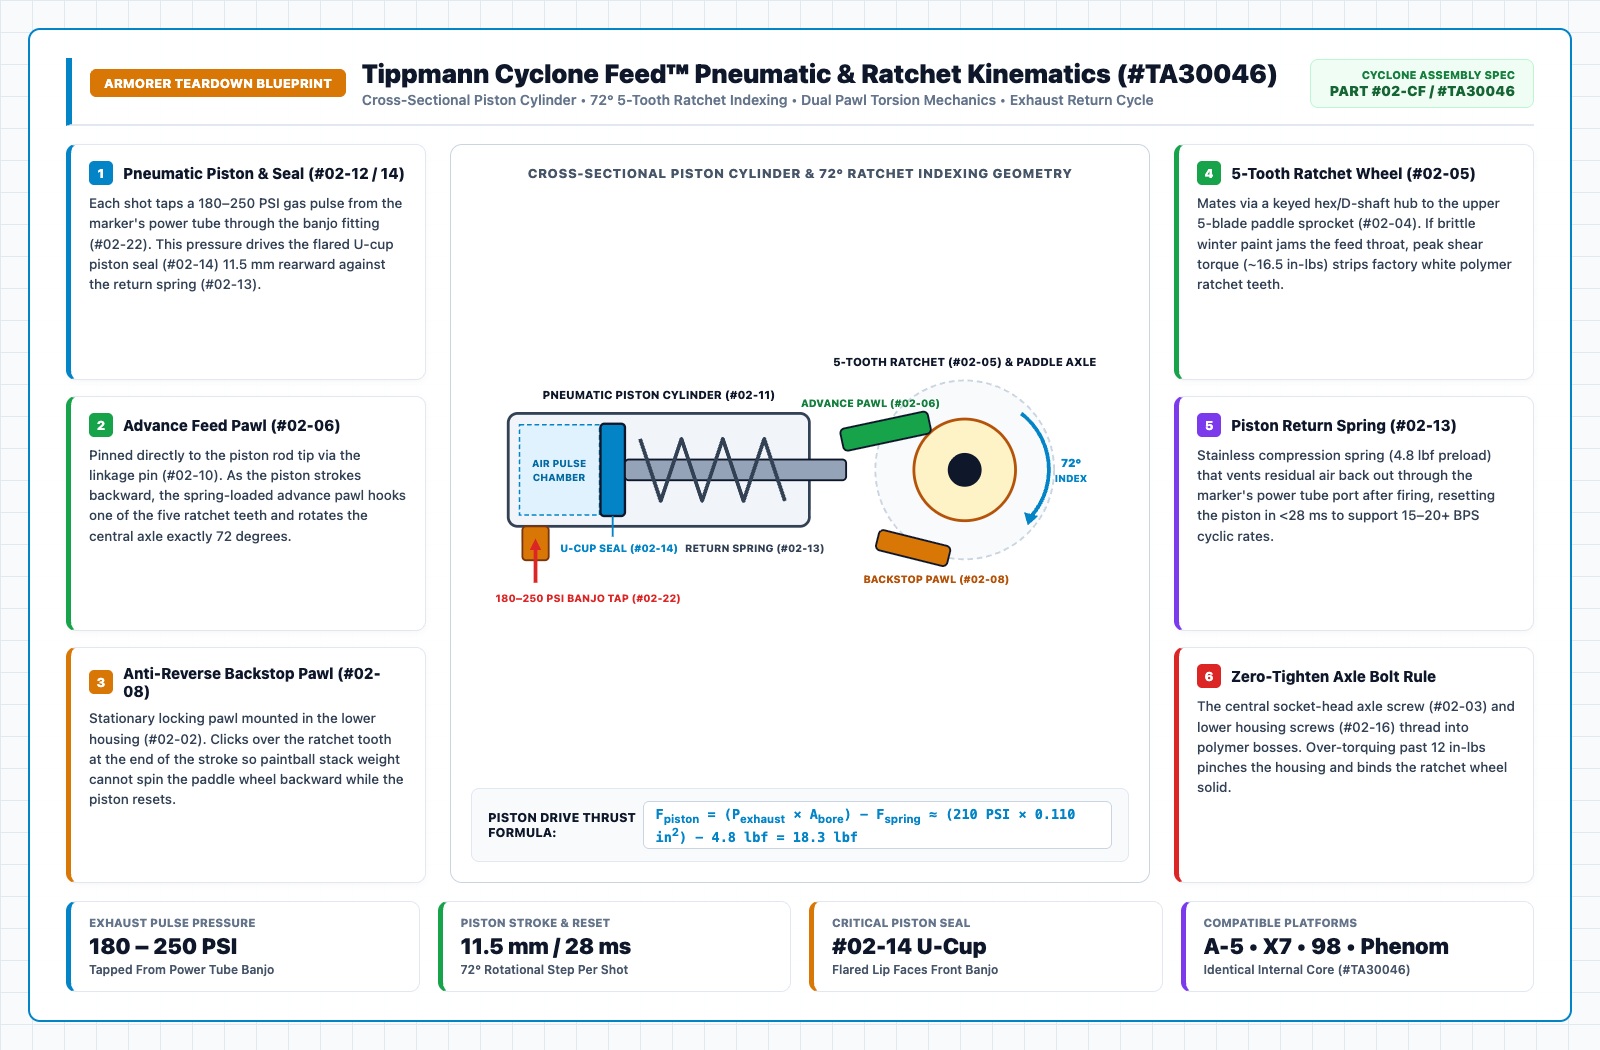
Unlike battery-powered force-fed loaders that rely on electric DC motors, the Tippmann Cyclone Feed is a positive-displacement pneumatic indexing mechanism synchronized directly to your marker’s firing valve. Every time you pull the trigger on an A-5, X7, or 98 Custom, a fraction of the low-pressure exhaust gas vented from the inline poppet valve is diverted through the front power tube banjo fitting (#02-22) and 1/8-inch polymer hose (#02-19) into the Cyclone piston cylinder. When you rebuild tippmann cyclone feed internals, you are balancing four mechanical and pneumatic parameters:
- Pneumatic Piston Thrust vs. Return Spring Preload: During the 4.5 ms valve dwell window, a secondary gas pulse of 180 to 250 PSI enters the 0.375-inch bore of the Cyclone cylinder (#02-11), acting against the flared polyurethane U-cup seal (#02-14, effective area ≈0.110 in2). Subtracting the 4.8 lbf compression resistance of the stainless piston return spring (#02-13), the net linear drive thrust is governed by: Fpiston = (Pexhaust × Abore) − Fspring ≈ (210 PSI × 0.110 in2) − 4.8 lbf ≈ 18.3 lbf.
- 72-Degree Ratchet & Dual-Pawl Indexing Geometry: As the piston rod (#02-12) strokes 11.5 mm rearward in approximately 9 milliseconds, the spring-loaded advance feed pawl (#02-06) engages one of the five asymmetrical teeth on the central ratchet wheel (#02-05), rotating the 5-blade paddle sprocket (#02-04) exactly 72 degrees (360° ÷ 5 teeth = 72° per shot) to chamber the next paintball. Simultaneously, the stationary anti-reverse backstop pawl (#02-08) clicks over the adjacent tooth to lock the sprocket against reverse rotation.
- Shear Torque & Polymer Tooth Stripping: Operating at a ratchet pitch radius of 0.42 inches, normal indexing torque is τratchet = Fpiston × rpitch ≈ 7.69 in-lbs. However, if a swollen paintball or shell fragment causes a paintball loader jam inside the feed throat while firing rapid strings on a Response Trigger or E-Grip board, spike pressures can drive shear torque past 16.5 in-lbs—rounding off factory white Delrin ratchet teeth.
- 28-Millisecond Exhaust Venting Recovery: Once the marker’s bolt closes, the piston return spring (#02-13) must push the piston forward 11.5 mm in under 19 milliseconds, venting the trapped air backward through the 1/8-inch hose and out the marker’s breech. If congealed oil or gelatinous paint restricts the banjo orifice (#02-22), the piston fails to reset before the next trigger pull, causing mid-string starvation above 8 BPS.
Master Diagnostic Matrix: Tippmann Cyclone Feed Failure & Rebuild Lookup Table
Before tearing down the feed housing, identify the exact worn component using our field armorer diagnostic matrix below:
| Field Symptom / Failure Mode | Faulty Cyclone Part (#ID) | Root Cause / Physics Mechanism | Armorer Rebuild Countermeasure | Replacement Part / Kit |
|---|---|---|---|---|
| Piston Strokes, Paddles Skip or Spin Free Most common mechanical failure |
5-Tooth Ratchet Wheel (#02-05) & Pawls (#02-06 / 08) | Shear torque (>16.5 in-lbs) strips polymer ratchet teeth or pawl torsion spring (#02-07) unseats | Replace stripped ratchet with black OEM or CNC aluminum ratchet (#02-05) and re-seat pawl springs |
Check Amazon Check eBay |
| Manual Button Works, Dead Under Air Pneumatic thrust loss |
Piston U-Cup Seal (#02-14) & Cylinder (#02-11) | Flared polyurethane U-cup lip worn flat, cracked by CO2 chill, or installed backward | Install fresh #02-14 piston cup seal (flared lip facing front banjo) coated in Dow 33 grease |
Check Amazon Check eBay |
| Piston Sticks Back / Starves Above 8 BPS Slow exhaust return (>40 ms) |
Return Spring (#02-13) & Banjo Hose (#02-19 / 22) | Fatigued return spring (<4.8 lbf) or paint sludge clogging the 1/8" pneumatic exhaust line | Flush banjo fitting and hose with isopropyl alcohol, replace #02-13 spring, or add QEPH exhaust valve |
Check Amazon Check eBay |
| Frequent Paintball Crushing in Feed Bowl Excessive paddle impact |
5-Blade Paddle Sprocket (#02-04) | Rigid stock hard-plastic sprocket blades shear brittle tournament or cold-weather paint shells | Drop in flexible silicone “Squishy Paddles” during your Tippmann Cyclone Feed upgrades |
Check Amazon Check eBay |
| Cracked Feed Neck or Stripped Housing Bosses Catastrophic shell damage |
Upper/Lower Housing (#02-01 / 02) or Complete Unit (#TA30046) | Direct bunker impact on hopper clamp or over-torqued baseplate screws (#02-16) | Replace outer composite shell or bolt on a factory-assembled Complete Cyclone System (#TA30046) |
Check Amazon Check eBay |
Step-by-Step Execution: How to Rebuild Tippmann Cyclone Feed Internals
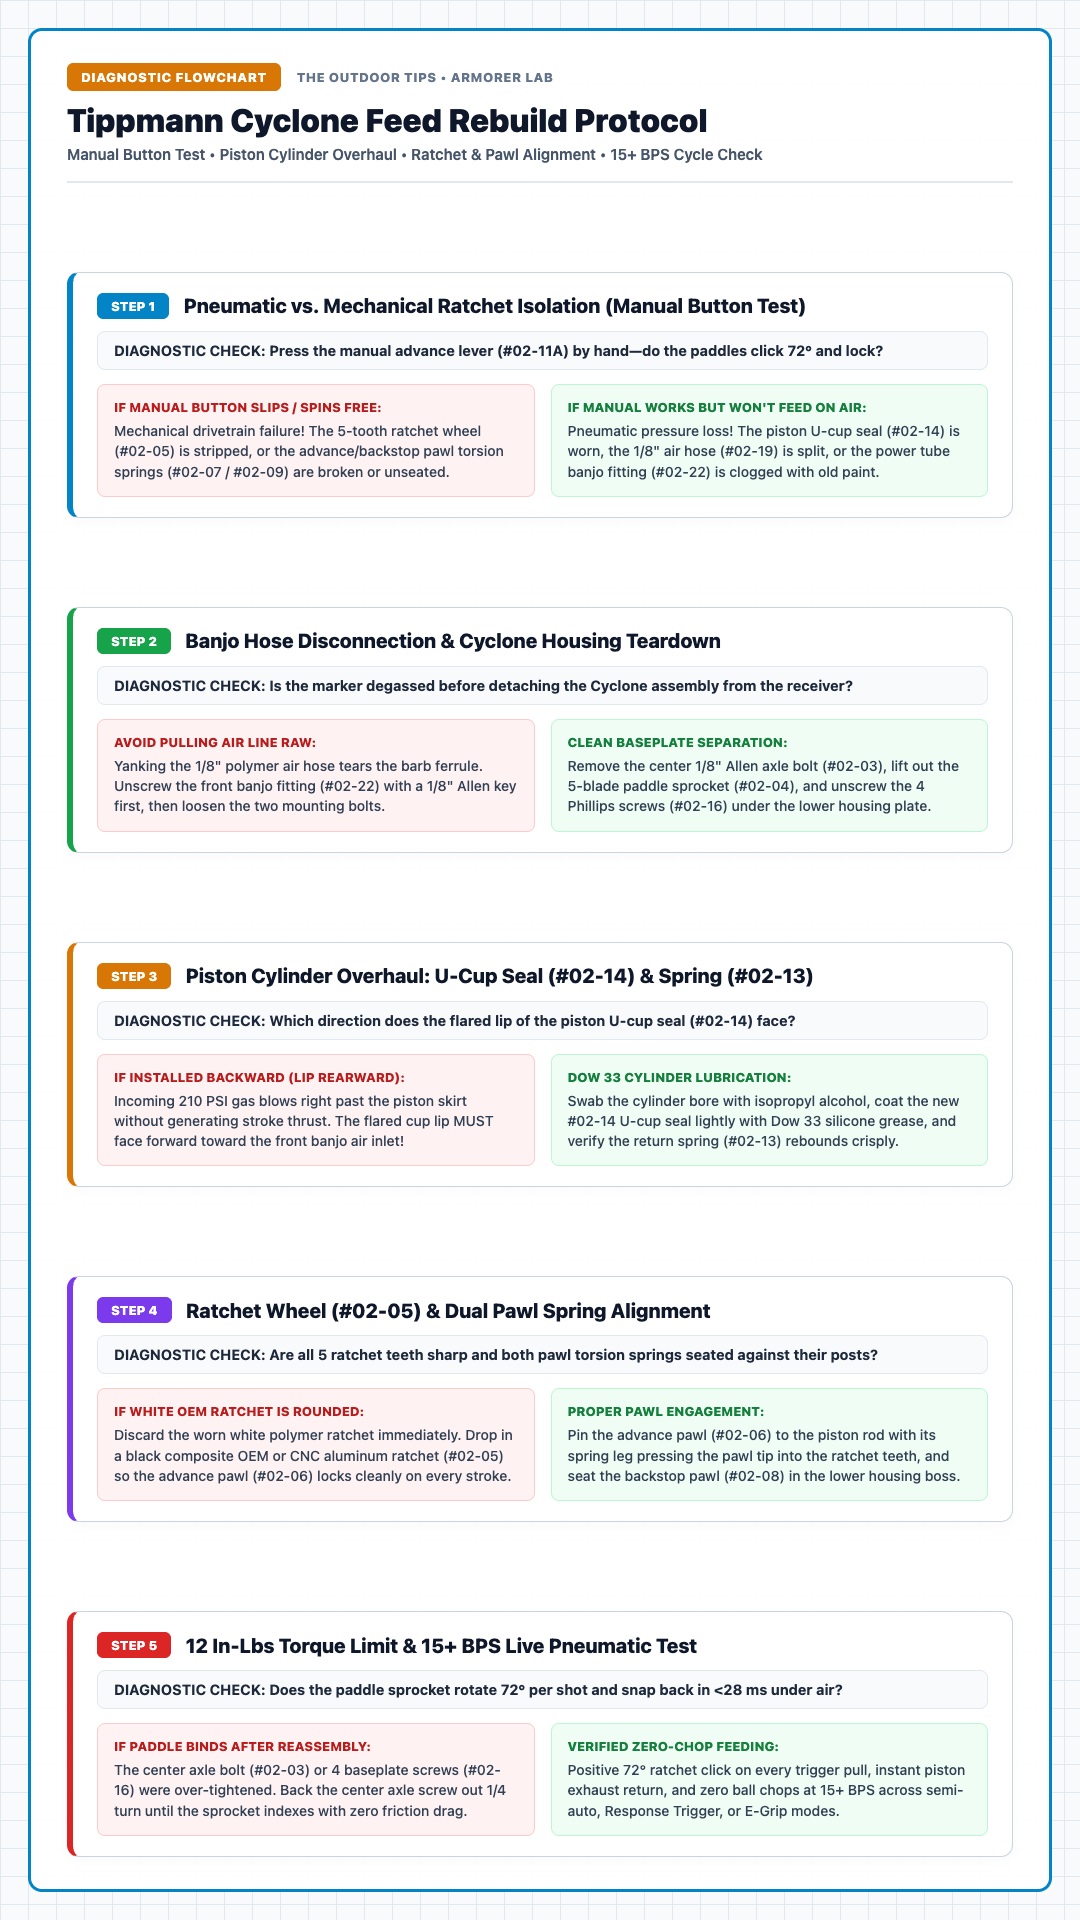
Whether your Cyclone unit is mounted on a Tippmann A-5 or 98 Custom or an X7 Classic / X7 Phenom, the internal ratchet and piston core (#02-CF) is 100% identical across all platforms. Follow this five-phase armorer protocol to rebuild tippmann cyclone feed assemblies in under 20 minutes:
Phase 1: Manual Button Diagnostic & Banjo Line Disconnection
Before unbolting the Cyclone housing from your marker, isolate the fault and safely depressurize the gas line:
- Degas and Remove Your Tank: Unscrew your HPA or CO2 bottle and fire two dry shots in a safe direction to vent residual line pressure (see our guide to safely empty a paintball tank at home if your ASA pin binds).
- Run the Manual Advance Lever Check: Press the manual feed lever (#02-11A) at the rear of the Cyclone cylinder 5 times. Each press should produce two distinct metallic/polymer clicks (one from the advance pawl, one from the backstop pawl) and rotate the paddle sprocket exactly one-fifth of a turn (72°).
- Disconnect the Front Banjo Fitting (#02-22): Using a 1/8-inch Allen wrench, unscrew the front banjo bolt connecting the 1/8-inch black pneumatic hose (#02-19) to the front of the Cyclone piston cylinder. Never yank the polymer tube off the brass barb by force, or you will flare the hose end and create a permanent paintball gun air leak.
- Detach the Cyclone Assembly from the Receiver: On an A-5 or X7, loosen the two 5/32-inch mounting screws clamping the feed breach to the right receiver side (on a 98 Custom, unhook the quick-release vertical adapter pin) and lift the entire Cyclone unit onto a clean workbench towel.
Phase 2: Paddle Sprocket & Lower Baseplate Teardown
With the Cyclone assembly off the marker, separate the upper feed bowl (#02-01) from the lower mechanical gearbox (#02-02):
- Remove the Wide-Mouth Hopper & Center Axle Screw (#02-03): Pop off the 200-round offset loader shell. Insert a 1/8-inch Allen wrench straight down into the center of the 5-blade paddle sprocket (#02-04) and unscrew the stainless socket-head axle bolt (#02-03) and its flat steel washer.
- Extract the 5-Blade Paddle Sprocket (#02-04): Lift the paddle wheel straight up and out of the feed bowl. Scrub any dried paint gelatin out of the feed throat with warm water and inspect your marker’s ball detent while the breech opening is accessible.
- Unscrew the 4 Lower Baseplate Screws (#02-16): Flip the Cyclone housing upside down. Using a #1 Phillips screwdriver, remove the four self-tapping housing screws securing the bottom cover plate (#02-02).
- Lift the Baseplate Slowly to Capture Torsion Springs: Gently pry the lower baseplate straight up while keeping your fingers over the cylinder cap (#02-11A). Inside, you will expose the 5-tooth ratchet wheel (#02-05), the dual pawls (#02-06 and #02-08), and the pneumatic piston assembly.
Phase 3: Pneumatic Piston Cylinder, U-Cup Seal (#02-14) & Spring Overhaul
If your Cyclone struggled to cycle under air or hissed out the rear manual button, focus on the pneumatic cylinder bore:
- Slide Out the Piston Rod, Return Spring, and Rear Cap: Lift the rear manual button cap (#02-11A), the coiled stainless return spring (#02-13), and the piston rod (#02-12) out of the cylinder trough.
- Inspect and Replace the Flared U-Cup Piston Seal (#02-14): Unlike standard toroidal O-rings found on our paintball O-ring sizing chart, the Cyclone piston relies on a directional cup-style polyurethane seal (#02-14). Peel off the worn seal and snap a fresh #02-14 U-cup onto the front piston groove with the wide flared cup lip facing FORWARD toward the front banjo air inlet. If installed backward, air will blow past the skirt without stroking the piston.
- Lubricate with Dow 33 & Stretch-Check the Return Spring: Swab the internal cylinder bore with 91% isopropyl alcohol to remove gummy paint residue. Apply a thin film of Dow 33 light silicone grease around the exterior of the #02-14 U-cup seal, and verify that the return spring (#02-13) measures at least 1.45 inches in free length.
Phase 4: 5-Tooth Ratchet (#02-05) & Dual Pawl Spring Alignment
Reassembling the two pawls and their miniature torsion springs correctly is the most critical step during a Cyclone Feed gearbox overhaul:
- Upgrade or Replace the 5-Tooth Ratchet Wheel (#02-05): Inspect all five teeth on the central ratchet gear. If any tooth tip is rounded, chipped, or made of older brittle white plastic, discard it and drop a new black composite OEM ratchet or CNC billet aluminum ratchet (#02-05) onto the central D-shaft hub.
- Pin the Advance Feed Pawl (#02-06) to the Piston Rod: Place the advance pawl torsion spring (#02-07) over the pivot boss on the advance pawl (#02-06), then insert the metal linkage pin (#02-10) through the rear eyelet of the piston rod (#02-12). Ensure the torsion spring legs push the hooked tip of the advance pawl inward toward the ratchet teeth.
- Seat the Anti-Reverse Backstop Pawl (#02-08): Slip the backstop torsion spring (#02-09) onto the stationary pivot post inside the housing and drop the locking pawl (#02-08) over it so its spring-loaded tip presses firmly against the lower ratchet teeth.
- Verify Synchronized Pawl Engagement: Before closing the lid, push the piston rod rearward with your thumb. Watch the advance pawl (#02-06) rotate the ratchet wheel one tooth (72°) while the backstop pawl (#02-08) clicks over the passing tooth to lock it in place.
Phase 5: 12 In-Lbs Torque Calibration & 15+ BPS Live Pneumatic Test
Improper screw torque during final closure causes 90% of post-rebuild binding issues:
- Fasten the Lower Baseplate (#02-02): Align the bottom cover over the pawl pivot pins and thread in the four Phillips screws (#02-16) until just snug (8 to 10 in-lbs). Press the rear manual button (#02-11A) to confirm the piston snaps back instantly under spring tension.
- Install the Paddle Sprocket & Calibrate Axle Bolt Torque (#02-03): Drop the 5-blade paddle wheel (#02-04) onto the keyed hex/D-shaft of the ratchet wheel. Thread in the center 1/8-inch Allen axle screw (#02-03) until snug (maximum 12 in-lbs). If the paddle feels stiff when pressing the manual button, back the center axle bolt out 1/8 to 1/4 of a turn until the sprocket spins crisply.
- Reconnect the Banjo Hose & Live-Fire at 15+ BPS: Bolt the Cyclone unit back onto your receiver, thread the banjo fitting (#02-22) into the front cylinder port (ensuring its miniature washer seal is intact), and air up your marker. Fire a 15-shot rapid string over the chronograph to verify zero skipped shots and instant piston recovery.
ASTM F1776 Pneumatic Pinch-Point & Pressurized Testing Mandate
When aired up, the Tippmann Cyclone piston drives the 5-blade sprocket with 18.3 lbf of force every time the marker fires. Never place your fingers inside the Cyclone feed bowl while an HPA or CO2 tank is attached to the marker—an accidental trigger pull or sear slip will slam the paddle blade against the feed throat. Always wear ANSI Z87.1 / ASTM F1776 eye protection and lock a barrel blocking device over the muzzle during live pneumatic feed testing.
Essential Workbench Tools & Parts to Rebuild Tippmann Cyclone Feed Systems
Stocking genuine polyurethane U-cup seals, heavy-duty ratchet wheels, and synthetic silicone grease in your gear bag guarantees you can overhaul a jammed Cyclone Feed between games. Here are our top armorer-approved parts and kits:
| Rebuild Kit / Upgrade Component | Armorer Function in Cyclone Overhaul | Technical Specification | Direct Purchase Links |
|---|---|---|---|
| Tippmann Cyclone Master Rebuild Kit | Replaces worn ratchet wheel, both pawls, torsion springs, piston U-cup seal, and return spring | Includes #02-05, #02-06, #02-08, #02-13 & #02-14 |
Check Amazon Check eBay |
| CNC Aluminum / Lightning Ratchet (#02-05) | Permanently eliminates stripped polymer ratchet teeth under 15–20+ BPS rapid fire | 6061-T6 Billet Alloy or Heavy-Duty Black Delrin |
Check Amazon Check eBay |
| Flexible Silicone “Squishy Paddles” (#02-04) | Soft interlocking fingers flex around fragile paintballs to prevent feed-bowl chops | Drop-in 5-blade elastomeric sprocket |
Check Amazon Check eBay |
| Dow 33 Light Silicone Marker Grease | Lubricates the #02-14 piston U-cup seal without swelling elastomer or attracting dirt | NLGI Grade 1 synthetic silicone lubricant |
Check Amazon Check eBay |
Video Demonstration: Complete Tippmann Cyclone Feed Disassembly & Rebuild
Watch this detailed workbench tutorial showing how to split the Cyclone baseplate, align the advance and backstop pawl torsion springs, service the pneumatic piston U-cup seal, and reassemble the sprocket without binding:
Final Armorer Verdict: OEM Seal Refresh vs. Full Vortex / Squishy Upgrade
If you run your marker in standard semi-automatic mode (6 to 10 BPS), a straightforward $12 overhaul to rebuild tippmann cyclone feed internals with a fresh #02-14 polyurethane piston U-cup seal and black OEM 5-tooth ratchet (#02-05) will restore factory-new reliability. However, if you pair your Cyclone with a high-cadence Tippmann A-5 upgrade such as a Response Trigger or E-Grip firing 15+ BPS, we strongly recommend dropping in flexible Squishy Paddles (#02-04) and an upgraded ratchet wheel while you already have the baseplate open.
Before putting your marker away after the season, follow our off-season paintball marker storage protocol by swabbing out any residual paint film inside the Cyclone bowl so gelatin never glues the ratchet pawls shut over the winter.
Frequently Asked Questions About Rebuilding a Tippmann Cyclone Feed
Why does my Cyclone Feed advance when I press the manual button, but not when I fire the marker?
If the manual lever (#02-11A) rotates the paddles cleanly by hand, your mechanical ratchet (#02-05) and pawls (#02-06 / #02-08) are intact, meaning the issue is 100% pneumatic. Either the flared polyurethane piston U-cup seal (#02-14) is worn out or installed backward, the 1/8-inch air line (#02-19) is cracked, or the front power tube banjo fitting (#02-22) is clogged with dried paint or thread sealant.
Which way does the piston O-ring / U-cup seal (#02-14) face inside the Cyclone cylinder?
The #02-14 piston seal is a flared U-cup lip seal, not a round O-ring. The wider, open flared lip MUST face forward toward the front banjo air fitting (#02-22). When the 180–250 PSI exhaust pulse enters the front of the cylinder, the gas catches inside the open cup lip and expands it outward against the cylinder wall to drive the piston rearward.
Why do my Cyclone paddles bind or stick after I tighten the center screw?
Over-tightening the central 1/8-inch Allen axle bolt (#02-03) pinches the upper paddle hub against the lower housing (#02-02), creating excessive friction that the 4.8 lbf piston return spring (#02-13) cannot overcome. Back the center axle screw out 1/8 to 1/4 turn until the paddle sprocket rotates with zero drag.
Are Cyclone Feed rebuild parts interchangeable between the Tippmann A-5, X7, Phenom, and 98 Custom?
Yes. While the external breach mounting bracket differs slightly between the A-5, X7 Phenom, and 98 Custom adapter kits, the internal drivetrain components—including the #02-04 paddle sprocket, #02-05 5-tooth ratchet, #02-06 advance pawl, #02-08 backstop pawl, #02-12 piston, #02-13 return spring, and #02-14 U-cup seal—are 100% identical across all Tippmann Cyclone Feed models.
Should I use marker oil or Dow 33 grease when I rebuild tippmann cyclone feed cylinders?
Inside the pneumatic piston cylinder (#02-11), a light smear of Dow 33 silicone grease on the #02-14 U-cup seal lasts much longer than thin pneumatic oil because incoming exhaust gas tends to blow liquid oil out the exhaust port. However, keep the mechanical ratchet teeth (#02-05) and pawls (#02-06 / #02-08) nearly dry or wiped with a micro-drop of thin oil so field dust and shell debris cannot stick to the gears.
How often should I rebuild a Tippmann Cyclone Feed system?
Clean the upper paddle bowl after any game day where paint breaks in the hopper, and perform a full lower baseplate teardown to rebuild tippmann cyclone feed seals and pawls every 10,000 to 15,000 shots (or once per season).