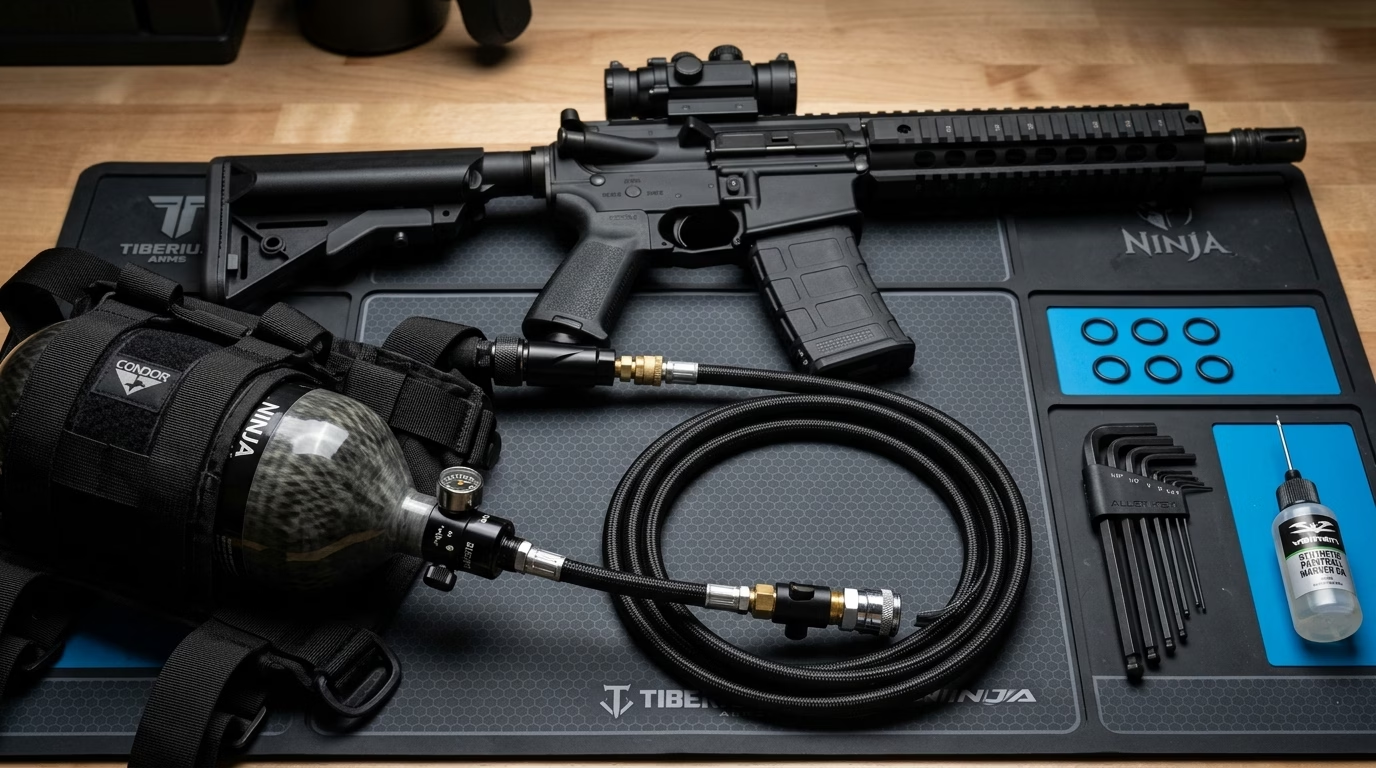
Mounting an air tank directly to your marker’s bottom-line ASA adds 2.5 to 3.5 pounds of rearward cantilever weight, destroying wrist agility and making tight snap-shooting agonizing during grueling ten-minute scenario points. Running a paintball remote line shifts that compressed air cylinder from your hands to a tactical harness or MOLLE backpack vest, dropping marker swing inertia by over 60%. However, routing regulated 800 PSI gas through a flexible whip introduces high-pressure failure points, slide-check leaks, and violent disconnect whipping hazards if configured incorrectly. In our field tests and match clinics across two decades of scenario and tournament play, we have dissected every coiled, microbore, and braided airline failure—from sheared bonnet O-rings to frozen slide checks. Here is our field-proven, armorer-certified blueprint to configuring, pressurizing, and maintaining your pneumatic umbilical for maximum cyclic consistency and zero leaks.
Executive Diagnostic & Safety Takeaways
A properly configured remote system isolates bottle mass while delivering uninterrupted regulated pneumatic volume. Never couple an unvented quick-disconnect coupling while pressurized; always specify a heavy-duty slide-check valve or on/off bleed bonnet to eliminate dangerous line whipping during field egress.
3,000–4,500 PSI
Burst rated to 10,000+ PSI
450–850 PSI
Post-regulator dynamic gas
#015 Urethane 90D
Extrusion & shred resistant
0 lbf vs 39.2 lbf
Slide-check vented vs unvented
Pneumatic Fluid Dynamics: Why Remote Lines Suffer Velocity Starvation
When you tether a high-cyclic electronic marker or rapid mechanical blowback to a paintball remote line, compressed gas must travel an additional 36 to 48 inches through internal diameters ranging from 0.090 inches (ultra-flexible microbore) to 0.187 inches (standard heavy coiled urethane). During sustained 12 to 15 ball-per-second (BPS) strings, frictional drag along the internal line wall creates a localized pneumatic pressure gradient known as line friction drop.
According to the Darcy-Weisbach flow equation, the pneumatic pressure drop across a fluid conductor increases in direct proportion to line length and flow velocity squared, while inversely scaling with the internal hydraulic diameter:
• ΔP = Pneumatic line pressure drop between tank regulator and marker inline regulator (PSI)
• f = Darcy friction coefficient of the thermoplastic internal bore
• L = Line hose length (typically 36 to 48 inches)
• D = Internal hose conduit diameter (inches)
• ρ = Gas density of compressed air at 800 PSI operating pressure
• v = Dynamic flow velocity during high-frequency valve recharge cycles
In our bench chronograph tests firing 15-BPS ramping strings on an electro-pneumatic spool marker, an undersized or coiled line with internal restrictions produced an instantaneous 65 PSI drop at the marker’s vertical regulator, inducing shootdown of up to 28 feet per second (FPS) by the tenth round. Using an optimized straight microbore line with smooth bore lining limited dynamic drop to less than 12 PSI, preserving tight ±3 FPS tournament consistency.
Furthermore, releasing a quick-disconnect (QD) fitting under full unvented line pressure turns the female collar into an unguided missile. The dynamic disconnect whipping force generated across the line nozzle is calculated as:
Remote Line Architecture: Coiled vs Microbore vs Steel Braided
Selecting the right paintball remote line depends on your tactical mobility needs, pack layout, and cyclic rate of fire. Below is the comprehensive comparison of standard coiled lines, straight microbores, and stainless steel braided whips evaluated across our armorer workshop:
| Hose Type | Working Rating | Bore Diameter | Flexibility & Snag Risk | Best Use Case |
|---|---|---|---|---|
| Heavy Coiled Urethane | 3,000 PSI | 0.187 in (3/16″) | Self-retracting; prone to snagging dense brush | Woodland scenarios, heavy mechanical markers (Tippmann A-5 / 98) |
| Straight Microbore | 4,500 PSI | 0.090–0.125 in | Ultra-flexible, zero spring tension, routes inside vest webbing | Tournament MagFed, speedball practice, lightweight tactical loadouts |
| Stainless Steel Braided | 5,000 PSI | 0.125 in (1/8″) | Indestructible abrasion shield; stiff, can scratch anodizing | Rugged big games, vehicle-mounted turrets, extreme rental abuse |
| Slide-Check Integrated | 3,000–4,500 PSI | Variable | Adds 1.5″ metal sleeve near marker coupling; zero-whip release | Mandatory for quick marker hand-offs, target shooting, staging areas |
For modern tactical and MagFed setups, a high-pressure straight microbore equipped with a slide-check valve offers the cleanest balance: it routes seamlessly through hydration loops on your plate carrier without snagging low-hanging tree branches, and exhibits virtually zero coil pullback tension against your firing wrist.
Diagnostic Setup & Inspection Flowchart
Follow our structured diagnostic decision tree below before pressurizing your pneumatic harness to prevent blown burst disks, catastrophic fitting leaks, and damaged marker threads:
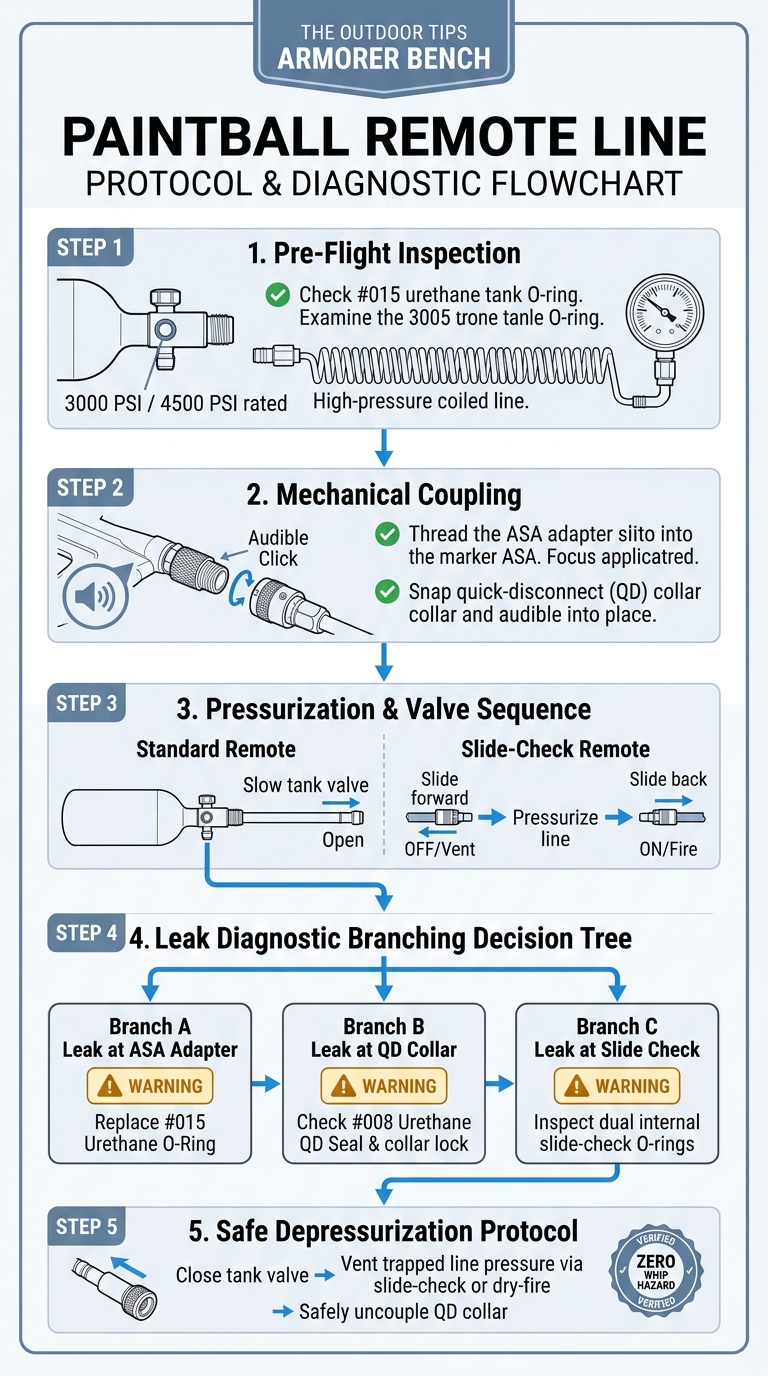
Step-by-Step Installation: 5-Phase Armorer Protocol
Setting up your paintball remote line requires systematic mechanical discipline. Never thread high-pressure fittings with coarse thread galling or rely on chewed, dried Buna-N O-rings. Follow these 5 armorer phases:
Phase 1: Pre-Flight O-Ring & NPT Fitting Inspection
Before threading any metal, inspect the tank adapter male nipple and the marker ASA quick-disconnect male plug. The ASA adapter must be fitted with a fresh #015 90-Durometer Urethane O-ring. Standard black 70-durometer Buna-N O-rings frequently extrude into the ASA threads under sudden 850 PSI surges, shredding during unthreading and causing massive gas blowouts.
Inspect all 1/8″ NPT (National Pipe Taper) threaded brass and stainless joints along your line manifold. If you recently serviced or replaced a quick-disconnect collar or gauge on your remote assembly, verify that 2 to 3 wraps of high-density PTFE tape (Teflon) or blue Loctite 242 thread locker were applied, leaving the initial two leading threads bare to prevent tape fragments from migrating into marker solenoids.
Phase 2: Mounting Tank Adapter & Harness Vest Routing
Insert your HPA tank into your vest tank pouch or pack harness, ensuring the cylinder neck points vertically or at a secure 45-degree angle. Thread the remote line tank adapter clockwise into your paintball tank regulator bonnet until the internal pin depressor sits flush against the pin valve.
Ensure the remote line’s tank on/off knob is turned fully counter-clockwise (retracted in the OFF position). Route the flexible hose up through your dominant shoulder strap’s retention loop or MOLLE webbing. This prevents the hose from draping loose beneath your armpit where it could hook on bunker frames or brush during tactical crawling.
Phase 3: Installing Marker ASA QD Adapter
Screw the male quick-disconnect (QD) dummy adapter into your marker’s bottom-line ASA or grip frame on/off purge valve. Hand-tighten until snug. If your marker features an integrated on/off lever ASA (such as Planet Eclipse POPS or Dye Hyper4), ensure the ASA lever is in the disengaged (degassed) forward position before inserting the male adapter.
Phase 4: Pressurization Sequence & Soap Bubble Leak Test
With the marker pointed in a safe downrange direction, engage the line through these precise sequence steps:
- Slide your remote line slide-check forward toward the marker to close the atmospheric exhaust port.
- Connect the female QD coupler over the marker’s male ASA adapter until the ball bearings click firmly into the locking groove. Pull back firmly on the collar to verify mechanical lockup.
- Slowly screw the tank adapter on/off knob clockwise. You will feel mechanical resistance as the internal actuator pin depresses your tank regulator pin valve. Continue turning until gas hiss stabilizes and the pressure gauge on the remote adapter reads 800–850 PSI.
- If your marker has an on/off ASA, engage the lever to pressurize the marker’s internal valve train.
If you hear an audible hissing sound, do not panic. Apply a 50/50 mixture of water and dish soap around the bonnet joint, slide-check collar, and QD coupling. If bubbles form around the tank bonnet, the #015 ASA O-ring is compromised. If bubbles hiss from the slide-check collar, the internal quad-rings require silicone grease lubrication or replacement.
Phase 5: Safe Depressurization & Zero-Whip Disconnect Protocol
Disconnecting a pressurized remote line incorrectly can whip fittings into your hands or cause binding paintball tank threads in your ASA. Always follow this exact reverse degassing drill:
- Slide-Check Depressurization: Slide the slide-check valve rearward toward your tank. This instantly blocks upstream bottle gas and vents all residual pressure inside the marker hose into the atmosphere with an audible pneumatic pop.
- Fire Clearing Shot: Point the marker downrange into a chrono station or barrel block and cycle the trigger once to exhaust any trapped valve air.
- Retract Female QD Collar: Pull back the outer knurled collar on the quick-disconnect coupling. Because the line is depressurized to 0 PSI, the male nipple will disconnect effortlessly with zero mechanical resistance or projectile whipping force.
- Tank Shutdown: When packing gear at the end of the day, back off the tank on/off knob counter-clockwise, then cycle the slide-check forward and backward to vent remaining manifold gas before unscrewing the bottle.
Under no circumstances should you ever attempt to thread or quick-connect a remote line to a tank’s high-pressure fill nipple. Fill nipples connect directly to raw 3,000–4,500 PSI cylinder volume. Standard remote line quick couplers are rated for 850 PSI regulated working pressure. Coupling 4,500 PSI raw gas into an 850 PSI line assembly will instantly detonate the hose or trigger the regulator’s 1.8K burst disk, releasing catastrophic shrapnel!
Troubleshooting Common Remote Line Failures
Even high-end airline setups experience pneumatic anomalies in extreme weather or heavy tournament conditions. Here is our field armorer triage matrix:
1. Air Bleeding from the Quick-Disconnect Collar
If high-pressure air leaks continuously from the junction between the female QD coupler and the male ASA fitting, check the internal locking ball bearings. Over time, sand and trail dirt accumulate inside the bearing race, preventing the collar from snapping fully forward. Clean the collar with isopropyl alcohol and apply three drops of light synthetic marker oil to the bearings. Inspect the male nipple’s forward sealing face for micro-nicks or deep scratches that prevent a true seal against the internal urethane seat.
2. Slide-Check Leaks When Pushed Forward
The slide-check valve utilizes two internal #010 or #011 polyurethane O-rings that slide over radial cross-drilled air transfer ports. When dirt enters the line or the assembly runs dry, these O-rings tear or develop flat spots. Unscrew the slide-check retaining nut, extract the core, and replace the internal O-rings with 90-durometer urethane rings coated in Dow 33 or Dye Slick Lube as detailed in our paintball lube guide.
3. Velocity Shootdown on Rapid Fire Strings
If your marker chronographs at 285 FPS on single shots but drops to 240 FPS during ramping bursts, your paintball remote line has a pneumatic flow bottleneck. Verify that your tank on/off knob is screwed down completely to achieve full pin valve travel. Partially depressed pins choke the inlet orifice from 0.150 inches down to 0.030 inches, starving the marker of volume. If using a mechanical marker or high-pressure gas-thru setup, review our technical comparison on macroline vs steel braid lines to ensure your primary plumbing satisfies volume demands.
Essential Armorer Remote Line Workbench Gear
To service, maintain, and upgrade your paintball remote line in the pits, keep these field-tested armorer components in your gear bag:
Ninja Paintball Pro Remote with Slide Check
The gold standard in microbore remote systems. Features 4,500 PSI working pressure rating, zero-whip slide check, and dual rotational swivels for full 360-degree range of motion.
Captain O-Ring #015 Urethane Tank O-Rings (25-Pack)
Heavy-duty 90-durometer polyurethane replacement O-rings engineered specifically to withstand repeated remote adapter threading and high-pressure shearing.
Video Walkthrough: Operating & Bleeding a Remote Line
Watch this practical overview demonstrating proper slide-check operation, line venting, and harness routing to keep your tactical marker light and responsive:
Final Armorer Verdict: Optimal Remote Configuration
If you play MagFed, heavy scenario woodsball, or run an authentic mil-sim loadout, a high-quality paintball remote line is the single most effective ergonomic upgrade you can make. Never compromise on safety: choose a modern high-pressure straight microbore rated to 4,500 PSI equipped with an integrated slide-check valve. Equip every ASA adapter with 90-durometer urethane O-rings, inspect QD ball bearings regularly, and always vent downstream pressure prior to uncoupling. Adhering to these armorer standards guarantees zero whipping accidents, minimal velocity shootdown, and flawless all-day cyclic performance.
Frequently Asked Questions
Can I use a paintball remote line with both CO2 and compressed air (HPA)?
Yes, standard remote lines are compatible with both CO2 and high-pressure compressed air (HPA). However, when running CO2 with an anti-siphon or vertical cylinder, cold liquid CO2 can cause remote line O-rings to freeze, shrink, and dump gas during rapid firing. HPA delivers cleaner, temperature-stable gas through your remote umbilical line without freezing internal seals.
Why is my slide-check valve stuck and difficult to move?
A stuck slide check is caused by either high line pressure trapping the sleeve, dry internal quad-rings, or grit accumulation inside the sliding sleeve race. Always depressurize the system at the tank on/off knob first, apply 2 drops of Dow 33 or 100% silicone lubricant to the sleeve seams, and slide the collar back and forth to distribute the lubricant.
How often should I replace the O-rings on my remote line?
The #015 urethane O-ring on the tank and marker ASA adapters should be inspected before every weekend of play and replaced every 3 to 6 months, or whenever flat spots or micro-tears appear. Internal slide-check and QD coupler O-rings should be serviced with fresh silicone grease annually.
Does a paintball remote line cause my paintball gun to shoot slower or lose velocity?
A properly sized paintball remote line does not reduce single-shot muzzle velocity. However, if using an older narrow-bore coiled hose during sustained rapid fire (12+ BPS), dynamic friction can cause minor velocity drop (shootdown). Upgrading to a straight high-pressure microbore eliminates noticeable flow restriction.
Is it safe to leave a remote line pressurized during a lunch break?
No. Never leave a remote line or marker pressurized when stepping off the field into staging or picnic areas. Always disengage the slide check to exhaust line pressure, disconnect the marker from the hose, install a barrel blocking device, and back off the tank on/off valve.
Can I shorten a coiled remote line if it is too long?
Do not attempt to cut, trim, or re-clamp high-pressure coiled remote lines at home. Factory crimped fittings are hydraulically tested to 10,000+ PSI burst thresholds. Homemade worm-drive clamps or DIY compression fittings will fail violently under 850 PSI regulated gas pressure. If excess length is a concern, switch to a fixed-length straight microbore.