15+ BPS Semi-Auto & 10.5 BPS NXL Ramping • 3-Screw & Rebound Protocol
Field Execution at a Glance: 15+ BPS Electronic Trigger Walking
Learning how to walk paintball trigger assemblies at 15+ balls per second (BPS) in uncapped semi-automatic—or effortlessly sustain a 10.5 BPS NXL ramping stream with zero barrel whip—requires synchronizing your flexor tendons with a 1.2-millimeter microswitch throw and your marker’s 120 PSI pneumatic rebound. By floating your firing-hand thumb alongside the upper frame cheek (“Violin Grip”) instead of wrapping it around the back cap, your index and middle fingers operate as phase-shifted pistons firing every 66.6 milliseconds (7.5 pulls per second per finger) while the barrel tip stays locked within a 1.5-inch group at 60 feet.
- The “Violin” Open-Thumb Rule: Never wrap your firing-hand thumb around the rear grip frame while walking the trigger; clamping the thumb compresses the carpal tunnel tendons and caps alternating finger speed at 8.5 to 9.5 BPS.
- 3-Screw Travel Calibration: Dial pre-travel to 0.5 mm and set the post-travel stop screw 0.3 mm past microswitch click (or optical beam break) so your fingers never waste energy bottoming out a 4 mm stock throw.
- Fatal Field Error to Avoid: Never mash the trigger with forearm tension (which jerks the 14-inch barrel tip 4 inches downward on the breakout) or lower board debounce to 1 ms where pneumatic recoil triggers illegal NXL Rule 7.2.1 runaway bounce.
In our field tests and match clinics, one of the most common misconceptions among newer tournament players is that modern 10.5 BPS NXL ramping has made learning to walk paintball trigger mechanisms obsolete. Then we put those same players on a chronograph range or watch them in a tournament point: because they slap the trigger with a stiff, single-finger jerk to initiate ramping, their muzzle dips 6 inches off the lane on the first three shots, their stream drops out of ramp mid-gunfight when transitioning to their left shoulder, and they are completely helpless in uncapped semi-automatic events, 1-on-1 mechanical/electronic hybrid drills, or instant double-tap snap duels.
Whether your goal is ripping a clean, rope-like 15.5 to 18.0 BPS string in uncapped semi-auto or holding a laser-flat 10.5 BPS tournament lane with either hand while sprinting to a corner bunker, trigger walking is an exact biomechanical and mechanical science. Before adjusting your grip frame, pair this training protocol with our armorer tutorial on how to install aftermarket trigger on Planet Eclipse, eliminate runaway switch chatter using our diagnostic guide on paintball trigger bounce causes and fixes, and apply your trigger speed directly to our paintball snap shooting 50-ball daily drill and breakout lane shooting paintball drills.
1. The Electromechanical Physics: Milliseconds, Microswitches & Rebound Impulse
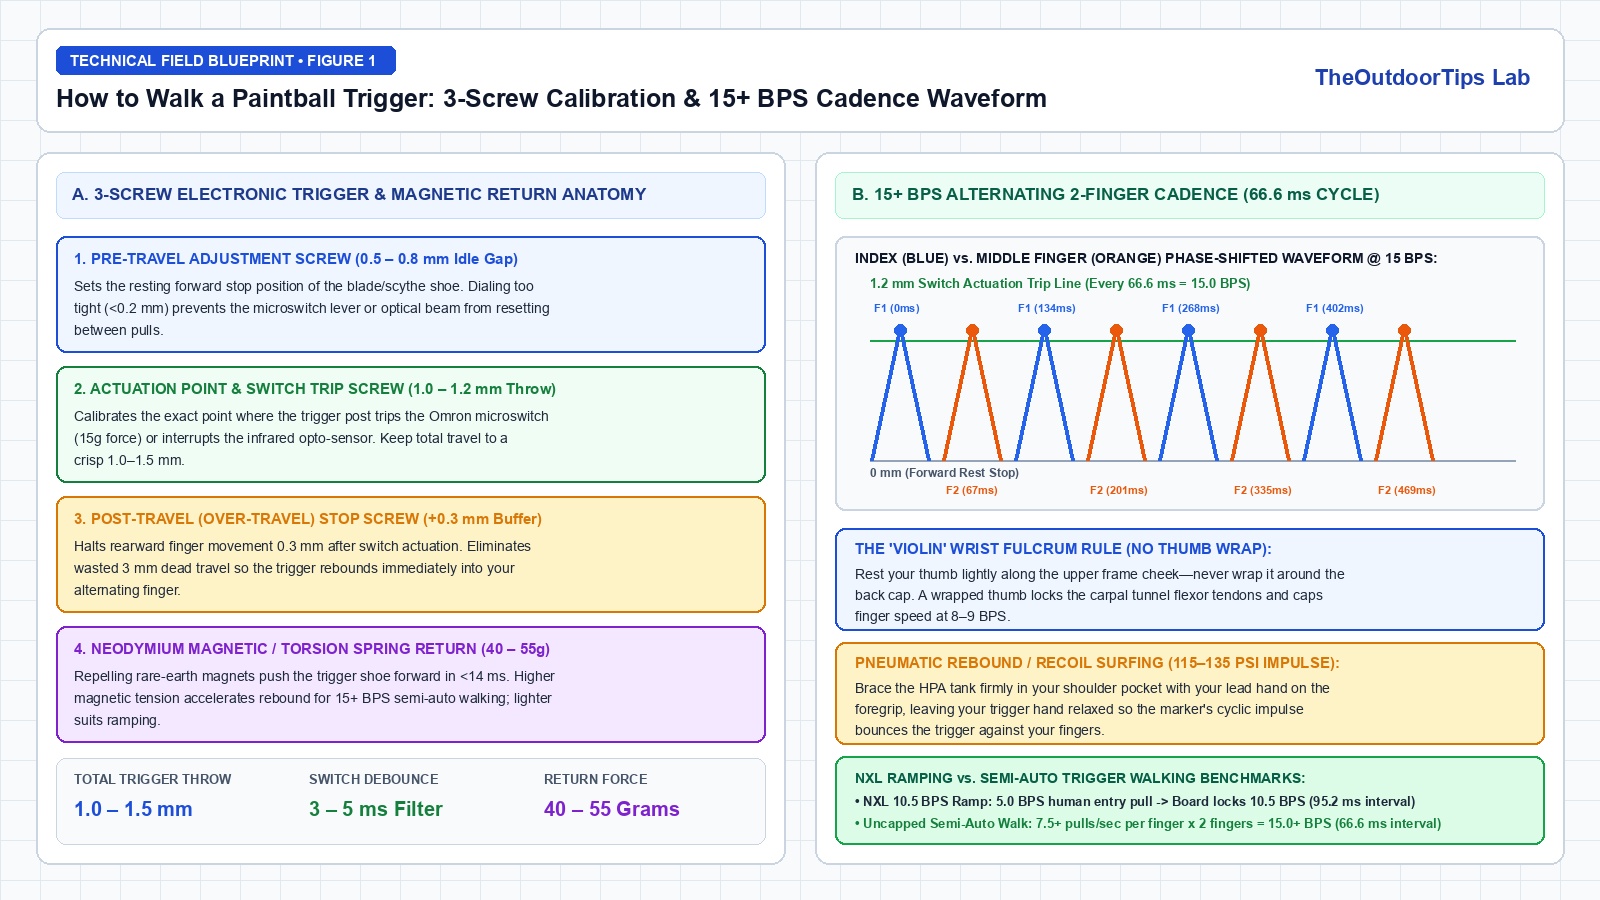
To understand how professional players walk paintball trigger shoes at 15 to 20+ BPS without fatiguing their forearms, we must break down the millisecond timing of an electronic paintball marker’s firing loop. To achieve a sustained cadence of 15.0 balls per second in semi-automatic mode, the marker’s circuit board must register a valid switch closure and release every 66.67 milliseconds (1,000 ms ÷ 15).
Physiologically, a human index finger tapping alone hits a neurological twitch ceiling around 7.5 to 9.0 repetitions per second (110 to 133 ms per tap). However, when you alternate your index finger (F1) and middle finger (F2) in a 180-degree phase-shifted “walking” motion—where F1 releases forward at the exact millisecond F2 drives rearward—each individual finger only needs to cycle at 7.5 Hz (once every 133.3 ms) to deliver a combined 15.0 BPS output at the breech.
Inside the grip frame, three mechanical variables dictate whether the marker can physically keep up with your fingers:
- Total Linear Throw (1.0 – 1.5 mm vs. 4.5 mm Stock): Mechanical work equals force multiplied by distance (W = F × d). If your factory trigger travels 4.5 mm per pull, your fingertips must move a cumulative 135 millimeters (5.3 inches) every second at 15 BPS. By tightening the pre-travel and post-travel set screws to restrict total throw to 1.2 millimeters, you reduce finger excursion by 73%, allowing short, effortless micro-twitches.
- Switch Actuation & Magnetic Return Velocity (< 14 ms): Modern high-end markers (Planet Eclipse CS3, Geo R5, 180R, Dye M3+/DSR+, DLX Luxe Idol) use either a levered Omron microswitch requiring 15–25 grams of force or a zero-contact infrared optical break-beam sensor, paired with repelling rare-earth neodymium magnets (or a torsion return spring) dialed to 40 to 55 grams of return force. Strong magnetic return snaps the trigger shoe forward in under 14 milliseconds so the switch resets before your second finger arrives.
- Pneumatic Cyclic Rebound (“Recoil Surfing”): When a spool-valve bolt cycles at 105–135 PSI to launch a 3.2-gram paintball at 290 FPS (~11.4 Joules), the reciprocating bolt mass imparts a sharp, rhythmic longitudinal impulse into the marker body. When you anchor your 450–550 PSI HPA tank tightly into your shoulder pocket and hold the front foregrip with 70% grip force while keeping your rear trigger hand relaxed at 20% tension, the marker’s cyclic vibration physically bounces the trigger shoe forward and back against your stationary fingertips.
2. Hand Biomechanics: The “Violin” Grip, Trigger Profiles & Two-Hand Tension Balance
In our armorer clinics, 90% of players who struggle to break past 9 BPS in semi-auto are fighting their own anatomy. Try this physical test right now with your bare hand: squeeze your thumb tightly against your palm as if gripping a baseball bat, then try to flutter your index and middle fingers rapidly. You will immediately feel tightness along the underside of your wrist. Now open your thumb upward into a relaxed “thumbs-up” posture and flutter your index and middle fingers—your finger speed instantly doubles.
A. The “Violin” Open-Thumb Grip & Wrist Fulcrum
Anatomically, the tendons that flex your index and middle fingers (flexor digitorum superficialis and profundus) pass through the narrow carpal tunnel alongside the flexor pollicis longus tendon of the thumb. When you wrap your firing-hand thumb around the rear grip frame of a paintball gun, you create cross-tendon friction and lock your wrist joint. To walk paintball trigger assemblies like a pro, place the pad of your thumb lightly against the upper side cheek of the receiver frame (or float it slightly off the grip), rotate your rear elbow 10 degrees outward to align your forearm tendons, and rest your ring and pinky fingers lightly beneath the trigger guard as a pivot stabilizer.
B. Fingertip Placement & Blade vs. Scythe Trigger Shoe Geometry
Never bury your fingers up to the first knuckle inside the trigger guard. Only the distal 4 to 6 millimeters of your index and middle fingertips should contact the face of the trigger shoe, where tactile mechanoreceptor density is highest and rotational arc radius is optimized:
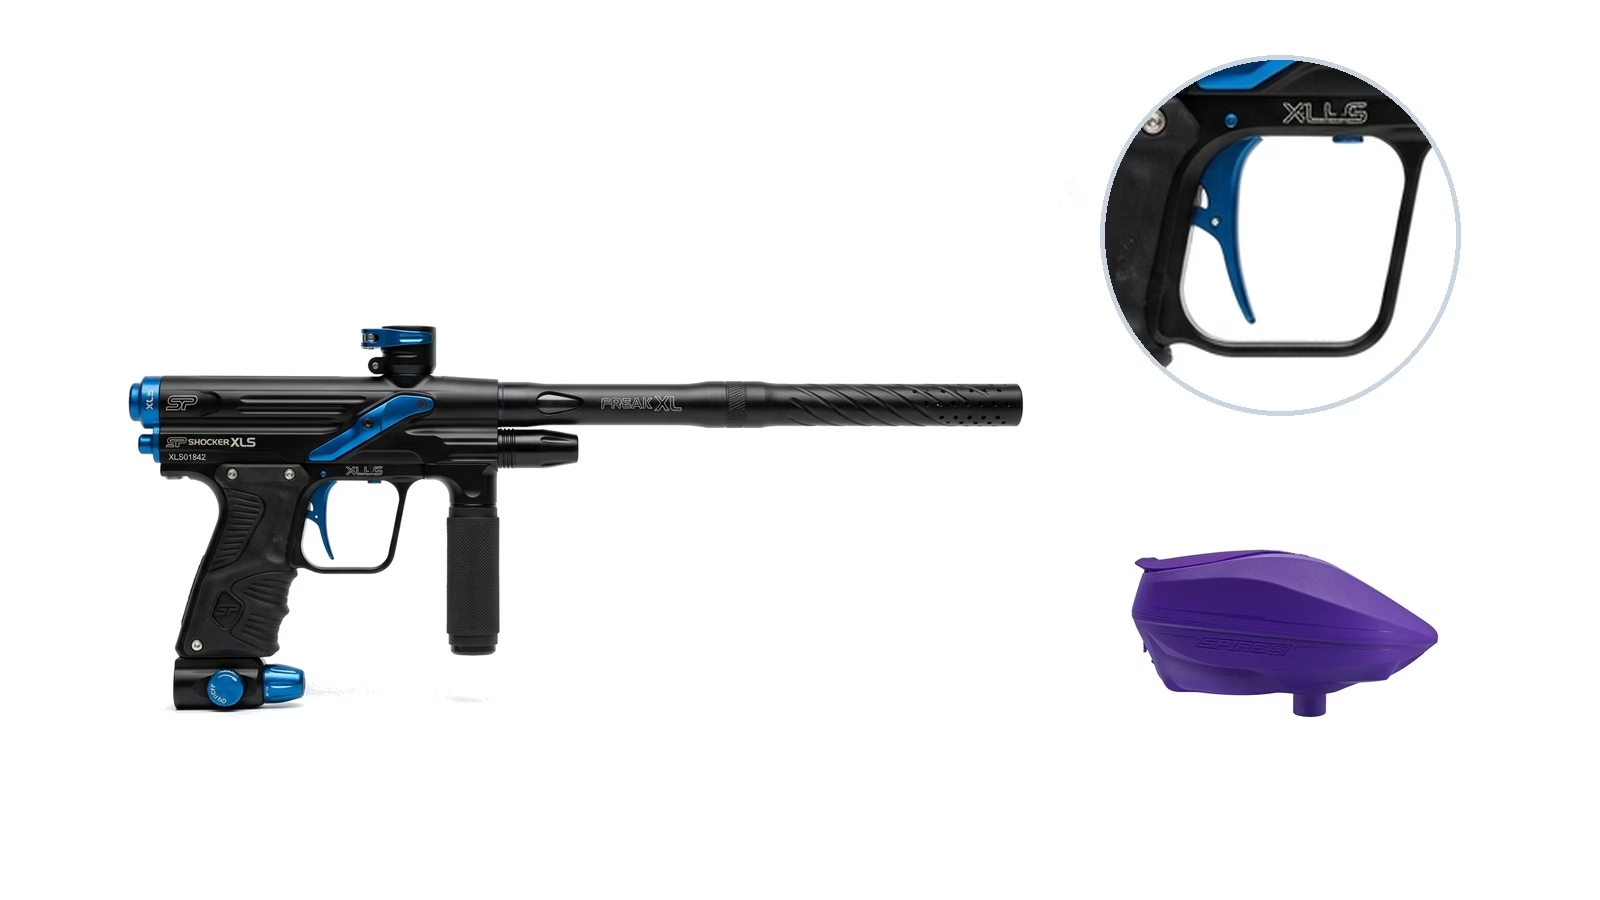
- Flat / Deuce / Blade Triggers (Kelly / Infamous / Exalt): Present a straight, vertical contact plane. Because the bottom of a top-pivoting blade moves through a wider linear arc for the same angular rotation, positioning your middle finger at the bottom tip of a blade trigger gives maximum mechanical leverage for high-speed semi-auto walking and rapid off-hand transitions.
- Scythe / S-Curve Triggers (Stock Planet Eclipse / Dye UL): Feature a forward hook at the top and a recessed curve at the bottom that naturally cradles the longer middle finger alongside a shorter index finger, making scythe profiles popular for steady 10.5 BPS ramping control (see our full blade vs scythe paintball trigger comparison and how to tune paintball dwell and debounce guide).
3. Master Diagnostic Matrix: Fixing Trigger Walking & Cadence Breakdowns
Use the structured diagnostic lookup matrix below to troubleshoot stuttering firing streams, finger lockups, velocity drop-offs, or NXL referee bounce penalties on the practice grid.
| Condition / Scenario | Root Cause / Physics Mechanism | Armorer Fix / Tactical Counter | Recommended Tool / Gear Link |
|---|---|---|---|
| 1. Trigger Locks Up (“Dead Pulls”) Above 11 BPS | Index finger traps the trigger shoe behind the microswitch reset point before the middle finger strikes, or magnetic return tension is too weak (< 25g) to push the blade forward in under 15 ms. | Back out the pre-travel screw 1/4 turn to widen reset margin, increase magnetic return screw by 1.5 turns, and practice full finger lift-off on the rebound stroke. | AmazoneBay |
| 2. Barrel Tip Dips 4–6 Inches Downward While Walking | Over-travel stop screw is backed out too far (> 3 mm throw) and player is squeezing the rear grip frame with their thumb, transferring downward flexor torque to the muzzle. | Set post-travel stop screw to +0.3 mm past actuation, float thumb alongside upper frame cheek, and lock 70% stabilizing tension into the front foregrip & shoulder tank butt. | AmazoneBay |
| 3. Runaway Double/Triple Shots on Single Pull (Trigger Bounce) | Actuation point is set hair-thin (< 0.3 mm) with board debounce at 1–2 ms; the 120 PSI bolt impulse shakes the microswitch contact closed repeatedly (illegal under NXL Rule 7.2.1). | Raise software debounce filter to 4–5 ms, add 1/4 turn of forward pre-travel margin, and verify zero extra shots on the slap-test before walking onto the field. | AmazoneBay |
| 4. Breech Chops or Dry-Fires Above 14 BPS Semi-Auto | Gravity/agitation loader feed rate falls behind the 66.6 ms breech cycle, or break-beam breech eyes are fouled with paint oil and prematurely releasing the bolt. | Keep break-beam eyes ON during live fire, clean eye prisms + rubber ball detents, and pair a high-speed force-assisted loader (Virtue Spire V / Dye LTR) rated for 20+ BPS. | AmazoneBay |
| 5. Ramping Stream Drops Out Mid-Lane (Off-Hand Side) | Non-dominant hand pauses for > 200 ms (< 5.0 BPS sustain threshold) when shifting weight behind the bunker, causing the NXL board logic to reset back to semi-auto. | Train 60-second off-hand two-finger flutter drills at 7–8 BPS human input (giving a 3 BPS safety margin above the 5.0 BPS NXL ramp sustain floor). | AmazoneBay |
| 6. Gritty Trigger Pivot & Sluggish Forward Reset | Old gelatin paint residue or thick Dow 33 grease gummed inside the sealed ball-bearing trigger pivot pin, increasing rotational drag friction. | Remove the trigger pin, flush the miniature ball bearing with isopropyl alcohol, and apply 1 drop of ultra-thin dry PTFE/gun oil (NEVER put thick Dow 33 grease on trigger bearings). | AmazoneBay |
4. Step-by-Step Field & Home Protocol: How to Walk a Paintball Trigger at 15+ BPS
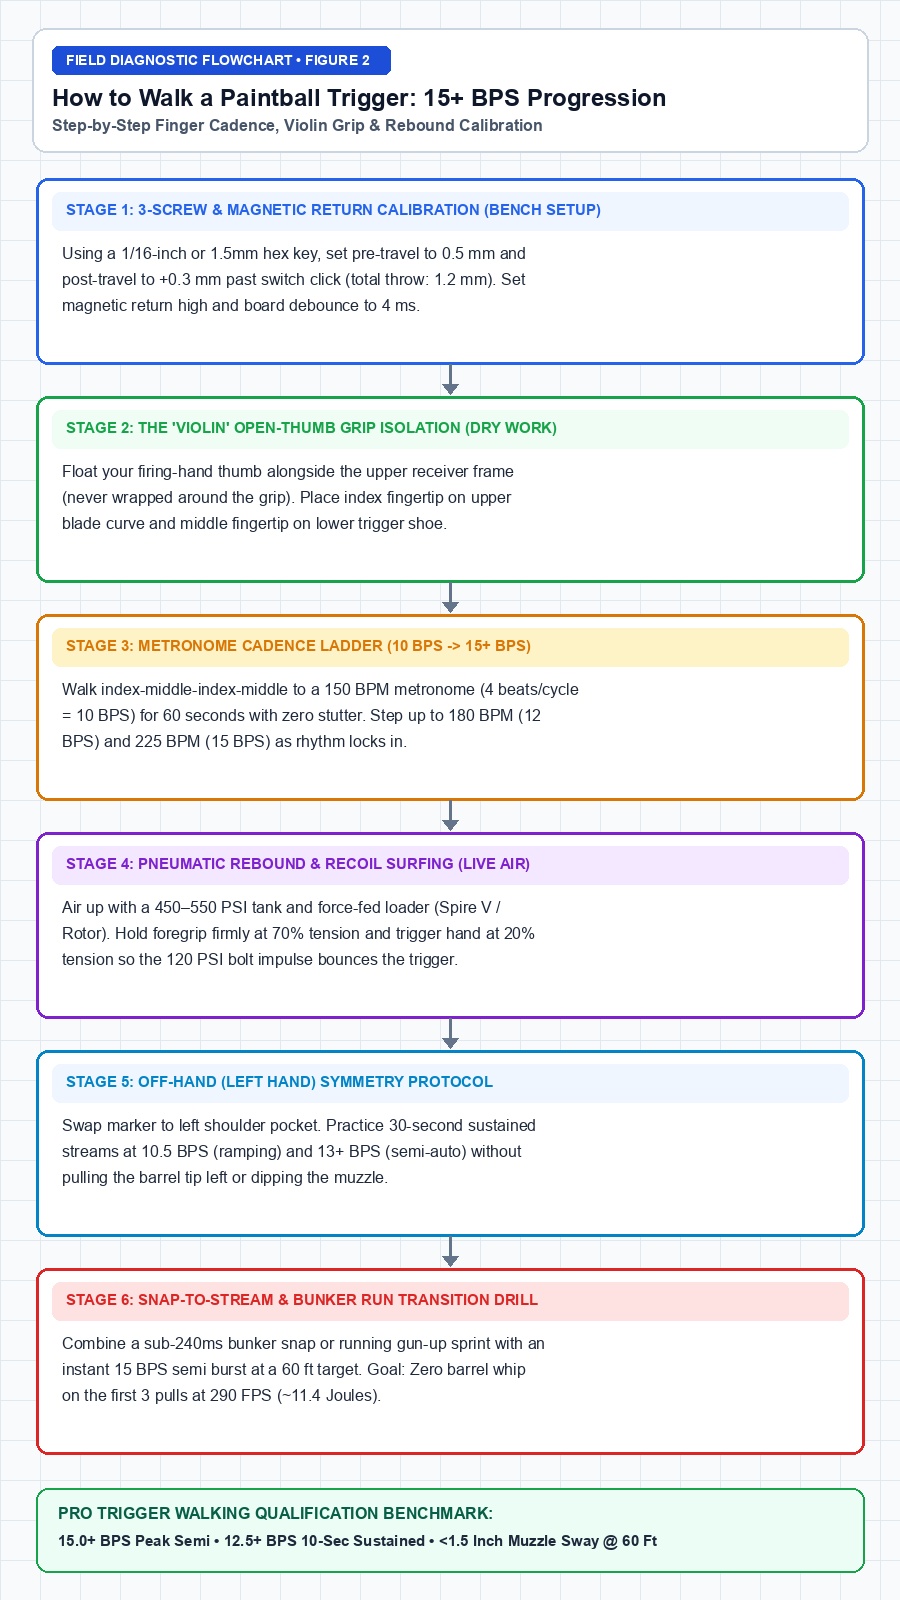
Follow this progressive 5-phase training curriculum to build an effortless, ambidextrous 15+ BPS trigger walk without developing forearm pump or sacrificing muzzle stability.
Phase 1: 3-Screw Mechanical Calibration & Bearing Prep (Bench Setup)
- Degas & Power Down: Remove your HPA tank, clear the breech, and turn the electronics off so you can hear the acoustic click of the microswitch (or watch the OLED sensor icon in Hardware Test mode for optical triggers).
- Dial Pre-Travel (0.5 – 0.8 mm): Using a 1/16-inch or 1.5mm Allen key, turn the upper pre-travel screw clockwise until the trigger shoe sits 0.5 mm ahead of the switch activation point. Verify that the switch still clicks cleanly when released slowly.
- Dial Post-Travel Stop (+0.3 mm): Pull the trigger until the switch clicks, then turn the lower post-travel stop screw clockwise until it bottoms out against the frame. Back it out 1/4 turn counterclockwise (+0.3 mm buffer) so the switch activates reliably under fast, light taps without extra dead travel.
- Set Return Tension (40 – 55 Grams): For high-speed semi-auto trigger walking, set your magnetic return screw to medium-high (75% inward). The stronger forward snap pushes your finger back out in under 14 ms, actively assisting your cadence.
Phase 2: The “Violin” Dry-Walk & Metronome Cadence Ladder (10 Mins Daily)
Raw speed comes from rhythm, not brute force. When beginners try to walk paintball trigger blades as fast as possible right away, their index and middle fingers fire simultaneously (“galloping”) instead of alternating at an even 50/50 duty cycle.
- The Violin Posture: Hold your unloaded marker (with tank attached for realistic balance) in your living room. Float your thumb parallel to the upper receiver frame, rest your ring and pinky fingers beneath the trigger guard lip, and place the very tips of your index and middle fingers on the trigger face.
- 150 BPM -> 225 BPM Metronome Progression: Open a free smartphone metronome app at 150 BPM. Treat each beat as 4 alternating pulls (Index-Middle-Index-Middle = 600 pulls/min = 10.0 BPS). Walk the trigger smoothly for 60 seconds with zero gaps or stutters.
- Step Up the Ladder: Once 10.0 BPS feels effortless with both your right and left hands, increase the metronome to 180 BPM (12.0 BPS) for 60 seconds, then 210 BPM (14.0 BPS), and finally 225 BPM (15.0 BPS). Your OLED board’s built-in ROF (Rate of Fire) training screen will confirm your peak and average BPS.
Phase 3: Laser Barrel-Tip Stability Audit (Zero Muzzle Whip)
Firing 15 BPS is useless if your barrel tip whips 5 inches left and right with every finger stroke—at 75 feet, a 2-degree muzzle wobble spreads your paint stream across a 32-inch circle. Tape a lightweight laser pointer underneath your 14-inch barrel tip aimed at a wall dot 15 feet away. Walk the trigger at 14+ BPS for 10 seconds with your dominant hand, then 10 seconds with your off-hand. If the laser dot dances wider than a 1.5-inch circle, shift grip clamping pressure from your rear trigger hand (keep at 20% tension) to your front foregrip hand (70% tension) and press the HPA tank butt harder into your sternum-deltoid pocket.
Phase 4: Live-Air Pneumatic Rebound Surfing (“Riding the Recoil”)
Step onto the target range with a full 4500 PSI HPA tank, a force-fed electronic loader (Virtue Spire V or Dye LTR), and 200 paintballs chronographed at 290 FPS (~11.4 Joules). Set your marker to uncapped semi-auto. Initiate a 12 BPS two-finger walk, then consciously relax your wrist by 50% while keeping your fingertips hovering 1 millimeter inside the trigger guard. You will feel the 120 PSI cyclic bolt impulse bounce the trigger shoe forward and back against your alternating fingers—jumping your cadence from 12 BPS to 15.5–17.0 BPS almost automatically.
Phase 5: Tournament 10.5 BPS Ramp Entry & Running Gun-Up Sustain
Switch your board to NXL 10.5 BPS ramping mode. Practice two critical match scenarios: first, Instant Ramp Activation on the Breakout—executing 3 lightning-fast two-finger pulls in under 150 ms as the horn sounds so your marker hits full 10.5 BPS ramping by your second stride toward your bunker; second, One-Finger vs. Two-Finger Sustain While Running—maintaining a smooth 7 BPS two-finger flutter while sprinting laterally to the Dorito or Snake corner, keeping your upper body decoupled from your legs as detailed in our dorito side paintball strategy and back player paintball suppression tactics manuals.
Referee Slap-Tests, Switch Debounce Floors & Barrel Blocking Rules
Under NXL Tournament Rule 7.2.1, any marker that fires more than one paintball per single trigger pull in semi-auto—or continues firing after the finger releases the trigger in ramping mode—assesses a major penalty. When calibrating a hair-trigger to walk paintball trigger frames rapidly, always perform the Referee Tank-Slap Test: air up the marker with eyes off, hold it by the foregrip, and strike the back of the HPA tank firmly with your palm. If the marker fires by itself from shock vibration, increase your software debounce filter to 4 or 5 ms and widen pre-travel by 1/4 turn. Always keep a heavy-duty barrel sleeve (barrel condom) locked over your muzzle during dry-fire trigger walking drills outside of an enclosed chronograph net.
5. Armorer Workbench: Best Triggers, Loaders & Calibration Tools for 15+ BPS
Upgrading from a heavy factory cast-aluminum trigger shoe to a CNC-machined billet blade or deuce trigger with dual sealed ball bearings removes side-to-side play and cuts rotational inertia in half. Pair your trigger setup with clear thermal optics using our guide on how to change paintball lens.
Infamous Deuce / Exalt CNC Aluminum Bearing Trigger
Ultralight aircraft-grade 6061-T6 billet aluminum trigger with dual high-speed stainless ball bearings and 4-point external travel/magnetic adjustment screws for sub-1.2mm throws.
Virtue Spire V / Dye LT-R High-Speed Electronic Loader
Delivers continuous, jam-free 20+ BPS stack tension so your breech never outruns the feedneck during high-speed 15+ BPS uncapped semi-automatic trigger walking drills.
Bondhus / Exalt Precision Ball-End Allen Key Set
Includes exact 0.050-inch, 1/16-inch, and 1.5mm hardened steel hex wrenches required to micro-adjust pre-travel, post-travel, and magnetic return grub screws without stripping threads.
Handheld Paintball Radar Chronograph & BPS Meter
Simultaneously measures muzzle velocity (285–295 FPS) and real-time balls-per-second (BPS) string cadence so you can audit both your dominant and off-hand trigger walking speeds.
6. Pro Armorer & Field Clinic: Trigger Setup & Walking Technique Video
Watch the hands-on demonstration below to see how tournament players position their thumb in the open Violin posture, calibrate pre-travel and post-travel stops to a 1.2-millimeter throw, and transition smoothly between right-hand and left-hand trigger walking.
Rhythm Over Tension: The Secret to Effortless 15+ BPS Trigger Control
In every tournament clinic we run, the breakthrough moment when a player learns to walk paintball trigger assemblies above 15 BPS happens the instant they stop squeezing the rear grip frame. By dialing your 3-screw trigger geometry down to a crisp 1.2-millimeter throw with 45 grams of magnetic rebound, floating your thumb along the upper receiver cheek, and anchoring 70% of your stability in the front foregrip and shoulder pocket, your index and middle fingers can flutter effortlessly while your barrel tip stays dead-flat on target.
Dedicate 10 minutes a day to the 150-to-225 BPM metronome ladder with both hands. Within two weeks, both your uncapped semi-auto burst speed and your off-hand 10.5 BPS tournament lane accuracy will reach pro-division standards.
7. Frequently Asked Questions: How to Walk a Paintball Trigger
1. Why does wrapping my thumb around the grip slow down my trigger walking speed?
Wrapping your thumb tightly around the rear grip frame contracts the flexor pollicis longus tendon inside the carpal tunnel, creating mechanical friction against the index and middle finger flexor tendons and locking your wrist. Floating your thumb along the upper side cheek of the frame (“Violin Grip”) frees those tendons and instantly adds 4 to 6 BPS to your alternating finger speed.
2. Should I set my magnetic trigger return light or heavy to walk a paintball trigger fast?
For high-speed 15+ BPS uncapped semi-automatic walking, set your magnetic return tension to medium-heavy (40 to 55 grams). A stronger magnetic rebound snaps the trigger shoe forward in under 14 milliseconds so the switch resets before your alternating finger strikes. A feather-light return feels soft on single pulls but causes the trigger to lag behind your fingers above 12 BPS.
3. What is the best trigger shape for walking: Blade (Deuce) or Scythe?
A straight or slightly angled Blade / Deuce trigger is favored by most pro players for fast walking and off-hand transitions because it offers a uniform, flat contact face from top to bottom and maximizes bottom-tip leverage. A curved Scythe trigger contours around the fingertips and is preferred by players who want a locked-in ergonomic pocket during sustained 10.5 BPS ramping.
4. Does learning to walk a paintball trigger still matter for 10.5 BPS NXL ramping?
Yes. Even in 10.5 BPS NXL ramping, you must execute 3 semi-auto pulls at 5.0+ BPS to engage the ramp and maintain 5.0+ BPS input with zero pauses while running, diving, or switching to your non-dominant left shoulder. Players with a smooth two-finger trigger walk hit full ramping 180 milliseconds faster off the break and never drop their lane during bunker transitions.
5. How do I stop my barrel from bouncing up and down while walking the trigger?
Muzzle bounce occurs when your post-travel stop screw allows excessive rearward throw (> 3 mm) and your firing hand is gripping the frame too tightly. Dial your post-travel stop to +0.3 mm past switch actuation, lock 70% of your holding tension into your front foregrip hand pulling the HPA tank into your shoulder, and keep your trigger hand relaxed at 20% tension.
Official Tournament Rulebook Companion: See how the 10.5 BPS ramping algorithm and 300 FPS chronograph penalties are enforced on the field in our NXL Tournament Rules Explained: X-Ball & M500 Guide.