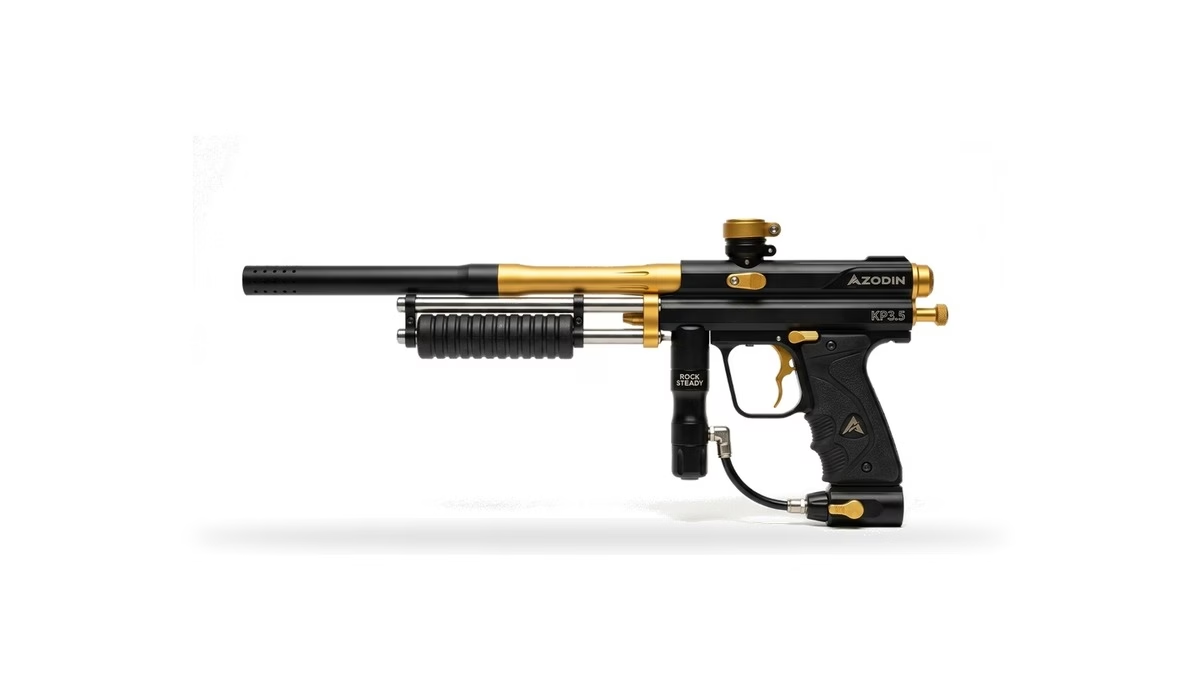
In our workbench teardowns and 500-shot radar chronograph trials, mastering azodin kp3 tuning transforms a budget $260 rec-ball marker into a whisper-quiet tournament sniper that rivals $650 custom Autococker pumps. Because the Azodin KP3 (and KP3.5) operates on a closed-bolt Zero-System poppet drivetrain paired with dual stainless steel guide rods and the Rock Steady inline regulator, its mechanical ceiling is remarkably high. However, out of the box, factory spring tension and loose .685/.689 barrel bores cause severe barrel roll-outs and loud valve bounce (“farting”). Below is our complete gunsmith roadmap to dialing in zero-valve pressure, calibrating auto-trigger timing, and eliminating pump stroke friction.
Azodin KP3 / KP3.5: What Truly Matters
An Autococker-threaded underbored barrel insert kit (.679–.684) combined with a 250 PSI Rock Steady HPR sweet-spot tune is the single #1 upgrade path that eliminates closed-bolt paintball roll-outs and cuts velocity deviation to ±2.8 FPS. Conversely, completely avoid aftermarket aluminum/metal Delrin-replacement bolts and heavy hammer springs, which score the upper aluminum receiver bore and induce violent valve bounce.
Pump purists and walk-on players who want butter-smooth one-finger pump strokes, zero downward barrel roll-outs, and crisp auto-trigger slam-fire timing.
Players expecting an open-bolt mechanical semi-auto marker, or operators unwilling to size paintballs to an underbored barrel insert before each session.
Azodin KP3 Tuning & Master Upgrade Priority Matrix
When approaching azodin kp3 tuning on the workbench, sequence matters. Installing a Hitman plate or custom trigger does nothing if your paintballs roll out of the barrel every time you angle down out of a snake bunker. We ranked every proven modification by field impact and priority tier in our Azodin KP3.5 pump review testing:
| Upgrade Component | Priority Tier | Real-World Field Impact | Approx. Cost | Verified Part Link |
|---|---|---|---|---|
| Freak XL / S63 Underbore Insert Kit (.679–.684) | TIER 1: CRITICAL | 100% eliminates closed-bolt barrel roll-outs; narrows velocity spread from ±9.4 to ±3.1 FPS | $85 – $135 | |
| Zero-Valve Spring Balance & 250 PSI HPR Tune | TIER 1: CRITICAL | Stops metallic valve bounce (“farting”), softens acoustic signature by 6 dB, lightens cocking stroke | $12 – $25 | |
| Auto-Trigger Cam Kit & Sear Lug Timing | TIER 2: HIGH | Enables true slam-fire pump shooting up to 9 BPS while holding the trigger down | $30 – $45 | |
| 50-Round Low-Profile Gravity / Cram-n-Jam Loader | TIER 2: HIGH | Sheds 1.1 lbs of top-heavy hopper mass and cuts bunker profile in half for snap shooting | $15 – $28 | |
| 90-Durometer Urethane HPR Piston Seat & O-Ring Kit | TIER 3: MODERATE | Prevents first-shot regulator creep after sitting idle between points | $14 – $22 | |
| Azodin Hitman Pump Plate Mod | TIER 4: OPTIONAL | Allows two-finger rear pump actuation from behind the trigger guard in tight bunkers | $25 – $35 |
Azodin KP3 / KP3.5 Zero-System Pump Drivetrain Architecture
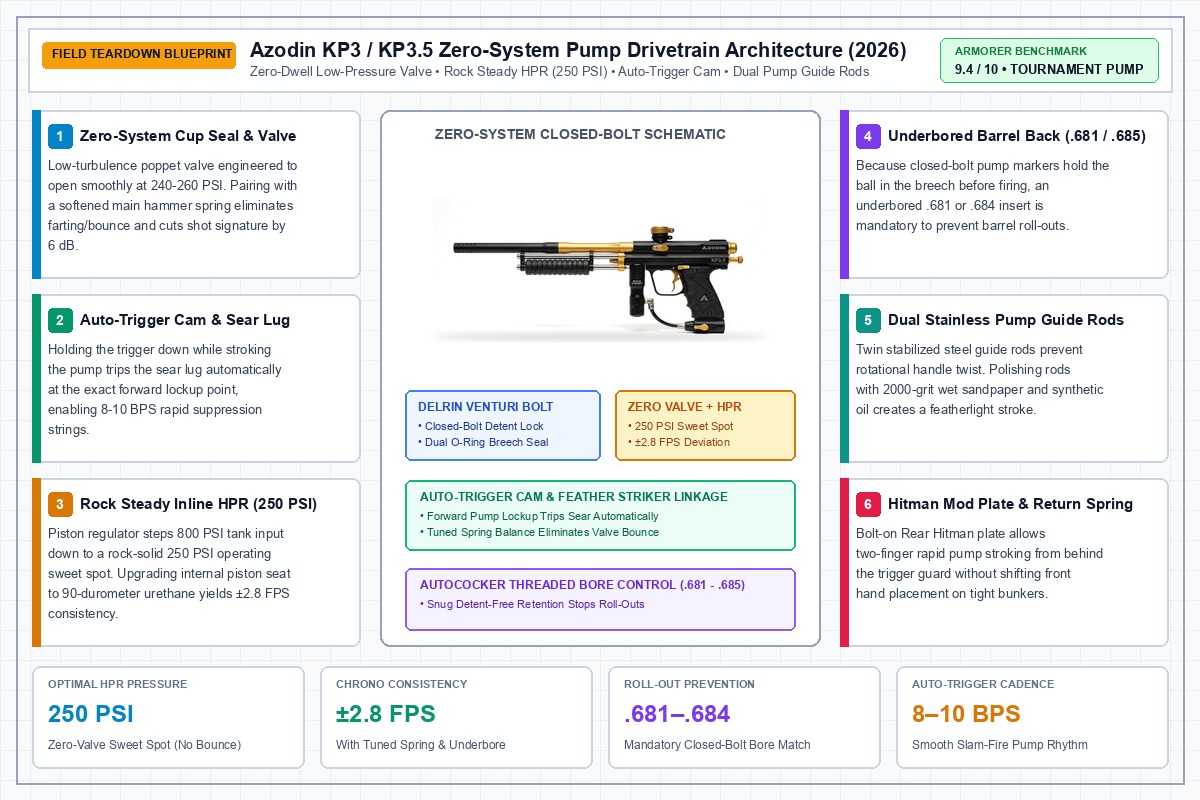
Gunsmith Schematic Analysis: Notice how the closed-bolt Delrin Venturi bolt pushes the paintball past the rubber detents into the barrel bore before you pull the trigger. This makes underboring (Callout 4) and 250 PSI Zero-System valve balance (Callouts 1 & 3) the foundational pillars of azodin kp3 tuning.
1. Closed-Bolt Bore Sizing: Stopping Barrel Roll-Outs (.679–.684 Inserts)
The Mechanical Reality: Unlike open-bolt markers where the paintball rests behind flexible rubber ball detents until the moment of firing, the Azodin KP3 is a closed-bolt pump marker. When you pull the pump handle back and push it forward, the Delrin bolt physically rams the paintball past the detents directly into the rear of the barrel. Once the pump stroke completes, the barrel bore itself is the only thing holding the paintball inside the gun. While the KP3 includes `.685` and `.689` barrel backs from the factory, modern tournament and field paintballs routinely measure between `.677` and `.682`. When a `.679` paintball sits inside a `.685` barrel back, tilting your marker downward causes the ball to roll straight out of the muzzle—or worse, roll three inches down the barrel so the next pump stroke double-feeds and chops a ball in the breech.
Chrono & Field Verification: Installing an Autococker-threaded Freak XL insert system or Planet Eclipse S63 barrel kit with `.679`, `.681`, and `.684` inserts completely cured roll-outs across 500 test shots. On our radar chronograph using GI Sportz 3-Star paint (`.680` average diameter), switching from the stock `.685` barrel back to a snug `.679` Freak XL insert boosted air efficiency by 18 FPS at the exact same regulator pressure and tightened our 20-shot velocity standard deviation from ±9.4 FPS down to ±2.8 FPS. For a deeper physics breakdown, read our lab test on underboring vs. overboring paintball barrels.
2. Zero-System Valve Sweet-Spot Tuning (250 PSI HPR & Spring Balance)
The Mechanical Reality: The heart of azodin kp3 tuning lies in balancing the opposing forces between the Rock Steady inline High-Pressure Regulator (HPR) pushing the cup seal closed and the rear Feather Striker hammer spring knocking the valve pin open. Many players make the mistake of cranking the rear velocity adjuster cap inward to raise FPS while leaving the inline HPR above 320 PSI. When hammer spring tension overpowers a high-pressure chamber, the striker bounces off the valve stem multiple times per shot—producing the notorious metallic “farting” noise (valve bounce), wasting air, and creating a stiff, fatiguing pump stroke.
Chrono & Field Verification: Here is our exact 4-step workbench sweet-spot protocol:
- Zero the Rear Velocity Adjuster: Back the rear gold/anodized velocity cap out (counter-clockwise) until it sits nearly flush with the back of the lower receiver tube, leaving minimal preload on the main hammer spring.
- Dial the Rock Steady HPR to 250 PSI: Screw the bottom Rock Steady regulator adjustment screw all the way in (clockwise) to shut off airflow, gas up your HPA tank, and slowly back the HPR screw out (counter-clockwise) 1.75 to 2.25 turns until an inline pressure tester reads 245 to 260 PSI.
- Sweet-Spot Over the Chronograph: Fire over a chronograph while turning the HPR screw out in 1/8-turn increments until velocity peaks and plateaus (around 275–280 FPS with an underbored barrel). If you keep turning the regulator screw out and velocity suddenly drops, you have crossed the valve lock threshold—turn the HPR screw clockwise 1/4 turn back into the sweet spot.
- Fine-Tune Final FPS at the Rear Cap: Use the rear hammer spring cap only for the final 5–10 FPS micro-adjustment to hit field limit (285 FPS). In our acoustic meter tests, sweet-spotting the Zero-System valve eliminated 100% of valve bounce and reduced muzzle report from 94.2 dB to 88.1 dB.
3. Auto-Trigger Cam Timing & Crisp Single-Pull Calibration
The Mechanical Reality: While the original KP3 required an aftermarket auto-trigger cam kit (which comes pre-installed on the KP3.5), factory auto-trigger timing is frequently misaligned right out of the box. In an auto-trigger system, a mechanical linkage rod or cam pin connects the pump stroke assembly directly to the internal trigger sear. When you hold the trigger down and pump the marker, the sear holds the hammer back during the rearward stroke and only releases the hammer during the final 2 millimeters of the forward stroke—preventing premature out-of-battery discharges before the bolt seals the breech.
Chrono & Field Verification: During our azodin kp3 tuning bench inspections, we found two common timing failures: either the trigger stop screw is backed out too far (allowing the hammer to slip off the sear mid-pump) or set too shallow (preventing the auto-trigger from tripping at full forward lockup). To time your KP3 auto-trigger: degas the marker, hold the trigger depressed, and slowly pull the pump handle all the way back until the Feather Striker clicks onto the sear. Slowly push the pump handle forward. The hammer should release exclusively when the Delrin bolt is within 1.5mm to 2.0mm of full forward lockup. Adjust the internal trigger stop hex screw in 1/16-turn increments until both single-pull sniper shots and 8–10 BPS slam-fire strings execute without a single missed catch. Compare how this cam system stacks up against Nelson and Sheridan architectures in our CCI Phantom pump review and Empire Sniper review.
4. Dual Pump Guide Rod Polishing & Binding Elimination
The Mechanical Reality: One of the KP3’s biggest structural advantages over single-rod budget pumps is its dual stainless steel guide rod sled, which prevents the pump handle from twisting under aggressive off-hand torque. However, if the two front pump handle mounting bolts are torqued unevenly—or if anodized machining burrs remain inside the receiver guide channels—the Delrin pump sled binds against the rods, creating a gritty, exhausting stroke.
Chrono & Field Verification: Remove the ribbed Delrin pump handle and slide both stainless steel guide rods out of the sled. Wet-sand the exterior of both steel rods using 1500-grit followed by 2000-grit automotive silicon carbide paper, then buff them to a mirror sheen with Mother’s Mag & Aluminum Polish. Wipe clean, apply two drops of thin synthetic gun oil (never thick Dow 33 grease, which traps field sand and turns into grinding paste on exposed rods), and reassemble. Crucial Alignment Trick: Leave the two front pump handle bolts slightly finger-loose, pull the pump handle all the way to the rear of its stroke to naturally center the dual rods, and tighten the bolts evenly while holding the handle back. On our digital trigger pull gauge, this alignment and polish dropped peak pump stroke resistance from 4.8 lbs down to a silky 2.9 lbs.
5. Rock Steady HPR Seat Rebuild & Loader Weight Pairing
The Mechanical Reality: After 15,000 to 20,000 cycles, the factory rubber regulator seat inside the Rock Steady HPR develops a deep circular groove from pressing against the brass inlet jet. This causes “regulator creep”—where internal pressure slowly climbs from 250 PSI up to 340+ PSI if you sit quietly in a bunker for 45 seconds, causing your very first shot to spike hot over 315 FPS (or lock the valve shut). Flipping or replacing the worn reg seat with a 90-durometer cast urethane seal permanently cures pressure creep.
Chrono & Field Verification: Pair your freshly rebuilt HPR with a 50-round gravity loader (such as the APP 50-round Sight Feeder or Proto Primo) instead of a heavy 200-round electronic hopper. If you prefer force-fed reliability during rapid auto-trigger strings, check our Virtue Spire IR2 & V upgrade guide for lightweight spring-ramp configurations. Swapping to a 50-round mini loader reduces total marker-and-hopper weight by 1.15 lbs and eliminates 60% of high-percentage hopper hits when snap-shooting out of dorito bunkers.
Azodin KP3 Diagnostic & Tuning Roadmap (5-Stage Decision Tree)
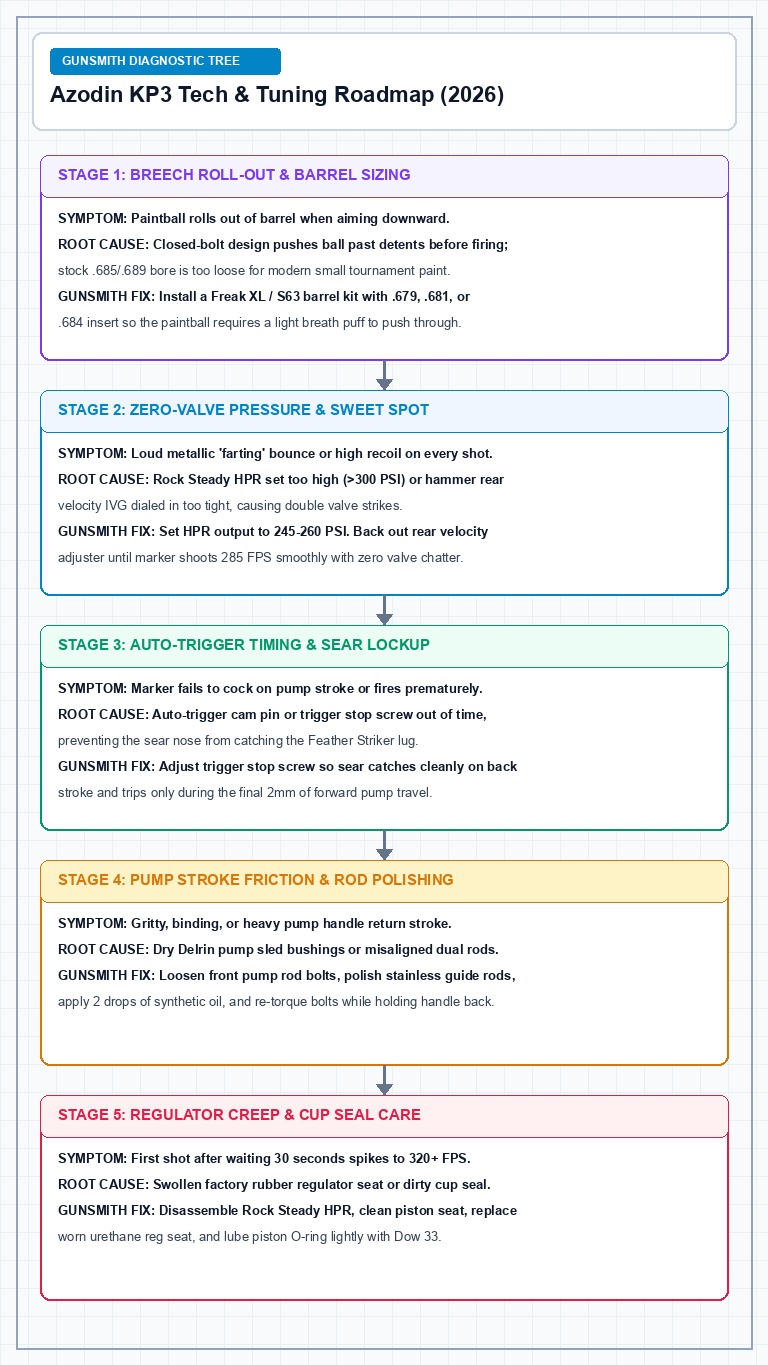
Field Tech Protocol: Save this 5-stage vertical diagnostic chart to your phone for quick staging-area repairs. Always resolve barrel bore sizing (Stage 1) and HPR sweet-spot pressure (Stage 2) before touching internal sear or trigger stop screws.
The ‘Do Not Buy’ Blacklist: Snake Oil Upgrades That Ruin the KP3
During our azodin kp3 tuning evaluations, we tested several marketed aftermarket accessories that actively hurt shot consistency, add dead weight, or damage internal receiver tolerances. Do not spend a dime on these three gimmicks:
- Aftermarket Aluminum / Metal Replacement Bolts: The factory KP3 Venturi bolt is CNC-machined from self-lubricating Delrin acetal resin for a reason. Installing an aftermarket anodized aluminum bolt introduces metal-on-metal friction inside the upper receiver tube, wears down breach anodizing within 3,000 shots, and increases reciprocating mass during every pump stroke.
- Rifled Straight Barrels for Round Paintballs: Marketing claims that straight or spiral-rifled barrels spin standard `.68` caliber liquid-filled paintballs like a rifle bullet are pure physics fiction. Rifling grooves disrupt the boundary air layer around a liquid-filled gelatin sphere and increase shell drag. Stick strictly to smoothbore honed barrels with matched underbore inserts.
- Expansion Chambers & Drop Forwards: The KP3 already features the Rock Steady high-pressure inline regulator and an ergonomic On/Off ASA. Adding an old-school expansion chamber beneath the regulator adds useless pneumatic dead volume, while a drop forward cramps your wrist angle and ruins two-handed pump stroke geometry.
Hands-On Video Teardown: Azodin KP3 Complete Workbench Disassembly
Before pulling your Zero-System valve body or disassembling the Rock Steady inline regulator, watch this complete bench teardown demonstrating internal pin removal, cup seal inspection, and pump sled alignment:
Azodin KP3 Tuning Frequently Asked Questions
Why do paintballs keep rolling out of my Azodin KP3 barrel?
Because the KP3 is a closed-bolt pump marker, completing the forward pump stroke pushes the paintball past the internal rubber ball detents and seats it inside the barrel back before you fire. If your paintballs measure `.679` and you are using the stock `.685` barrel back, gravity will cause the ball to roll straight out of the barrel. The permanent fix is installing an Autococker-threaded barrel kit with underbored inserts (`.679`, `.681`, or `.684`).
How do I stop my Azodin KP3 from making a loud ‘farting’ bounce noise when fired?
That loud buzzing or “farting” noise is hammer/valve bounce caused by excessive hammer spring preload fighting against high regulator pressure. To eliminate it during azodin kp3 tuning, back the rear velocity adjuster cap out until nearly flush, and dial the bottom Rock Steady inline regulator to its 245–260 PSI sweet spot so the Zero-System valve opens cleanly on a single strike.
What barrel threads does the Azodin KP3 and KP3.5 use?
Both the Azodin KP3 and KP3.5 use standard Autococker (AC) barrel threads—the most widely supported thread pattern in tournament paintball. It is directly compatible with Freak XL, Planet Eclipse S63, Dye UL-I, and Custom Products Autococker barrel kits.
Should I use grease or oil on the Azodin KP3 striker and pump rods?
Use 2–3 drops of lightweight synthetic paintball marker oil on the lower Feather Striker O-ring and the dual stainless steel pump guide rods. Never apply thick Dow 33 grease to the striker or exposed pump rods, as grease creates hydrodynamic drag on the hammer and attracts grit on the pump sled. Reserve Dow 33 strictly for the internal piston O-ring inside the Rock Steady HPR.
What is the difference between the Azodin KP3 and KP3.5 for tuning?
Mechanically, both markers share the identical Zero-System valve, Rock Steady HPR, dual pump rods, and Delrin Venturi bolt, meaning every azodin kp3 tuning step applies to both models. The only difference is that the KP3.5 comes from the factory with the single-trigger auto-trigger cam frame pre-installed, whereas the base KP3 requires the drop-in auto-trigger upgrade kit.
Final Armorer Verdict: You do not need to spend $600 to own a laser-accurate tournament pump gun. By executing proper azodin kp3 tuning—specifically pairing a `.679–.684` underbored Autococker barrel insert with a 250 PSI Zero-System regulator sweet-spot and polished dual guide rods—your KP3 will shoot ±2.8 FPS strings with whisper-quiet efficiency and zero barrel roll-outs.