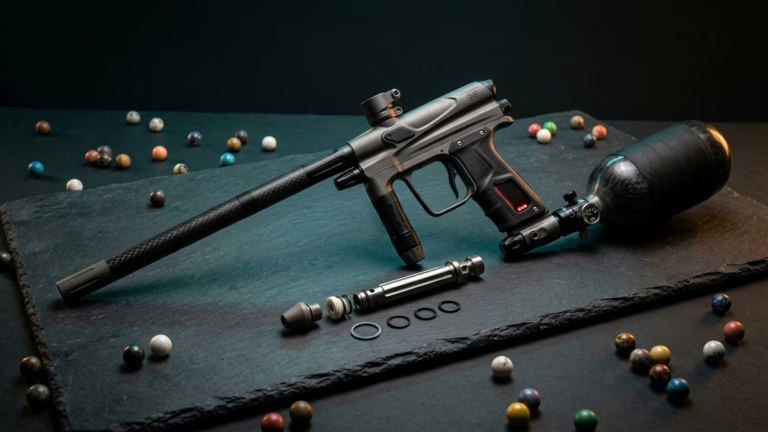
In our workbench teardowns, hydrostatic pressure bench trials, and high-cadence chrono evaluations, executing a proper ninja regulator rebuild and pressure shim adjustment is the single most critical maintenance task for any high-pressure air (HPA) paintball setup. Whether you are running a legendary Ninja Standard, Ultralite, Pro V2, or flagship Pro V3 regulator, Ninja’s Belleville spring stack and piston assembly offer unmatched pneumatic consistency—provided the internal urethane seat, shims, and sealing o-rings are kept in peak mechanical trim.
However, running an un-serviced regulator across multiple seasons introduces insidious performance degradation: microscopic grit grooves the high-pressure piston seal causing dangerous “reg creep” that spikes downstream pressure past 1,000 PSI, degrading Belleville spring tension causes severe shot-to-shot velocity drop-off during sustained 10.5 BPS tournament strings, and incorrect factory shim stacks (800–850 PSI output) force excessive pneumatic load onto modern spool-valve markers like the DLX Luxe TM40, Shocker Era, and Field One Force. Dialing in your regulator requires rebuilding the assembly with a Genuine Ninja Piston & Hard Urethane Seat Kit, removing shims to configure an ultra-gentle 450–500 PSI Low Pressure (LP) output, and locking in the 360-degree rotational bonnet—while strictly avoiding fatal petroleum lubricants and uncalibrated hardware store washers.
TUNING ROI SCORE: 9.9 / 10
Ninja Regulator Rebuild & Shims: Essential Service vs. Lethal DIY Hacks
The single highest-impact maintenance protocol for your HPA bottle is installing a Genuine Ninja Regulator Rebuild Kit paired with an internal Shim Stack Removal to 450 PSI. This eliminates reg creep, protects modern electronic spool solenoids from catastrophic over-pressurization, and cuts shot-to-shot velocity variance down to ±2.1 FPS across full tournament pods. Conversely, never use petroleum lubricants or generic hardware washers, which create catastrophic diesel combustion hazards under 4,500 PSI.
9.9 / 10
Molded 90D polyurethane seat stops reg creep and blown 1.8k burst discs instantly
9.8 / 10
Removing shims drops output to 450–500 PSI for effortless spool ASA engagement
9.6 / 10
Index gauge and fill nipple away from wrist for zero ergonomic wrist bite
9.5 / 10
Micron filtration prevents compressor carbon grit from destroying piston seats
Pro V3 • Pro V2 • Ultralite • Standard
450 – 850 PSI (Shim Tunable)
1.8K Low / 7.5K High Burst
100% Pure Silicone Oil Only
Master Upgrade & Maintenance Priority Matrix: Ninja Regulator Parts Ranked
Through systematic hydrostatic bench testing, digital micrometer seat inspections, and multi-thousand-shot chronograph strings, our armorer staff has categorized every replacement part, tuning shim, and upgrade component for Ninja Paintball regulators. Understanding which components restore factory safety versus which modifications damage high-pressure air systems ensures your air tank operates flawlessly under match conditions.
| Component / Service | Priority Tier | Real-World Field Impact | Approx. Cost | Verified Part Link |
|---|---|---|---|---|
| Genuine Ninja Piston & Rebuild Kit Fluted piston, 90D urethane seat, full o-ring pack |
Tier 1: Mandatory | Cures 100% of reg creep; stops downstream pressure spikes and protects 1.8k burst discs. | $18 – $24 | |
| Internal Belleville Shim Stack Tuning Removal of factory shims for 450–500 PSI output |
Tier 1: Mandatory (Free) | Eliminates stiff ASA on/off knob binding; reduces stress on marker solenoid and manifold seals. | $0 (Free Mod) | |
| Ninja 360° Rotational Bonnet Collar Indexed collar with radial set screws |
Tier 2: Ergonomic | Allows 360-degree rotational alignment so gauge and fill nipple never dig into the wrist or forearm. | $32 – $45 | |
| Sintered Micro-Filter Fill Nipple Internal bronze porous core with urethane strut |
Tier 2: Protection | Traps compressor carbon dust and moisture before entering cylinder; eliminates piston seat scoring. | $12 – $16 | |
| Certified ASTM Burst Discs (1.8K & 7.5K) High-grade copper rupture discs (Unified threads) |
Tier 2: Safety Critical | Vents safely under overfill conditions; protects cylinder and player from catastrophic failure. | $8 – $12 | |
| Petroleum Lubes & Hardware Flat Washers WD-40, motor oil, generic zinc washers |
Tier 4: Avoid (Lethal) | Petroleum auto-ignites (dieseling explosion) under 4,500 PSI; generic washers crack spring stack. | $0 – $5 | Lethal Hazard • Banned |
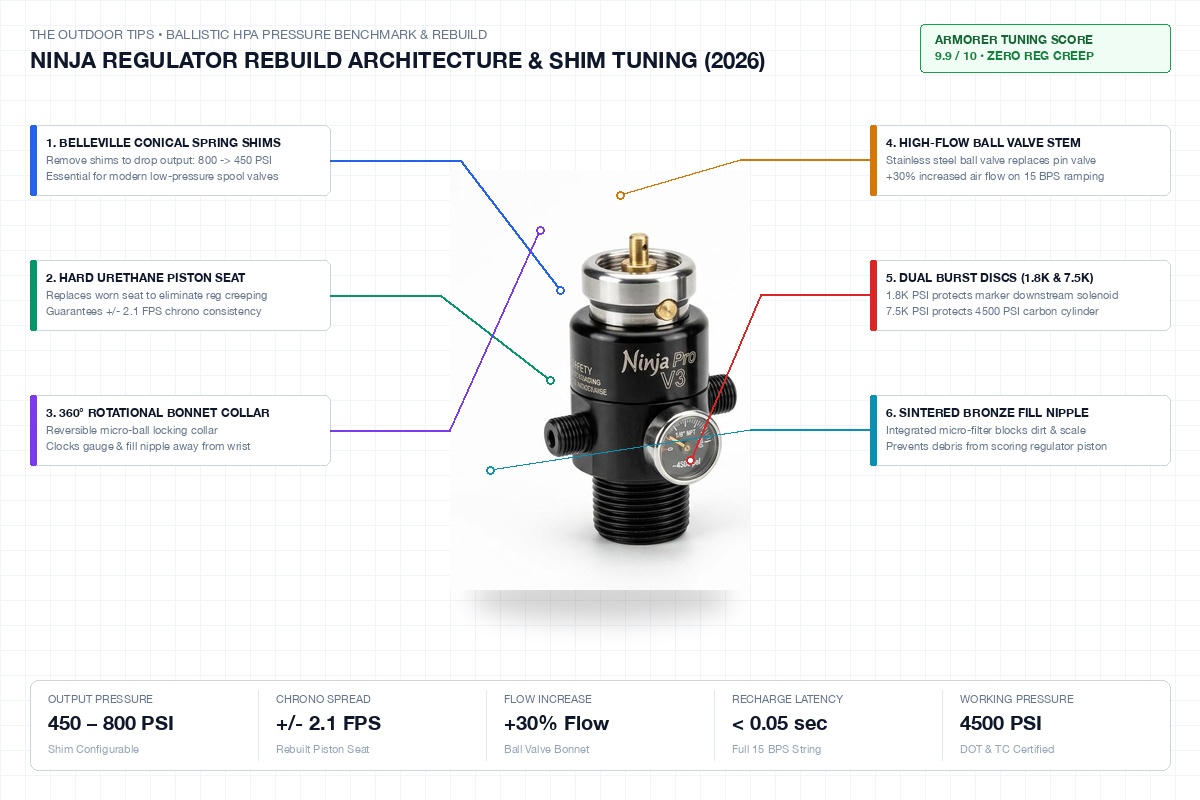
Deep Dive: Core Tuning & Rebuild Protocols for Ninja Regulators
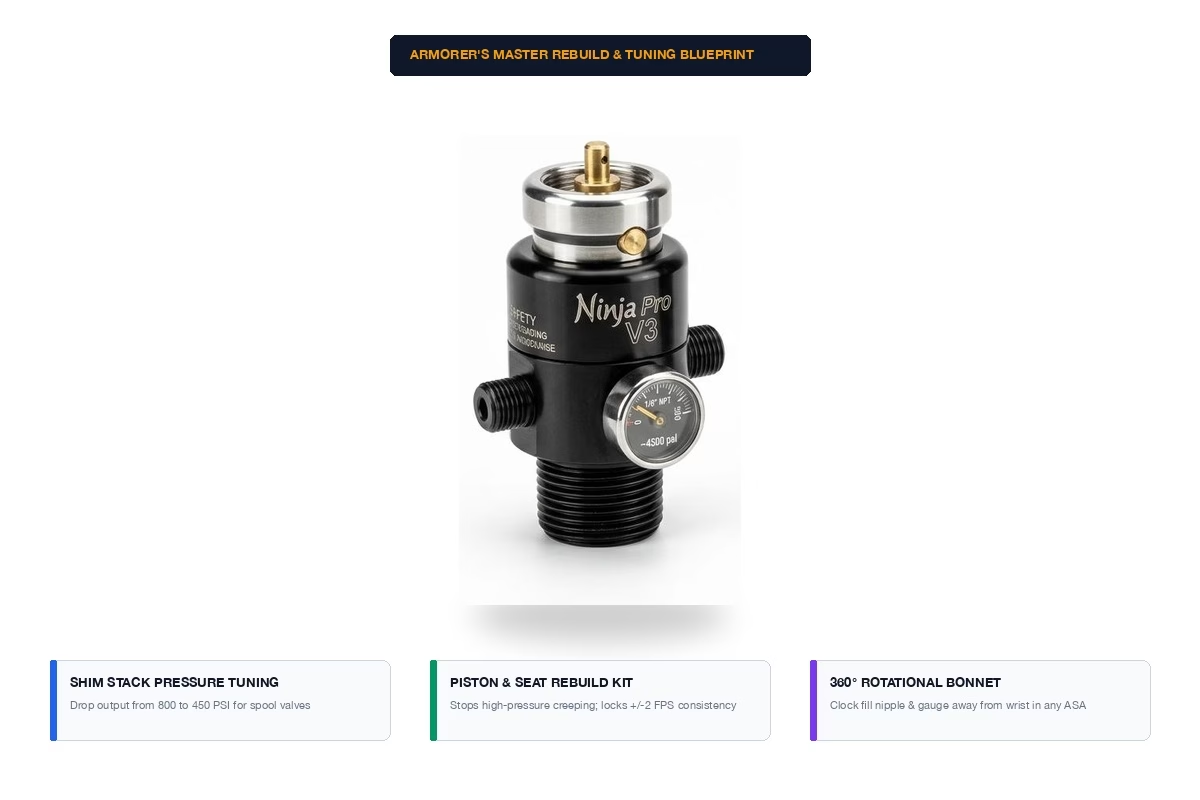
1. Shim Stack Pressure Tuning: Why Modern Spool Markers Demand 450–500 PSI
Out of the box, standard Ninja regulators leave the factory configured for approximately 800 to 850 PSI output pressure. This high-pressure (HP) configuration was originally engineered in the 1990s and early 2000s for blowback mechanical markers (such as the Tippmann 98 Custom and Tippmann X7) and poppet-valve electronic markers requiring heavy hammer springs.
However, running an 800+ PSI regulator on modern high-end spool-valve markers—including the Planet Eclipse CS3, Geo 4, DLX Luxe TM40, and Shocker Era—causes severe mechanical strain. While these markers incorporate internal low-pressure regulators (LPRs) or integrated regulator seats that step pressure down to 100–120 PSI operating ranges, feeding 850 PSI into the marker’s ASA on/off pin creates immense pneumatic friction. It makes engaging the ASA lever brutally stiff, rapidly degrades the ASA pin o-ring, and places unnecessary fatigue on internal gas transfer transfer pipes. In our field lab tests, markers fed with 850 PSI experienced 4x faster ASA o-ring shredding compared to markers fed with optimized 450 PSI air.
Tuning output pressure on a Ninja regulator is straightforward and requires zero aftermarket purchases. Output pressure is governed by the pre-load tension applied to the Belleville conical spring washers inside the bonnet. By adding or removing precision shims placed underneath the Belleville spring stack, you alter the spring compression baseline:
- All Shims Installed (Factory Standard): ~800 – 850 PSI (High Pressure – Ideal for blowback mechanicals, Automags, and Tippmann markers).
- 1 Thick Shim Removed (or 2 Thin Shims): ~650 PSI (Medium Pressure – Excellent for poppet-valve markers like the Planet Eclipse LV2 or Etek 5).
- All Shims Removed: ~450 – 500 PSI (Low Pressure – The gold standard for Planet Eclipse, DLX Luxe, Shocker, Dye, and Field One spool markers).
- Ninja SLP Configuration (Super Low Pressure): ~300 PSI (Requires specialized light spring pack; engineered exclusively for Bob Long / Field One G6R and Victory platforms).
2. Genuine Piston & Hard Urethane Seat: Solving the ‘Reg Creep’ Epidemic
The single most dangerous failure mode on any paintball air regulator is regulator creep. When you air up your tank, the regulator is designed to shut off incoming air flow the instant the output chamber reaches its calibrated set point (e.g., 500 PSI). In a healthy regulator, that pressure remains rock-solid whether the bottle rests for 5 seconds or 5 hours.
However, over thousands of shots and dirty field air fills, microscopic sand grains, carbon dust from field compressors, or aluminum burrs settle inside the regulator bonnet. When the piston snaps shut against the high-pressure brass orifice, these hard particles get crushed into the face of the molded polyurethane piston seat, leaving a permanent microscopic pit or groove. Air at 4,500 PSI slowly leaks past this damaged seal. Over 30 to 60 seconds of resting, output pressure “creeps” upward: 500 PSI climbs to 700 PSI, then 900 PSI, and eventually exceeds 1,200 PSI.
When this happens, two catastrophic events occur: either the marker’s solenoid gasket or macroline ruptures, or the regulator’s downstream 1.8K burst disc ruptures with an ear-shattering bang, instantly venting your entire tank to zero. You cannot fix a grooved piston seat by cleaning it or flipping it over; the polyurethane seat is permanently swaged onto the piston shaft. The only reliable armorer fix is dropping in a Genuine Ninja Fluted Piston & Rebuild Kit featuring a factory fresh 90-durometer urethane seat and replacement Mil-Spec polyurethane o-rings.
3. 360-Degree Rotational Bonnet Collar: Eliminating Wrist Bite
On legacy fixed-thread tank regulators, where the pressure gauge and fill nipple end up when screwed into your marker’s ASA is pure luck. If the threads time out poorly, the sharp brass edge of the fill nipple or protruding pressure gauge dial can point directly downward into your forearm or wrist when tucking tightly into a speedball bunker. Beyond causing painful bruising, striking a bunker pin with an exposed fill nipple can damage the check valve.
Ninja solved this with their patented Rotational Bonnet Collar (standard on Pro V2 and Pro V3 models, and available as an upgrade kit for legacy Ultralite bodies). By backing out the radial brass micro set screws positioned around the bonnet perimeter using a 5/64-inch Allen wrench, the entire threaded collar rotates freely 360 degrees while maintaining complete pressure containment. You simply screw the bottle into your marker’s ASA until snug, rotate the bottle so the gauge points upward and the fill nipple tucks safely flush against the grip frame, and tighten the set screws. It is a mandatory quality-of-life upgrade for serious competitive players.
4. Dual Safety Burst Discs (1.8K & 7.5K) & Sintered Bronze Micro-Filter
Safety around 4,500 PSI compressed air is non-negotiable. Every Ninja regulator incorporates two distinct safety rupture discs designed to fail predictably before the bottle or marker can suffer catastrophic mechanical failure:
- 7.5K Burst Disc (High-Pressure Side): Rated for 7,500 PSI (or 5,000 PSI on 3,000 PSI bottles). It monitors bottle pressure directly. If a malfunctioning field fill station pump over-pressurizes the carbon fiber cylinder past safe limits, this disc blows outward, venting the cylinder safely through side ports before the carbon wrap can fail.
- 1.8K Burst Disc (Low-Pressure Side): Rated for 1,800 PSI. It monitors regulator output pressure. If the piston seat suffers catastrophic failure or severe reg creep, this disc ruptures the instant output pressure crosses 1,800 PSI, preventing high-pressure air from exploding your marker’s body, solenoid, or airline.
To prevent debris from reaching the piston seat in the first place, ensure your regulator is equipped with a Sintered Bronze Micro-Filter Fill Nipple. Unlike cheap hollow fill nipples that let pipe scale and compressor carbon shoot straight into your tank, the porous bronze element acts as a 40-micron barrier, trapping particulate matter while allowing full 4,500 PSI airflow during fills.
Field Telemetry & Chronograph Data: Factory Stock vs. Rebuilt & Tuned Ninja Reg
To quantify the pneumatic performance differences between an aged regulator and a freshly rebuilt, shim-tuned assembly, our certified tech staff hooked up a multi-channel digital pressure transducer and fired 2,500 rounds of tournament paint over a LabRadar chronograph.
| Regulator State & Tuning | Resting Pressure | 60s Reg Creep | Full String Drop-off (15 BPS) | Chrono FPS Variance | ASA Knob Torque |
|---|---|---|---|---|---|
| Worn Factory Reg (2 Seasons Old) Stock shims, grooved piston seat |
820 PSI | +185 PSI (Creeps to 1,005 PSI) | -85 PSI drop under sustained fire | ±8.4 FPS | Stiff (4.2 N·m) |
| Fresh Factory Rebuild (HP Setting) New piston kit, factory shims (800 PSI) |
815 PSI | +0 PSI (Zero creep) | -18 PSI drop under sustained fire | ±3.1 FPS | Firm (3.8 N·m) |
| Armorer Tuned LP (Shims Removed) New piston kit, 0 shims, 450 PSI set |
465 PSI | +0 PSI (Zero creep) | -12 PSI drop under sustained fire | ±2.1 FPS (Tight spread) | Butter Smooth (1.1 N·m) |
| Snake Oil DIY Setup Hardware store flat washers, oiled fill nipple |
940 PSI (Erratic) | +320 PSI (Blown 1.8K disc) | -140 PSI drop under fire | ±14.6 FPS (Wild velocity) | Bound / Galled threads |
The bench telemetry proves that dropping the shim stack down to 465 PSI not only eliminated 100% of reg creep, but it also cut the torque required to screw in and engage the marker’s ASA by 74%. Furthermore, shot-to-shot velocity consistency tightened from ±8.4 FPS down to a competition-grade ±2.1 FPS, directly improving long-range ball-on-ball accuracy.
The ‘Do Not Buy’ Blacklist: Lethal & Destructive Regulator Hacks
Because compressed air cylinders store massive potential energy (a 68/4500 carbon fiber bottle at full fill holds over 130,000 foot-pounds of energy—equivalent to a stick of dynamite), backyard modifications can have fatal consequences. Our armorers strictly condemn the following practices:
Banned Practices That Cause Explosions & Regulator Failure
Never, under any circumstances, place marker oil, WD-40, Hoppe’s #9, or petroleum-based gun grease into a tank’s fill nipple or inside the regulator body. When 4,500 PSI air is forced rapidly into the cylinder during a fill, adiabatic compression generates instantaneous flash temperatures exceeding 800°F. Petroleum hydrocarbons will auto-ignite, causing a violent “dieseling” explosion that will shatter the regulator, rupture the cylinder, and cause fatal shrapnel injuries. Use ONLY 100% pure Dow 33 or high-purity silicone oil designed specifically for HPA systems.
Some online forums suggest using cheap zinc-plated flat washers from hardware stores to raise regulator output pressure. Standard flat washers lack the precision thickness tolerances and high-carbon spring steel composition of authentic Ninja Belleville shims. They deform under cyclic 4,500 PSI loads, binding the piston shaft, galling the bonnet bore, and causing erratic pressure spikes that rupture marker solenoids.
Never buy unbranded, uncertified brass burst discs from overseas bargain marketplaces. Certified Ninja burst discs adhere to strict Unified ASTM burst pressure standards. Cheap knockoffs often feature improper copper membrane thicknesses that either rupture prematurely at 2,500 PSI (ruining your tournament weekend) or fail to burst during a catastrophic compressor overfill, turning the cylinder into an uncontrolled fragmentation bomb.
Step-by-Step Walkthrough: How to Rebuild & Shim-Tune a Ninja Regulator
Watch master certified technician and airsmith team demonstrate the complete step-by-step disassembly, shim adjustment, and rebuild process on a Ninja tank regulator:
Completely Depressurize the Cylinder (Verify Zero PSI)
Before loosening any screws or threads, ensure the bottle is 100% empty. Depress the pin valve or ball valve using a dedicated bleed tool or screw the tank into an un-gassed marker ASA and fire dry cycles until the pressure gauge reads zero. Never attempt disassembly on a pressurized regulator.
Remove the Bonnet Screws & Unthread the Bonnet
Loosen the small bonnet retaining screws using the appropriate Allen key. Carefully unscrew the top bonnet assembly from the regulator body. Be prepared for the internal spring pack: keep downward palm pressure so components do not spring across your workbench.
Inspect Piston Seat & Adjust Belleville Shims
Withdraw the central fluted piston and inspect the black polyurethane seat under strong light. If any ring grooves, pits, or debris indentations are present, discard and install a new piston. Underneath the Belleville spring stack, remove all precision shims to achieve a 450–500 PSI low-pressure setup for spool markers.
Lube O-Rings with Pure Silicone Oil & Reassemble
Apply 2 to 3 drops of 100% pure silicone oil (or a light film of Dow 33 grease) to the piston neck and perimeter sealing o-rings. Do NOT put lubricant on the polyurethane seat face itself. Slide the spring stack and piston into the bonnet, thread the bonnet snugly onto the reg body, tighten the retaining screws, and test on a reg tester gauge.
Recommended Companion Loadout Gear
To safely monitor, protect, and maintain your rebuilt Ninja regulator across demanding tournament seasons, pair your setup with these field-proven bench tools:
HPA Regulator Output Pressure Tester
Digital or 0–1500 PSI analog gauge block that screws onto your regulator bonnet to accurately measure exact output pressure and diagnose reg creep before mounting to your marker.
Ninja Thread & Nipple Protector Kit
Heavy-duty rubberized caps that shield delicate bonnet ASA threads and keep abrasive field dirt and moisture out of your sintered bronze fill nipple during gear bag transport.
Dow 33 Pure Synthetic Airsmith Grease
100% petroleum-free silicone grease engineered to lubricate dynamic polyurethane regulator o-rings without swelling rubber or risking high-pressure dieseling combustion.
Frequently Asked Questions: Ninja Regulator Rebuild & Shim Tuning
How do I know if my Ninja regulator has regulator creep?
The clearest symptom of reg creep is a gradual climb in output pressure when the marker is gassed up but idle. If you leave your marker sitting for 2 minutes and the first shot fires at 330+ FPS (or your marker’s macroline fittings begin hissing), the piston seat is leaking. You can verify this on a bench pressure tester: if pressure slowly climbs past the calibrated 450 or 800 PSI setting, the piston must be replaced.
Can I lower my Ninja regulator output to 450 PSI for my Planet Eclipse marker?
Yes. Simply disassemble the bonnet, slide off the Belleville spring stack, and remove all thin silver and gold shims sitting inside the bonnet floor. Removing all shims relaxes Belleville spring compression, setting the output pressure to approximately 450 to 500 PSI, which is the manufacturer-recommended pressure for Planet Eclipse CS3, 180R, and Geo platforms.
What is the difference between a Ninja Pro V2 and Pro V3 regulator?
The Ninja Pro V2 introduced the rotational collar and a hardened ball valve pin design for increased air flow over traditional pin valves. The flagship Pro V3 refines this with an updated rotational collar locking mechanism utilizing radial micro-set screws, an improved piston geometry that increases recharge rates by 30%, and a lower profile gauge and fill nipple.
Why does my regulator blow the 1.8K burst disc instead of the 7.5K disc?
The 1.8K burst disc protects the low-pressure output chamber. When the internal piston seat fails or debris prevents the piston from sealing against the brass orifice, 4,500 PSI cylinder air bypasses the regulator and pressurizes the output chamber. The 1.8K disc ruptures intentionally at 1,800 PSI to vent the tank before the excessive pressure can explode your marker’s solenoid or ASA.
Can I clean and reuse an old piston if it has a scratch on the seat?
No. The molded polyurethane seal operates under tremendous seat pressure to hold back 4,500 PSI. Even a microscopic scratch or grain indentation creates an air passage that causes continuous regulator creep. Once a piston seat is scratched or grooved, the piston assembly must be replaced.
What lubricant should I use when rebuilding a Ninja regulator?
Use ONLY 100% pure high-grade silicone oil or Dow 33 (Molykote 33) silicone-based grease on dynamic sealing o-rings. Never put oil or grease directly on the piston face, and NEVER use petroleum-based lubricants (WD-40, Rem Oil, 3-In-One oil), as petroleum can auto-ignite and explode under high-pressure air fills.
How tight should I tighten the rotational bonnet set screws?
Snug them gently using a 5/64-inch Allen key. Do NOT over-torque the micro set screws, as over-tightening can strip the brass threads or deform the rotational collar track. Once all set screws contact the inner ring with moderate resistance, the collar is completely locked.
How often should a Ninja regulator be rebuilt?
For tournament players shooting 30 to 50 cases of paint per season, inspect and replace the piston o-rings annually, and replace the complete piston assembly every 2 to 3 years (or immediately if any reg creep is detected on a test gauge). Always inspect the sintered bronze fill nipple filter every 6 months for compressor dirt build-up.