Filling a paintball tank is a crucial skill for every paintball player. Whether you use CO2 or compressed air (HPA), knowing how to safely and correctly refill your paintball tank is essential for uninterrupted gameplay.
In this comprehensive guide, we will walk you through the step-by-step process of filling both CO2 and compressed air tanks, along with important safety precautions and maintenance tips. Whether you are a beginner or an experienced player, this guide will equip you with the knowledge and skills to ensure your paintball tank remains filled and ready for action.
Types of Paintball Tanks
Before we dive into the filling process, it’s essential to understand the two main types of paintball tanks: CO2 and compressed air (HPA) tanks.
1. CO2 Tanks
CO2 tanks, also known as carbon dioxide tanks, have been used in paintball for many years. These tanks are filled with liquid carbon dioxide, which expands into a gas when released from the tank. CO2 is less expensive than compressed air, making it a popular choice for many recreational players.
However, CO2 tanks have some limitations. They are sensitive to temperature changes, which can affect the consistency of shots. Additionally, rapid firing can cause the CO2 to cool rapidly, leading to velocity fluctuations and potentially impacting accuracy.
2. Compressed Air (HPA) Tanks
Compressed air tanks, also known as High-Pressure Air (HPA) tanks, use compressed air or nitrogen instead of CO2. These tanks offer several advantages over CO2 tanks. Compressed air is not affected by temperature changes, providing more consistent performance even during rapid firing. HPA tanks also allow for more precise pressure adjustments, making them ideal for tournament-level play and advanced players.
While HPA tanks are generally more expensive than CO2 tanks, their performance and reliability make them a popular choice among competitive players and those seeking consistent shot accuracy.
Why Properly Filling Your Paintball Tank Matters
Before delving into the specifics of how to fill a paintball tank, let’s understand why this process is so important:
1. Consistent Performance
A properly filled paintball tank ensures consistent performance on the field. Whether you’re playing in a recreational setting or a competitive tournament, a steady and reliable air supply is vital for accurate shooting and maneuvering.
2. Uninterrupted Gameplay
Having a fully filled tank means you can stay in the game without interruptions. Running out of air mid-game can be frustrating and may lead to missed opportunities and less enjoyable gameplay.
3. Cost-Effectiveness
Knowing how to fill your paintball tank correctly can save you money in the long run. Properly filled tanks reduce wasted air, allowing you to get the most out of each fill and reducing the frequency of refills.
4. Safety
Filling your paintball tank correctly is essential for your safety and the safety of those around you. A well-maintained tank is less likely to cause malfunctions or accidents during gameplay.
Filling a CO2 Paintball Tank
Filling a CO2 paintball tank involves transferring liquid CO2 from a larger storage tank into the paintball tank. To fill a CO2 tank, you’ll need access to a CO2 fill station or a bulk CO2 tank with a siphon tube.
Here’s a step-by-step guide on how to fill a CO2 paintball tank:
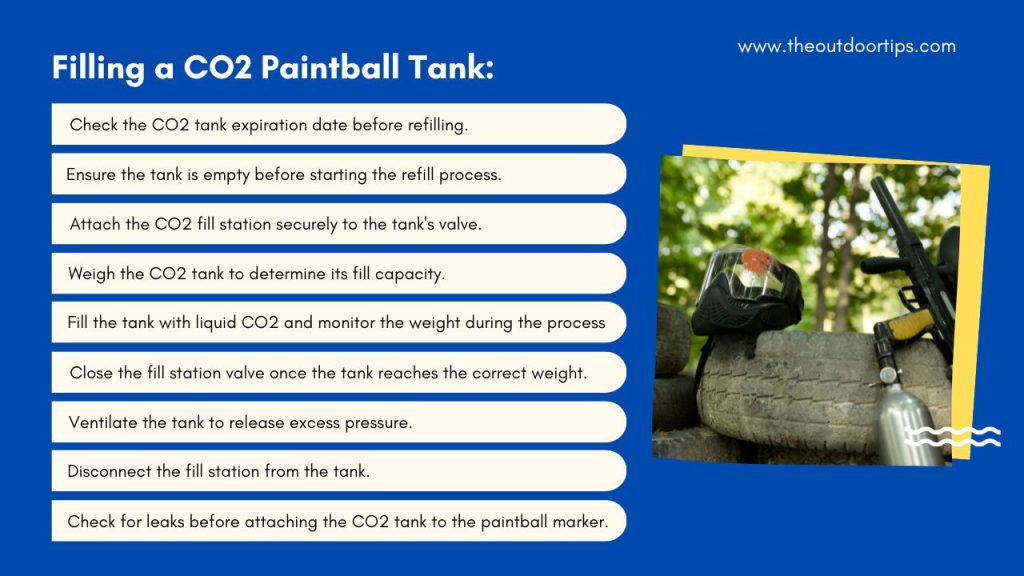
Step 1: Check the CO2 Tank Expiration Date
Before refilling, check the CO2 tank’s expiration date. Expired tanks should not be refilled and should be replaced.
Step 2: Ensure the Tank is Empty
Verify that the CO2 tank is empty before attempting to refill it. If there is any residual CO2 inside the tank, release it by firing your paintball marker in a safe area until the tank is completely empty.
Step 3: Attach the Fill Station
Attach the CO2 fill station to the CO2 tank’s valve using the appropriate fittings. Ensure the connections are secure to prevent leaks.
Step 4: Weigh the CO2 Tank
Before filling, weigh the CO2 tank. The tank’s weight should be within a specific range, which indicates how much CO2 the tank can hold.
Step 5: Fill the CO2 Tank
Open the CO2 fill station’s valve and transfer liquid CO2 into the paintball tank. Monitor the weight of the tank as it fills to ensure you don’t overfill it.
Step 6: Close the Fill Station Valve
Once the tank reaches the correct weight, close the CO2 fill station’s valve to stop the flow of CO2. Double-check that the valve is tightly closed.
Step 7: Ventilate the Tank
Ventilate the CO2 tank by slowly opening the valve for a brief moment to release any excess pressure.
Step 8: Disconnect the Fill Station
After ventilating the tank, disconnect the CO2 fill station from the paintball tank.
Step 9: Check for Leaks
Before attaching the CO2 tank to your paintball marker, check for any leaks by applying a small amount of soapy water to the valve and fittings. If bubbles form, there is a leak that needs to be addressed before use.
Filling a Compressed Air (HPA) Paintball Tank
Filling a compressed air (HPA) paintball tank involves using a high-pressure air compressor to fill the tank with compressed air or nitrogen. This process requires access to a paintball-friendly air station with a high-pressure compressor.
Here’s a step-by-step guide on how to fill a compressed air (HPA) paintball tank:
Step 1: Check the Tank Expiration Date
As with CO2 tanks, ensure that the HPA tank is not expired before refilling.
Step 2: Ensure the Tank is Empty
If the HPA tank is not empty, release any remaining air by firing your paintball marker until the tank is completely empty.
Step 3: Attach the Fill Station
Connect the HPA fill station to the HPA tank’s fill nipple using the appropriate fittings. Ensure the connections are secure to prevent leaks.
Step 4: Weigh the HPA Tank
Weigh the HPA tank before filling to determine how much air it can hold.
Step 5: Fill the HPA Tank
Using the high-pressure air compressor, begin filling the HPA tank with compressed air or nitrogen. Monitor the pressure gauge to prevent overfilling.
Step 6: Close the Fill Station Valve
Once the tank reaches the desired pressure, close the fill station’s valve to stop the airflow.
Step 7: Ventilate the Tank
Ventilate the HPA tank by slowly opening the fill station valve for a brief moment to release excess pressure.
Step 8: Disconnect the Fill Station
After ventilating the tank, disconnect the HPA fill station from the paintball tank.
Step 9: Check for Leaks
Before attaching the HPA tank to your paintball marker, check for any leaks by applying a small amount of soapy water to the fill nipple and fittings. If bubbles form, there is a leak that needs to be addressed.
Maintenance Tips for Your Paintball Tank
Proper maintenance of your paintball tank is crucial for optimal performance and longevity. Here are some maintenance tips to keep your tank in top condition:
1. Regular Inspection
Inspect your paintball tank regularly for any signs of damage, wear, or leaks. Address any issues promptly to prevent further damage.
2. O-Ring Lubrication
Lubricate the tank’s O-rings regularly using paintball-specific O-ring lubricant. This helps maintain a proper seal and prevents leaks.
3. Avoid Overfilling
Never overfill your paintball tank, as it can lead to damage and pose a safety risk.
4. Store in a Cool and Dry Place
When not in use, store your paintball tank in a cool and dry place to prevent moisture from affecting its components.
5. Replace Expired Tanks
Replace expired paintball tanks with new ones to ensure safety and performance.
Final Thoughts
Knowing how to fill a paintball tank is an essential skill for every paintball player. Whether you use a CO2 or compressed air (HPA) tank, understanding the proper techniques and safety precautions for filling them is crucial for a smooth and uninterrupted paintball experience.